Create Multi-Page Applications with Native Features using Ionic 2
By: X-Team
September 20, 2016 17 min read

Not too long ago I wrote about getting started with Ionic 2. In the previous, part one guide, I gave some overview on what Ionic 2 was and how it differed from Ionic Framework 1. This overview lead up to developing a very simple single page mobile application.
What if you wanted to build a multiple page application with persisted data storage and native platform features? We’re going to take the same guide from the previous part of the series and expand upon it include more intermediate level functionality.
This guide is part two of a three part series. In the next guide we’ll explore using a RESTful remote web service to consume data.
A Recap of the Previous Guide in the Series
In the previous application we had a single page with a UI card and list view. Using a popup prompt we were able to add new product data to the list.
The application in part one of the guide used 100% web code. This means that you could create a website out of the code that was used within the mobile application. However, there was no data persistence nor was there anything particularly unique to a mobile platform. In other words, nothing took advantage of native platform features.
We’re going to change this.
Starting with a Fresh Project
Instead of picking and pulling from the first guide in the series, we’re going to start a new project and reminisce on the things we saw in the previous guide.
From the Command Prompt (Windows) or Terminal (Linux and Mac), execute the following:
ionic start XProject blank --v2
cd XProject
ionic platform add ios
ionic platform add android
The above commands will create an Ionic 2 project that uses Angular 2 and TypeScript. While we’re adding the iOS platform, we won’t be able to build for iOS unless we’re using a Mac with Xcode installed.
Everything that we do from a development perspective will be done in the project’s app directory.
A fresh project with the base Ionic 2 template will have the following files and directories:
- app/app.ts
- app/pages/home/home.ts
- app/pages/home/home.html
- app/pages/home/home.scss
- app/theme/app.core.scss
- app/theme/app.ios.scss
- app/theme/app.md.scss
- app/theme/app.variables.scss
- app/theme/app.wp.scss
We used these files in the previous guide, but for this project we’re going to create others.
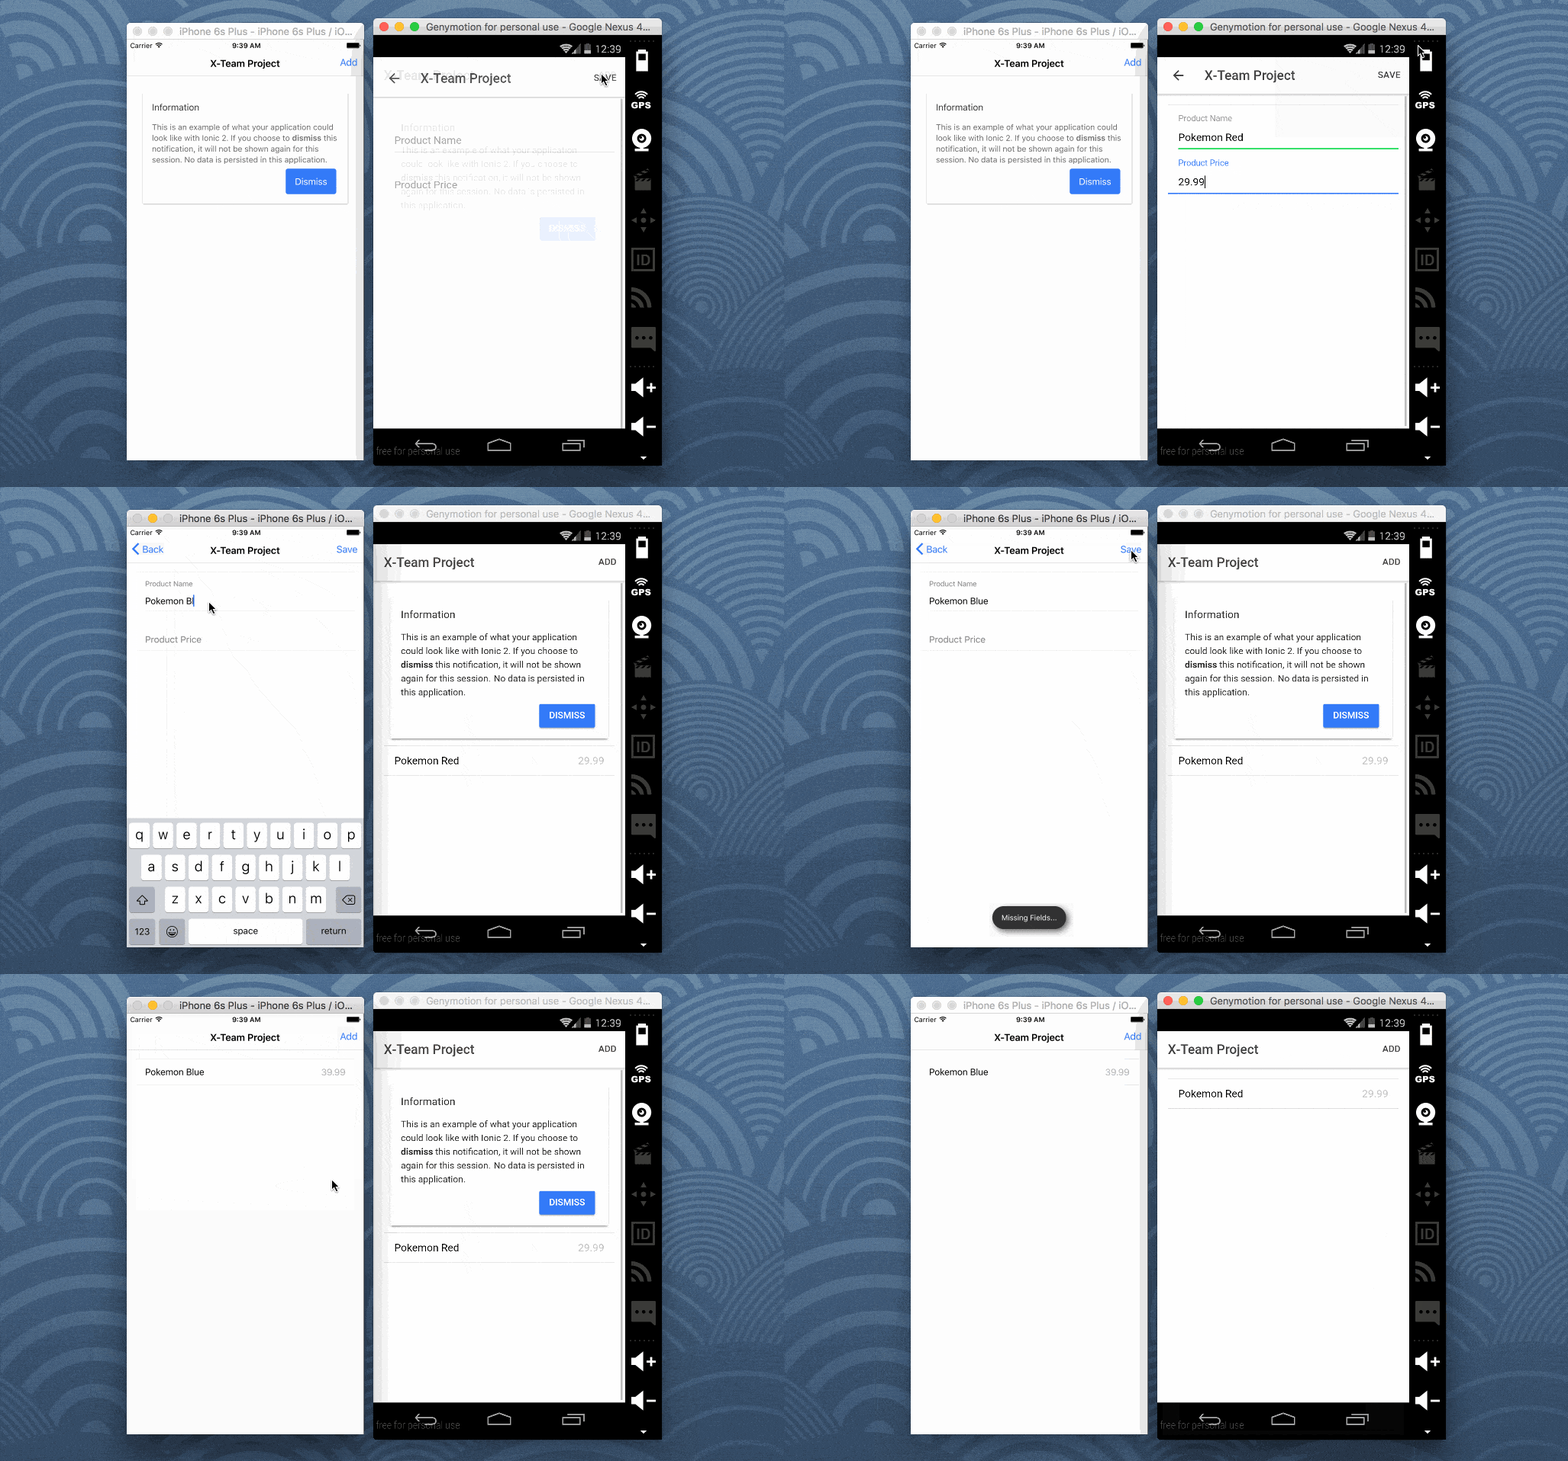
The application we’re building will look like the following:
As you can see from the above animation, this project will have two pages, which more or less perform the same things as the previous application.
Working with a Local Database
The first thing we want to worry about is creating a mechanism for persisting data. This will allow any data added to be reloaded when the application restarts.
There are several ways so save data in an Ionic 2 application. You can use HTML5 local storage, but it could have compatibility issues on different devices. You can use Mozilla localForage which corrects the compatibility issues, but data isn’t truly persisted. This brings us to SqlStorage for Ionic 2 which allows us to use SQLite and persisted key-value storage.
Before we can use SqlStorage effectively, we need to install the Apache Cordova SQLite plugin. This can be done by executing the following from the Command Prompt or Terminal:
ionic plugin add cordova-sqlite-storage
With the plugin installed, we want to create a provider component that can be used throughout the application. This allows us to use a single data instance in every page.
To create a provider, execute the following:
ionic g provider database
The above command will create a app/providers/database/database.ts file. Open it and include the following TypeScript code:
import { Injectable } from '@angular/core';
import { Storage, SqlStorage } from "ionic-angular";

@Injectable()
export class Database {

    private storage: Storage;
    private isInstantiated: boolean;

    public constructor() {
        if(!this.isInstantiated) {
            this.storage = new Storage(SqlStorage);
            this.isInstantiated = true;
        }
    }

    public getStorage() {
        return this.storage;
    }

}
The provider actually doesn’t do a whole lot. In the constructor method we check to see if the data layer had already been instantiated. We do this because we want one instance for the entire application. If it has not yet been instantiated, create a Storage object.
The getStorage method will allow us to obtain the open instance on any page.
As of right now, the provider cannot be shared across the application. To do this we must bootstrap it in the project’s app/app.ts file. Open this file and include the following import:
import { Database } from "./providers/database/database";
At the ionicBootstrap line we can inject it into the application like so:
ionicBootstrap(MyApp, [Database]);
Now the database can be used in our pages. It makes sense to start designing those pages now.
Creating the Page for Saving Data to the Database
The first page we want to create is the page for persisting data. This page will be the second accessible page from a user experience perspective.
To create this page, we’re going to use the Ionic 2 CLI just like we did with the database provider. From the command line, execute the following:
ionic g page create
The above command will create an app/pages/create directory with a TypeScript, HTML, and SCSS file included.
Starting with the project’s app/pages/create/create.ts file, open it and include the following TypeScript code:
import { Component } from '@angular/core';
import { NavController } from 'ionic-angular';
import { Toast } from "ionic-native";
import { Database } from "../../providers/database/database";

@Component({ templateUrl: 'build/pages/create/create.html', })
export class CreatePage {

    private products: Array<any>;
    public product: any;

    public constructor(private navCtrl: NavController, private database: Database) {
        this.products = [];
        this.product = {
            "name": "",
            "price": ""
        }
    }

    public onPageDidEnter() {
        this.database.getStorage().get("products").then(result => {
            this.products = result ? JSON.parse(result) : [];
        });
    }

    public save() {
        if(this.product.name && this.product.price) {
            this.products.push(this.product);
            this.database.getStorage().set("products", JSON.stringify(this.products));
            this.navCtrl.pop();
        } else {
            Toast.show("Missing Fields...", '5000', 'bottom').subscribe(toast => {});
        }
    }

}
So what exactly is happening in the above code? Let’s break it down.
First we’re importing a few essentials. We’re importing Toast because we want to show native platform notifications and we’re including Database because we need to be able to save.
Most of the magic happens in the CreatePage class.
Notice the two class variables. The private variable products will hold all currently saved products. We need this because we will be pushing new products into it and then saving the array to the database. It is private because it will never be rendered to the screen. The second variable product is public because it will bind to the input form. It represents the user input for product data. In the constructor method we initialize both these variables with empty data.
Not only are we initializing these variables, but we are also injecting the navigation controller and database provider to be used throughout this particular page.
Because it is never a good idea to load data in the constructor method, we’re going to load the data within the onPageDidEnter method. We lookup the data based on key. The value for our key will be a serialized array which is actually products.
In the save method we not only do the saving, but we access other native functionality as well. If the form fields are populated, serialize the products array and save it. If the form fields are not populated, show a native Toast notification.
Now how about the HTML UI that goes with this TypeScript logic?
The generator we used with the CLI should have created an app/pages/create/create.html file in our project. Open it and include the following markup:
<ion-header>
    <ion-navbar>
        <ion-title>X-Team Project</ion-title>
        <ion-buttons end>
            <button (click)="save()">Save</button>
        </ion-buttons>
    </ion-navbar>
</ion-header>

<ion-content padding>
    <ion-list>
        <ion-item>
            <ion-label floating>Product Name</ion-label>
            <ion-input type="text" [(ngModel)]="product.name"></ion-input>
        </ion-item>
        <ion-item>
            <ion-label floating>Product Price</ion-label>
            <ion-input type="text" [(ngModel)]="product.price"></ion-input>
        </ion-item>
    </ion-list>
</ion-content>
Notice the (click) tag in the navigation bar. When that button is clicked, the save method will be triggered. Remember it was a public method.
Now jump into the core content. Notice the [(ngModel)] tags in the input elements. These tags bind certain variables between the HTML and TypeScript. Because product was public in the TypeScript file, we can bind it.
With the creation page out of the way, we can focus on the list page.
Creating the Page for Loading and Listing Data
The second page we want to create is the page for listing data. This page will be our default page, and it will replace the templates default HomePage class.
To create this page, we’re going to use the Ionic 2 CLI just like we did with the database provider and creation page. From the command line, execute the following:
ionic g page list
The above command will create an app/pages/list directory with a TypeScript, HTML, and SCSS file included.
Starting with the project’s app/pages/list/list.ts file, open it and include the following TypeScript code:
import { Component } from '@angular/core';
import { NavController } from 'ionic-angular';
import { CreatePage } from "../../pages/create/create";
import { Database } from "../../providers/database/database";

@Component({
    templateUrl: 'build/pages/list/list.html',
})
export class ListPage {

    public products: Array<any>;
    public showingWelcome: boolean;

    public constructor(private navCtrl: NavController, private database: Database) {
        this.products = [];
        this.showingWelcome = true;
    }

    public onPageDidEnter() {
        this.database.getStorage().get("products").then(result => {
            this.products = result ? JSON.parse(result) : [];
        });
        this.database.getStorage().get("welcome").then(result => {
            this.showingWelcome = result ? false : true;
        });
    }

    public dismissWelcome() {
        this.showingWelcome = false;
        this.database.getStorage().set("welcome", this.showingWelcome);
    }

    public add() {
        this.navCtrl.push(CreatePage);
    }

}
So what is happening in the above code?
This time we’re importing the CreatePage we had just created as well as the Database provider. Again most of the magic happens in the ListPage class.
In this class we have two public variables that will be accessible from the UI. The products array will hold our list of products to be displayed in a list view. The showingWelcome boolean is used to to determine whether or not we should show a card before the list. This value will eventually be persisted to the database as well.
In the constructor method we initialize the two variables, and by default we want the welcome card to show. We are also injecting the navigation controller and database provider in the constructor to be used throughout the page.
Just like in the CreatePage, we don’t want to load data in the constructor method. Instead, we’re going to load our data in the onPageDidEnter method. We look up the data we want by key and deserialize it back into a usable format.
In the dismissWelcome method we change the boolean value of the card and save it to the database, so it won’t be shown on the next open.
Finally, the add method will navigate us to the CreatePage that we had created previously.
Now we probably want to take a look at the HTML UI that pairs with this TypeScript logic. Open the project’s app/pages/list/list.html file and include the following markup:
<ion-header>
    <ion-navbar>
        <ion-title>X-Team Project</ion-title>
        <ion-buttons end>
            <button (click)="add()">Add</button>
        </ion-buttons>
    </ion-navbar>
</ion-header>

<ion-content padding>
    <ion-card *ngIf="showingWelcome == true">
        <ion-card-header>
            Information
        </ion-card-header>
        <ion-card-content>
            <p>
                This is an example of what your application could look
                like with Ionic 2.  If you choose to
                <strong>dismiss</strong> this notification, it will
                not be shown again for this session.  No data
                is persisted in this application.
            </p>
            <ion-buttons end>
                <button primary (click)="dismissWelcome()">
                    Dismiss
                </button>
            </ion-buttons>
        </ion-card-content>
    </ion-card>
    <ion-list>
        <ion-item *ngFor="let product of products">

            <ion-note item-right>

            </ion-note>
        </ion-item>
    </ion-list>
</ion-content>
Inside the navigation bar we have a button with a (click) tag. When clicked, the add method will be called. Inside the core content we have an <ion-card>. This card has an ngIf condition which is mapped to the public variable that determines whether or not we should display the card. If false, the card will not show.
Finally, we have a list where we loop through the products array. Each item of the array will be referenced as product and the properties of the object will be shown in each row.
We’re not quite done yet though. Remember, we’re no longer using HomePage that was part of the default template. This means we need to crack open the project’s app/app.ts file and change it to look like the following:
import { Component } from '@angular/core';
import { ionicBootstrap, Platform } from 'ionic-angular';
import { StatusBar } from 'ionic-native';

import { Database } from "./providers/database/database";

import { ListPage } from './pages/list/list';

@Component({
    template: '<ion-nav [root]="rootPage"></ion-nav>'
})
export class MyApp {
rootPage: any = ListPage;

    constructor(platform: Platform) {
        platform.ready().then(() => {
            StatusBar.styleDefault();
        });
    }

}

ionicBootstrap(MyApp, [Database]);
Essentially we just replaced HomePage with ListPage bringing our application to a close.
Testing the Mobile Application
To test this application, we can use a device or simulator. It cannot be tested in a browser because we are using native components that the browser will not understand.
If you wish to test on Android, execute the following:
ionic emulate android
Replacing the emulate keyword with run will run it on a device.
Conclusion
Previously we saw how to create a basic Ionic 2 mobile application from simple Angular 2 web code. This time we took it to the next level and included data persistence and native features, allowing us to escape from the typical web browser. We also included basic navigation features.
TABLE OF CONTENTS
