
When it comes to mobile application development, there are many different routes you can choose. You can choose a native solution, using the Android SDK and Java or iOS with Objective-C, but in both these scenarios, there is a multiple language requirement. A more efficient and possibly cheaper solution would be to use a cross platform framework that lets you deploy to various platforms using a single set of code.
There are numerous cross platform frameworks available, but one of the more popular is Ionic Framework. It first made an appearance a few years back, and in my personal opinion, helped make AngularJS as successful as it's been. However, time has passed, and now Ionic 2 has become available, introducing us to a new and improved Angular 2.
This guide will be part of a series of guides on the topic of Ionic 2. In this particular guide, we're going to take a look at what Ionic 2 has to offer versus its predecessor and how to get started with the new and improved framework. In the next articles, we'll see how to persist data to storage, use various platform APIs, and interface with remote web services.
What is Ionic 2 and Why Does it Matter?
To explain Ionic 2, it is probably a good idea to take a step back and explain the first version of Ionic Framework.
Ionic Framework was first introduced to the world as a stable release in May 2015. It was a framework built on Apache Cordova, similar to Adobe PhoneGap. The difference here is that Ionic Framework gave you an incredibly beautiful UI layer to work with, opening the door to even the worst designers, allowing them to produce stunning applications.
In addition to having a great UI, Ionic Framework leveraged AngularJS. With AngularJS one can do impressive things like dynamic views, data binding, and form validation with minimal effort.
Angular 2 was built from the ground up to bring performance as well as language enhancements to what AngularJS had given the world. With a new Angular came a new Ionic Framework.
With Angular 2, you can now use TypeScript to build Ionic 2 applications giving development a more object oriented look and feel. This is huge in my opinion because it makes applications easier to maintain and troubleshoot as they are now compiled rather than running as pure error-prone JavaScript.
Taking a Look at the Components, Not Controllers
Although loosely relevant to the goals of this guide, it is a good idea to see what Ionic 2 offers in terms of development versus the previous Ionic 1.
In the first version of Ionic Framework, controllers for each application view could be seen like this:
app.controller("ListController", function($scope) {

    $scope.personName = "Nic Raboy";

    $scope.shout = function() {
        console.log($scope.personName);
    }

});
In the above code, anything that is part of the $scope could be accessed from the UI. Similarly, in Ionic 2, the following component might be the equivalent to the previous controller:
export class ListComponent {

    public personName: string;

    public constructor() {
        this.personName = "Nic Raboy";
    }

    public shout() {
        console.log(this.personName);
    }

}
As someone who started with Java programming, the Angular 2 components make a lot more sense. All public variables and methods can be accessed from the UI, while all private variables and methods cannot be accessed.
Creating a Basic Ionic 2 Application
The comparison of Ionic Framework controllers versus Ionic 2 components didn't paint much of a story. In fact, Ionic Framework 1 is becoming less and less relevant as days pass.
We're going to take a look at building a simple Ionic 2 cross platform application using TypeScript and a single set of code.
Assuming you've already got Ionic Framework installed, from the Terminal (Linux and Mac) or Command Prompt (Windows), execute the following:
ionic start QuickProject blank --v2
cd QuickProject
ionic platform add android
ionic platform add ios
There are a few things to note in the above set of commands. The --v2 tag indicates that we are creating an Ionic 2 application. This requires the Ionic 2 CLI. While we are adding the iOS platform, we cannot build for iOS unless we are using a Mac computer with Xcode installed.
The Ionic 2 project will have many files and folders, however, all development will be done in the app directory found at the root of the project. It will contain all the TypeScript, HTML, and CSS files for each page of our application.
The base Ionic 2 template will have quite a few files and directories already created. For example, you might see the following:
- app/app.ts
- app/pages/home/home.ts
- app/pages/home/home.html
- app/pages/home/home.scss
- app/theme/app.core.scss
- app/theme/app.ios.scss
- app/theme/app.md.scss
- app/theme/app.variables.scss
- app/theme/app.wp.scss
The app/app.ts file will act as our parent component. It is where we bootstrap the Ionic 2 application and add any singleton providers.
The app/theme/ files, for the most part, are never touched. It is where you can define global CSS themes for individual platforms. However, we'd rather play around with local CSS stylesheets on a per component basis.
For this particular application, we're going to spend all our time in the app/pages directory. Each page of our application will end up here, and the base template provides us with a default app/pages/home page that contains an HTML UI file, an SCSS stylesheet, and a TypeScript file for component logic.
The application we build will perform like the following:
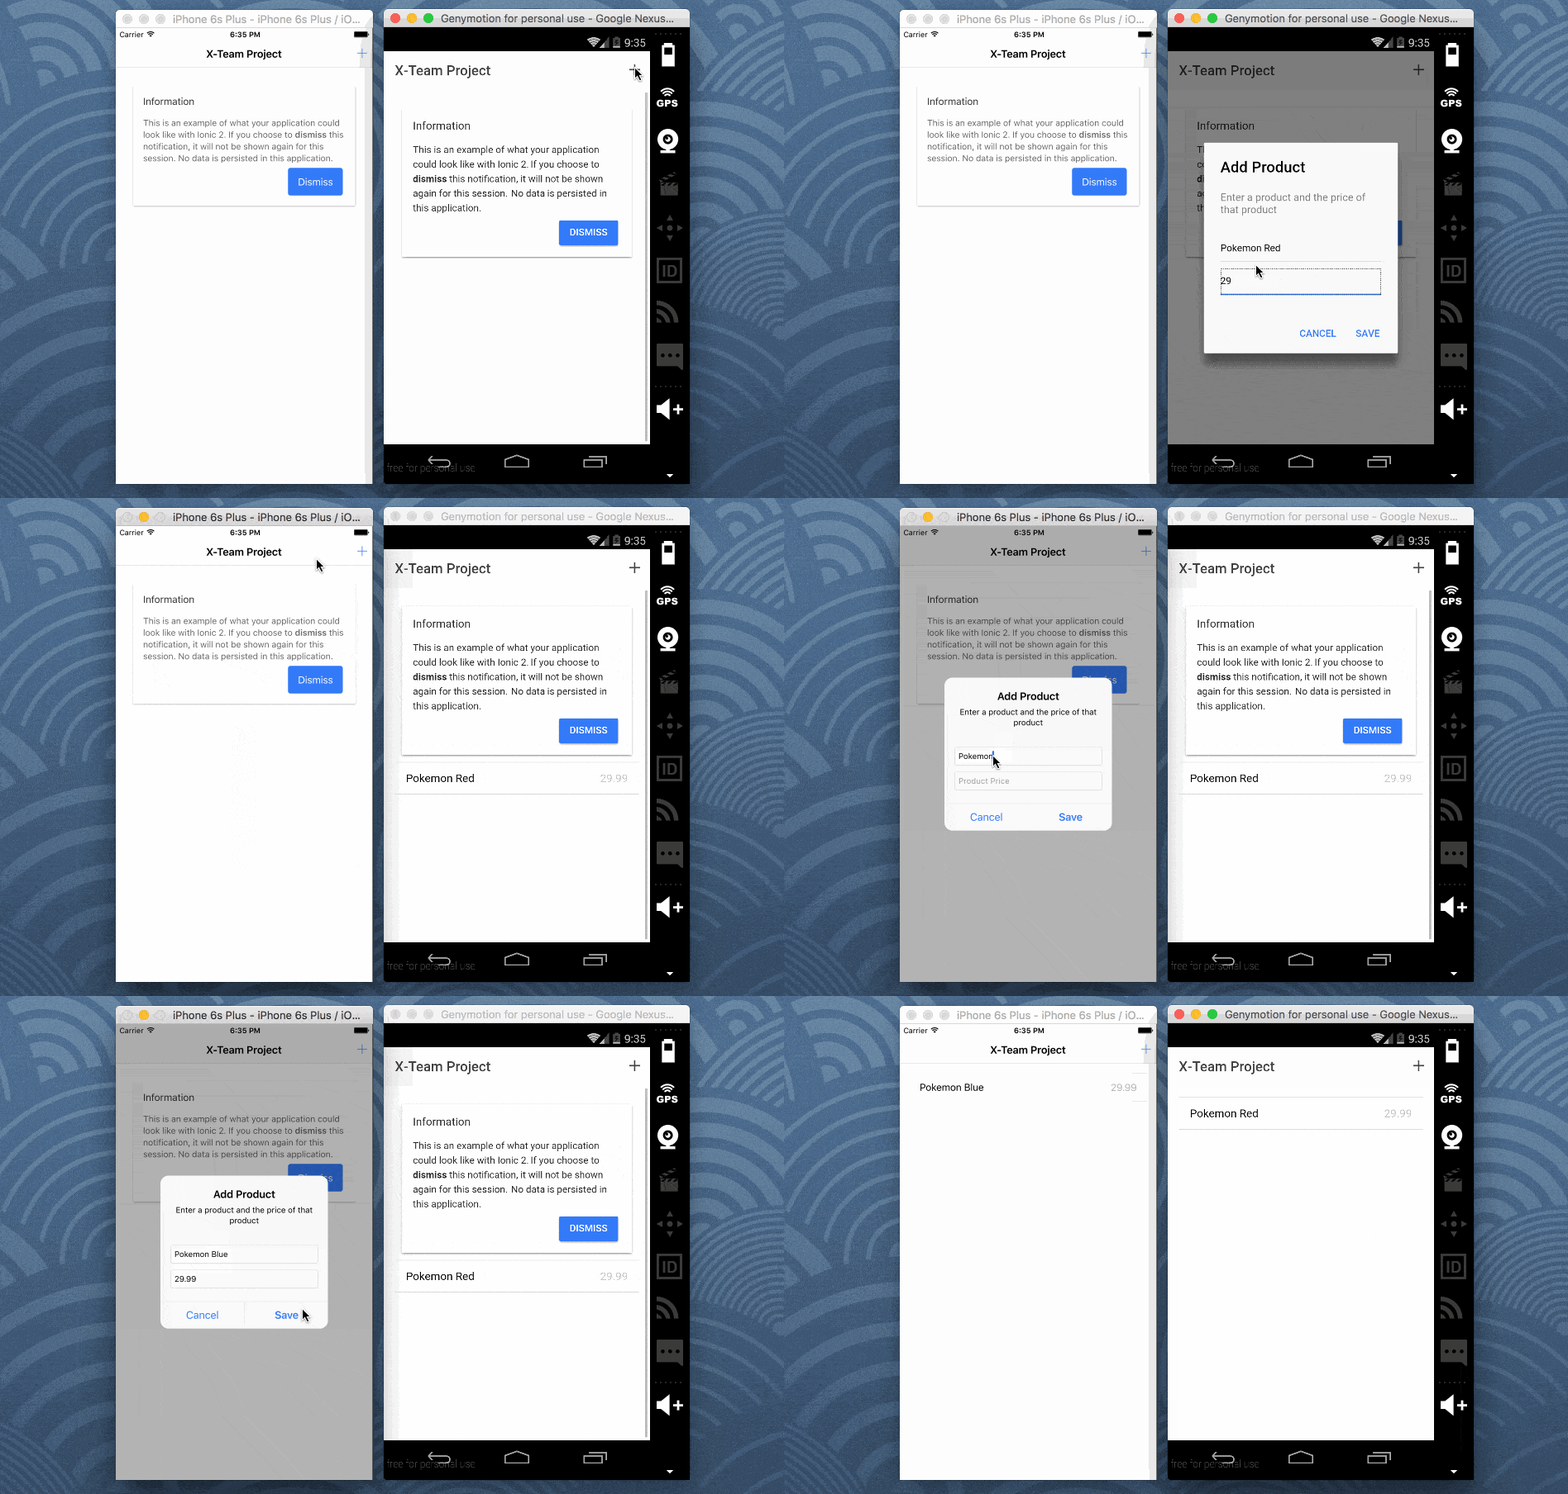
Essentially we'll have a card that can be dismissed and a list that we can populate via a popup alert.
Let's start by working with the app/pages/home/home.ts TypeScript logic file. Open it and include the following code. We'll break it down after.
import {Component} from '@angular/core';
import {NavController, Alert} from 'ionic-angular';

@Component({
    templateUrl: 'build/pages/home/home.html'
})
export class HomePage {

    public showingWelcome: boolean;
    public productList: Array<Object>;

    public constructor(private navCtrl: NavController) {
        this.showingWelcome = true;
        this.productList = [];
    }

    public dismissWelcome() {
        this.showingWelcome = false;
    }

    public add() {
        let alert = Alert.create({
            title: "Add Product",
            message: "Enter a product and the price of that product",
            inputs: [
                {
                    name: "product",
                    placeholder: "Product Name"
                },
                {
                    name: "price",
                    placeholder: "Product Price"
                }
            ],
            buttons: [
                {
                    text: "Cancel"
                },
                {
                    text: "Save",
                    handler: data => {
                        this.productList.push({
                            name: data.product,
                            price: data.price
                        });
                    }
                }
            ]
        });
        this.navCtrl.present(alert);
    }

}
A lot is going on in the above code, right? Let's see what's going on in the above component.
Like with any Angular 2 TypeScript file, we're first going to import all the necessary dependencies. In the above example, we are importing a required Angular 2 dependency as well as the Ionic 2 NavController and Alert components. We will be constructing an alert and presenting it with the navigation controller.
The @Component is where we define the HTML file that will be paired with this particular TypeScript file. Should we want to, we could also add any providers or directives to the @Component block as well.
The HomePage class is where all the magic happens. At the top of the class we define the following variables:
public showingWelcome: boolean;
public productList: Array<Object>;
These variables are public because we want to be able to access them from the HTML file. The showingWelcome variable will determine whether or not to show the welcome message. If it is true we'll show it, otherwise hide it. The productList will contain an array of objects, where each object contains a product name and a product price. This array will populate the list in the UI.
The constructor method, like any constructor method, will initialize our variables:
public constructor(private navCtrl: NavController) {
    this.showingWelcome = true;
    this.productList = [];
}
By default, the welcome message will show, which explains why we are setting it to true.
Although we haven't created our UI yet, it will contain a button capable of dismissing the welcome message. The UI button will call the following method:
public dismissWelcome() {
    this.showingWelcome = false;
}
This will set the showingWelcome variable to false and hide the message until the application loads again. Although we won't talk about it here, if you wish to persist this information for future application loads, you can make use of SQLite or similar.
Finally, we have our add method. In this method, we create a new Ionic 2 Alert. This alert will have two input fields, one that will accept a product name and one that will accept a price. While we could add validation on these fields, it is best to save it for an intermediate level tutorial.
When the Save button is pressed, the form fields become accessible through the data variable. The properties of the data variable will match the name properties given to each form field. The form data will then be pushed into the productList array of objects.
The prompt for information will not show until we call the following line:
this.navCtrl.present(alert);
The navCtrl was the same that was injected via the component's constructor method, which explains the usage of this.
With the TypeScript out of the way, we can focus on the HTML that is paired with it. Open the project's app/pages/home/home.html file and include the following markup:
<ion-header>
    <ion-navbar>
        <ion-title>
            X-Team Project
        </ion-title>
        <ion-buttons end>
            <button (click)="add()">
                <ion-icon name="add"></ion-icon>
            </button>
        </ion-buttons>
    </ion-navbar>
</ion-header>

<ion-content padding>
    <ion-card *ngIf="showingWelcome == true">
        <ion-card-header>
            Information
        </ion-card-header>
        <ion-card-content>
            <p>
                This is an example of what your application could look
                like with Ionic 2.  If you choose to
                <strong>dismiss</strong> this notification, it will
                not be shown again for this session.  No data
                is persisted in this application.
            </p>
            <ion-buttons end>
                <button primary (click)="dismissWelcome()">
                    Dismiss
                </button>
            </ion-buttons>
        </ion-card-content>
    </ion-card>
    <ion-list>
        <ion-item *ngFor="let product of productList">

            <ion-note item-right>

            </ion-note>
        </ion-item>
    </ion-list>
</ion-content>
Just like with the TypeScript, there is a lot going on in this HTML markup. We're going to break it down to get a better understanding.
The first thing we notice is the <ion-header> which acts as our page's action bar.
<ion-header>
    <ion-navbar>
        <ion-title>
            X-Team Project
        </ion-title>
        <ion-buttons end>
            <button (click)="add()">
                <ion-icon name="add"></ion-icon>
            </button>
        </ion-buttons>
    </ion-navbar>
</ion-header>
The header has a title and a single navigation button. This button will call our public method add from the TypeScript file through the usage of the (click) tag property.
The <ion-content> represents the core content on the page. We'll have a beautifully crafted dismissable card with a list below it.
Notice the declaration of the card itself:
<ion-card *ngIf="showingWelcome == true">
We have a conditional tag where we check to see if our public variable showingWelcome is true or false. For as long as this variable is true, the card and all of its content will show. Otherwise, it will remain hidden.
Going deeper into the content of the card, we notice the following button group:
<ion-buttons end>
    <button primary (click)="dismissWelcome()">
        Dismiss
    </button>
</ion-buttons>
Should the Dismiss button be pressed, the public method dismissWelcome will be executed. This will falsify the boolean variable and immediately hide the card.
Finally we have the list for presenting our products:
<ion-list>
    <ion-item *ngFor="let product of productList">

        <ion-note item-right>

        </ion-note>
    </ion-item>
</ion-list>
By making use of *ngFor we can loop through the public array of objects. For every item found we will print out the product name, and right-align the price that goes with it.
Testing the Ionic 2 Mobile Application
At this point, the simple application should be ready to run. From the Command Prompt (Windows) or Terminal (Mac and Linux), execute the following:
ionic run android
The above command will run the application for Android. If you want to run for iOS, swap out the platform in the above command.
Conclusion
In my personal opinion, Ionic 2 and Angular 2 is a huge improvement over its predecessor. While I haven't noticed any major changes to the theming or performance, being able to use TypeScript is an awesome advantage.
In this beginners guide, we saw how to create a simple Ionic 2 application that made use of various UI components such as cards and lists. We took control of these UI components using TypeScript and the power of Angular 2.
TABLE OF CONTENTS
