
Vue.js is a very popular JavaScript framework, but it isn't the only framework available for creating web applications. I am a huge advocate of Angular, so it made sense to try to accomplish this with Angular.
We're going to see how to create a web application with Angular and TypeScript that captures webcam photos directly from within the web browser.
Creating an Angular Web Application with the Angular CLI
To keep things simple and easy to understand, we're going to create a fresh Angular project. There are plenty of methods for accomplishing this, but we're going to use the Angular CLI.
With the Angular CLI installed, execute the following:
ng new ngx-camera-project
We don't need any extra dependencies.
Developing the TypeScript Logic and HTML UI for Capturing Images in the Web Browser
We know that the goal of this project will be to capture images from the webcam, but what exactly will we be doing?
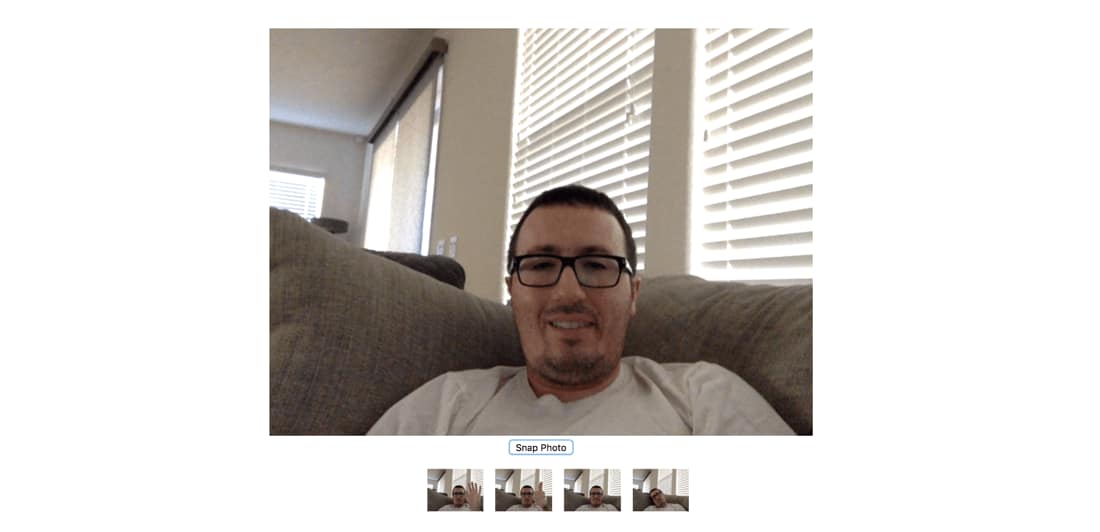
In the above screenshot, you'll see that we have a large image followed by a button and followed by several smaller images. The large image is a live stream from the webcam while the smaller images are previously captured frames from the webcam stream.
So how do we make this possible?
Within the new Angular project, open the project's src/app/app.component.html file and include the following:
<div id="app">
    <div><video #video id="video" width="640" height="480" autoplay></video></div>
    <div><button id="snap" (click)="capture()">Snap Photo</button></div>
    <canvas #canvas id="canvas" width="640" height="480"></canvas>
    <ul>
        <li *ngFor="let c of captures">
            <img src="" height="50" />
        </li>
    </ul>
</div>
There isn't a lot of HTML here, but we need to understand what is happening.
Take notice of the <video> and <canvas> tags. Each element has a local variable denoted by a # symbol. In other words, there is a #video and a #canvas variable. This is how we'll be able to access the elements from within our TypeScript.
The <button> element has a click event that will call a capture method from within our TypeScript.
<ul>
    <li *ngFor="let c of captures">
        <img src="" height="50" />
    </li>
</ul>
Finally, we have a list. Looking into the future for a moment, we're going to have a variable called captures which holds each of our captured images. In the HTML, we are going to loop through this array and render them on the screen.
Now let's take a look at the TypeScript logic that goes with the HTML markup. Open the project's src/app/app.component.ts file and include the following TypeScript code:
import { Component, OnInit, ViewChild, ElementRef } from '@angular/core';

@Component({
    selector: 'app-root',
    templateUrl: './app.component.html',
    styleUrls: ['./app.component.css']
})
export class AppComponent implements OnInit {

    @ViewChild("video")
    public video: ElementRef;

    @ViewChild("canvas")
    public canvas: ElementRef;

    public captures: Array<any>;

    public constructor() {
        this.captures = [];
    }

    public ngOnInit() { }

    public ngAfterViewInit() {
        if(navigator.mediaDevices && navigator.mediaDevices.getUserMedia) {
            navigator.mediaDevices.getUserMedia({ video: true }).then(stream => {
                this.video.nativeElement.src = window.URL.createObjectURL(stream);
                this.video.nativeElement.play();
            });
        }
    }

    public capture() {
        var context = this.canvas.nativeElement.getContext("2d").drawImage(this.video.nativeElement, 0, 0, 640, 480);
        this.captures.push(this.canvas.nativeElement.toDataURL("image/png"));
    }

}
A lot is happening in the above TypeScript code, so we're going to break it down.
Starting with the variables of our AppComponent class:
@ViewChild("video")
public video: ElementRef;

@ViewChild("canvas")
public canvas: ElementRef;

public captures: Array<any>;
Remember those local variables from the HTML? By using @ViewChild with the variable name, we can load the elements into the variable that follows. This will allow us to manipulate these DOM elements.
public ngAfterViewInit() {
    if(navigator.mediaDevices && navigator.mediaDevices.getUserMedia) {
        navigator.mediaDevices.getUserMedia({ video: true }).then(stream => {
            this.video.nativeElement.src = window.URL.createObjectURL(stream);
            this.video.nativeElement.play();
        });
    }
}
When we're sure that the view elements have initialized, we can do some tasks via the ngAfterViewInit method. Essentially, we're asking for permission to use the webcam, and we're showing the stream from the webcam in the <video> element.
To give credit where credit is deserved, much of the logic in the ngAfterViewInit was taken from an article by David Walsh titled, Camera and Video Control with HTML5. We've just gone ahead and made it Angular friendly.
When we want to capture an image, we can call the capture method:
public capture() {
    var context = this.canvas.nativeElement.getContext("2d").drawImage(this.video.nativeElement, 0, 0, 640, 480);
    this.captures.push(this.canvas.nativeElement.toDataURL("image/png"));
}
The capture method will use the canvas to capture a frame from the video stream and add it to the captures array.
There are a few improvements we can make to our project. For example, it isn't particularly necessary to display the canvas on the screen. Let's make some CSS adjustments to make our project a little more attractive.
Open the project's src/app/app.component.css file and include the following:
body {
    background-color: #F0F0F0;
}
#app {
    text-align: center;
    color: #2c3e50;
    margin-top: 60px;
}
#video {
    background-color: #000000;
}
#canvas {
    display: none;
}
li {
    display: inline;
    padding: 5px;
}
Everything should look and work pretty well at this point. You can take snapshots from the webcam and do whatever you'd like with them.
Conclusion
You just saw how to use Angular to capture images from the webcam using a web browser. In Angular, you access DOM elements via local variables and the @ViewChild reference.
The base64 encoded image data captured can easily be used to send to a remote web service and saved within a database. There are plenty of other use cases to do with the data as well.
SHARE:


