
Over the past few months, we've been exploring Ionic 2 as part of a three part tutorial series towards building cross platform hybrid applications. We started with a beginners guide to getting started with Ionic 2 and worked our way into building a multi-page application. We're going to bring this series to a close with another critical part of mobile application development. We're going to focus on working with remote web services and APIs.
Since Pokemon is all the rage right now, we're going to use Pokemon and the free to use Pokeapi as the basis of our examples.
Creating a Fresh Ionic 2 Project
Instead of continuing with one of the previously created projects in the series, we're going to create a new project and apply some of the things we've learned.
From the Terminal (Linux and Mac) or Command Prompt (Windows), execute the following commands:
ionic start PokemonProject blank --v2
cd PokemonProject
ionic platform add ios
ionic platform add android
The above commands will create an Ionic 2 project that uses Angular 2 and TypeScript. You'll notice that we're adding the iOS build platform. If you're not using a Mac with Xcode installed, you won't be able to build or test for iOS.
Everything we do in this project will happen in the following project locations:
- src/app
- src/providers
- src/pages
- www/assets
The application we're going to build will look like the following:
As you can see from the animated imageabove, our application will be a single page application that gathers Pokemon information from the free to use API Pokeapi. When clicking on any Pokemon loaded into the list, another API request is made for information on the type of Pokemon.
What we don't see in the above image is that we're caching the data into a SQLite database for quick loading.
Obtaining the Pokemon Images
Before we get into the code, we need to download some image files that we'll use in the application. We need to download these images for two reasons:
- Loading images from a network request is slow and eats up a lot of cellular data.
- The Pokeapi does not allow hot-linking of images.
Not a big deal.
Download the Pokeapi Sprites repository from GitHub. Copy the sprites/pokemon directory from the repository to the project's www/assets directory, but rename the repository directory to images.
This project will only use images 0.png to 151.png so it is up to you if you want to include everything.
Working with Ionic Native and a SQLite Database
In the previous tutorial we made use of key-value storage found in Ionic Framework's SqlStorage. However, as of Ionic 2 RC0, SqlStorage has since been removed from the framework.
This time around we're going to use SQLite which is part of Ionic Native.
Before we can use Ionic Native, we need to install the Apache Cordova plugin for SQLite. This plugin can be installed by executing the following:
ionic plugin add cordova-sqlite-storage
You'll notice it is the same plugin we used when SqlStorage existed. While it is the same plugin, we won't be using it the same way.
It is bad practice to use SQL directly in the pages of the application, so we'll create a shared provider to handle data interactions for us.
To create a provider in Ionic 2, execute the following with the Ionic 2 CLI:
ionic g provider database
The above command will create a src/providers/database.ts file in our project. Open it and include the following TypeScript code:
import { Injectable } from '@angular/core';
import { SQLite } from 'ionic-native';
import { Platform } from 'ionic-angular';

@Injectable()
export class Database {

    private storage: SQLite;
    private isOpen: boolean;

    public constructor(private platform: Platform) {
        if(!this.isOpen) {
            this.platform.ready().then((readySource) => {
                this.storage = new SQLite();
                this.storage.openDatabase({name: "data.db", location: "default"}).then(() => {
                    this.storage.executeSql("CREATE TABLE IF NOT EXISTS pokemon (id INTEGER PRIMARY KEY AUTOINCREMENT, name TEXT, url TEXT)", {});
                    this.isOpen = true;
                });
            });
        }
    }

    public getPokemon(): Promise<any> {
        return new Promise((resolve, reject) => {
            this.platform.ready().then((readySource) => {
                this.storage.executeSql("SELECT * FROM pokemon", []).then((data) => {
                    let pokemon = [];
                    if(data.rows.length > 0) {
                        for(let i = 0; i < data.rows.length; i++) {
                            pokemon.push({
                                id: data.rows.item(i).id,
                                name: data.rows.item(i).name,
                                url: data.rows.item(i).url
                            });
                        }
                    }
                    resolve(pokemon);
                }, (error) => {
                    reject(error);
                });
            });
        });
    }

    public createPokemon(name: string, url: string) {
        return new Promise((resolve, reject) => {
            this.platform.ready().then((readySource) => {
                this.storage.executeSql("INSERT INTO pokemon (name, url) VALUES (?, ?)", [name, url]).then((data) => {
                    resolve(data);
                }, (error) => {
                    reject(error);
                });
            });
        });
    }

}
There is a lot happening in the above code so let's break it down.
Because this is a provider that we plan to inject throughout the application, we are importing the Injectable class. While not absolutely required, the SQLite class found in ionic-native makes life a lot easier. Finally, we are importing Platform because we shouldn't try to use native plugins before the application is ready and this class makes it possible to check.
Inside the Database class we have three methods.
public constructor(private platform: Platform) {
    if(!this.isOpen) {
        this.platform.ready().then((readySource) => {
            this.storage = new SQLite();
            this.storage.openDatabase({name: "data.db", location: "default"}).then(() => {
                this.storage.executeSql("CREATE TABLE IF NOT EXISTS pokemon (id INTEGER PRIMARY KEY AUTOINCREMENT, name TEXT, url TEXT)", {});
                this.isOpen = true;
            });
        });
    }
}
This provider will act as a singleton where the same instance will be used on every page of the application. In the above constructor we make sure the instance hasn't already been created. If not, we make sure the application is ready, open a database, and create a table only if it doesn't exist.
public getPokemon(): Promise<any> {
    return new Promise((resolve, reject) => {
        this.platform.ready().then((readySource) => {
            this.storage.executeSql("SELECT * FROM pokemon", []).then((data) => {
                let pokemon = [];
                if(data.rows.length > 0) {
                    for(let i = 0; i < data.rows.length; i++) {
                        pokemon.push({
                            id: data.rows.item(i).id,
                            name: data.rows.item(i).name,
                            url: data.rows.item(i).url
                        });
                    }
                }
                resolve(pokemon);
            }, (error) => {
                reject(error);
            });
        });
    });
}
Let's say we want to query for Pokemon that have been saved to the database. We don't want to have to work with database rows as a result in our pages so instead we parse them into an array of objects. This becomes much more manageable in each of our pages.
Finally we have a method for saving Pokemon data to the database:
public createPokemon(name: string, url: string) {
    return new Promise((resolve, reject) => {
        this.platform.ready().then((readySource) => {
            this.storage.executeSql("INSERT INTO pokemon (name, url) VALUES (?, ?)", [name, url]).then((data) => {
                resolve(data);
            }, (error) => {
                reject(error);
            });
        });
    });
}
This application example is simple so we're only ever going to save two properties. In the above method we can see a parameterized query for saving this data.
The provider is complete, but it is not ready to be used. To use this provider, it must be added to the project's @NgModule block.
Open the project's src/app/app.module.ts file and include the following code:
import { NgModule } from '@angular/core';
import { IonicApp, IonicModule } from 'ionic-angular';
import { MyApp } from './app.component';
import { HomePage } from '../pages/home/home';
import { Database } from "../providers/database";

@NgModule({ declarations: [ MyApp, HomePage ], imports: [ IonicModule.forRoot(MyApp) ], bootstrap: [IonicApp], entryComponents: [ MyApp, HomePage ], providers: [Database] })
export class AppModule {}
In reality, we only imported the Database provider that we had created and added it to the providers array in the @NgModule block.
More information on Ionic 2 providers can be found in a previous article I wrote on the subject.
At this point we can use a local SQLite database throughout our application.
Creating the Page for Loading Pokemon Data
This application will be a single page application. As soon as the application opens, data will either be loaded from the SQLite database or it will be loaded from the Pokeapi service.
Open the project's src/pages/home/home.ts file and include the following massive amount of TypeScript code:
import { Component } from '@angular/core';
import { Http } from "@angular/http";
import { NavController, AlertController } from 'ionic-angular';
import "rxjs/Rx";
import { Database } from "../../providers/database";

@Component({
    selector: 'page-home',
    templateUrl: 'home.html'
})
export class HomePage {

    public pokemon: Array<any>;

    public constructor(private navCtrl: NavController, private alertCtrl: AlertController, private http: Http, private database: Database) {
        this.pokemon = [];
    }

    public ionViewDidEnter() {
        setTimeout(() => {
            this.loadPokemonData();
        }, 100);
    }

    public loadPokemonData() {
        this.database.getPokemon().then(result => {
            this.pokemon = result;
            if(this.pokemon.length == 0) {
                this.http.get("https://pokeapi.co/api/v2/pokemon?limit=151")
                    .map(result => result.json())
                    .flatMap(result => result.results)
                    .map(result => <any> result)
                    .subscribe(result => {
                        this.database.createPokemon(result.name, result.url);
                        this.pokemon.push(result);
                    }, error => {
                        console.error(error);
                    });
            }
        });
    }

    public showInfo(name: string) {
        this.http.get("https://pokeapi.co/api/v2/pokemon/" + name)
            .map(result => result.json())
            .flatMap(result => result.types)
            .map(result => (<any> result).type.name)
            .toArray()
            .subscribe(result => {
                this.showDialog(result);
            }, error => {
                console.error(error);
            });
    }

    public showDialog(data: Array<string>) {
        let alert = this.alertCtrl.create({
            title: 'Information',
            subTitle: 'This Pokemon is of type(s) ' + data.join(", "),
            buttons: ['OK']
        });
        alert.present();
    }

}
So what is happening in the above massive amount of TypeScript code? We're going to break it down to make it a little easier to understand.
import { Component } from '@angular/core';
import { Http } from "@angular/http";
import { NavController, AlertController } from 'ionic-angular';
import "rxjs/Rx";
import { Database } from "../../providers/database";
In the above imports we are including the Http class because we'll need it for communicating with the remote web service. The Http class relies on RxJS, so to get the most out of it we should import the appropriate libraries. Even though we added the Database provider to the @NgModule block, we still need to include it in any page we wish to use it.
public constructor(private navCtrl: NavController, private alertCtrl: AlertController, private http: Http, private database: Database) {
    this.pokemon = [];
}
In the above constructor method we are injecting the various components we plan to use as well as initialize our array that will be used in the HTML.
It is frowned upon to load data in the constructor method. Instead data should be loaded in one of the Ionic 2 lifecycle events.
public ionViewDidEnter() {
    setTimeout(() => {
        this.loadPokemonData();
    }, 100);
}
The ionViewDidEnter lifecycle event will trigger after the constructor method. We haven't created the loadPokemonData method yet, but take note of the timeout we're using. Because the Database provider has an asynchronous constructor method, we need to make sure the SQLite database is open before we try to use it. There are plenty of better ways to do this, but setting a short timer will work too.
public loadPokemonData() {
    this.database.getPokemon().then(result => {
        this.pokemon = result;
        if(this.pokemon.length == 0) {
            this.http.get("https://pokeapi.co/api/v2/pokemon?limit=151")
                .map(result => result.json())
                .flatMap(result => result.results)
                .map(result => <any> result)
                .subscribe(result => {
                    this.database.createPokemon(result.name, result.url);
                    this.pokemon.push(result);
                }, error => {
                    console.error(error);
                });
        }
    });
}
Above is where the magic happens and it is the foundation for this particular tutorial in the series.
Two things are happening in the loadPokemonData method. First we are executing a query against the SQLite database. If we receive an empty array from the query, meaning there were no results, then we are going to make an API request. The HTTP request will use RxJS and observables to transform the data into an array, the array will be flattened into a series of objects, the objects will be made generic through another transformation, and then we finally have access to the result. The result will be saved to the SQLite database and will be pushed into our public array to be presented on the screen.
public showInfo(name: string) {
    this.http.get("https://pokeapi.co/api/v2/pokemon/" + name)
        .map(result => result.json())
        .flatMap(result => result.types)
        .map(result => (<any> result).type.name)
        .toArray()
        .subscribe(result => {
            this.showDialog(result);
        }, error => {
            console.error(error);
        });
}

public showDialog(data: Array<string>) {
    let alert = this.alertCtrl.create({
        title: 'Information',
        subTitle: 'This Pokemon is of type(s) ' + data.join(", "),
        buttons: ['OK']
    });
    alert.present();
}
Finally we have two methods which will be triggered when we try to select a particular Pokemon. Another HTTP request will be made to a different API endpoint and that response data will be presented in an alert dialog.
Now let's take a look at the HTML that goes with the TypeScript. Open the project's src/pages/home/home.html file and include the following markup:
<ion-header>
    <ion-navbar>
        <ion-title>
            X-Team Pokemon
        </ion-title>
    </ion-navbar>
</ion-header>

<ion-content padding>
    <ion-list>
        <ion-item *ngFor="let monster of pokemon; let i = index;" (click)="showInfo(monster.name)">
            <h2></h2>
            <ion-thumbnail item-right>
                <img src="assets/images/1.png">
            </ion-thumbnail>
        </ion-item>
    </ion-list>
</ion-content>
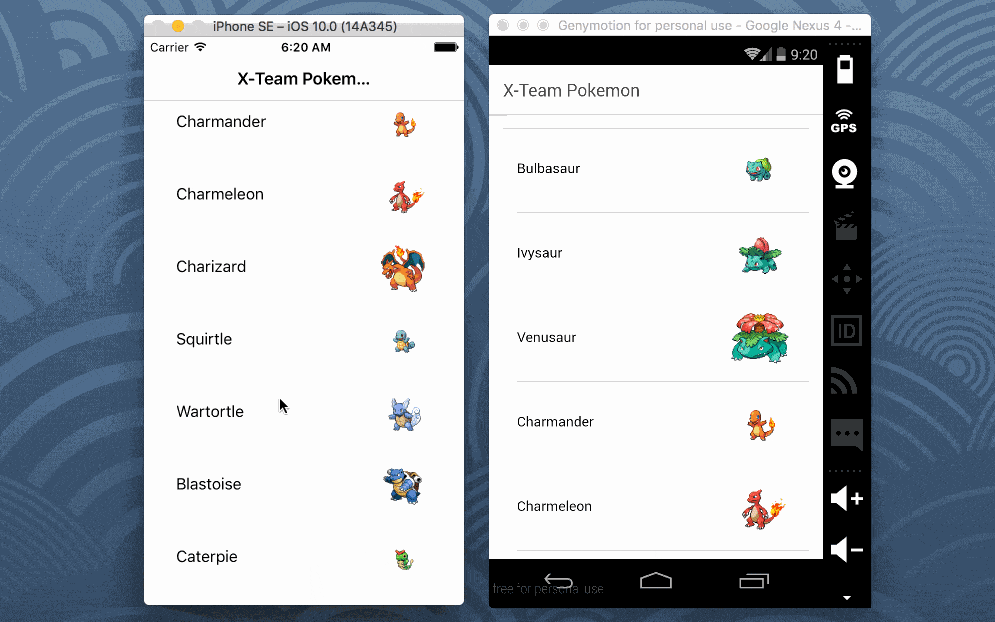
In the above markup we have an Ionic Framework list. This list is populated by looping through the pokemon array that is defined in the TypeScript file. Inside the list we are printing the Pokemon name and showing the image based on the files that were saved to the project's www/assets directory.
Testing the Mobile Application
To test this application we can use a device or simulator. It cannot be tested in a browser because we are using native components that the browser will not understand.
If you wish to test on Android, execute the following:
ionic emulate android
Replacing the emulate keyword with run will run it on a device.
Conclusion
In the first tutorial I wrote you saw how to get started with Ionic 2 by creating UI components and getting familiar with Angular 2. In the second tutorial we took it to the next level by adding multiple pages to the application and persisting data. This time around we brought the series to a close and worked with data found in a RESTful API.
The three tutorials should be enough to get you on the right track for developing Android and iOS applications with Ionic Framework and Angular 2.


