
Kubernetes
Containerisation has brought a lot of flexibility for developers in terms of managing the deployment of the applications. However, the more granular the application is, the more components it consists of and hence requires some sort of management for those.
One still needs to take care of scheduling the deployment of a certain number of containers to a specific node, managing networking between the containers, following the resource allocation, moving them around as they grow and much more.
Nearly all applications nowadays need to have answers for things like
- Replication of components
- Auto-scaling
- Load balancing
- Rolling updates
- Logging across components
- Monitoring and health checking
- Service discovery
- Authentication
Google has given a combined solution for that which is Kubernetes, or how it’s shortly called – K8s.
In this article, we will look into the moving parts of Kubernetes – what are the key elements, what are they responsible for and what is the typical usage of them. We will then have them all installed using the docker container provided as a playground by K8s team, and review the components deployed.
Glossary
Before we dive into setting up the components, you should get comfortable with some Kubernetes glossary.
Pod
Kubernetes targets the management of elastic applications that consist of multiple microservices communicating with each other. Often those microservices are tightly coupled forming a group of containers that would typically, in a non-containerized setup run together on one server. This group, the smallest unit that can be scheduled to be deployed through K8s is called a pod.
This group of containers would share storage, Linux namespaces, cgroups, IP addresses. These are co-located, hence share resources and are always scheduled together.
Pods are not intended to live long. They are created, destroyed and re-created on demand, based on the state of the server and the service itself.
Service
As pods have a short lifetime, there is not guarantee about the IP address they are served on. This could make the communication of microservices hard.
Imagine a typical Frontend communication with Backend services.
Hence K8s has introduced the concept of a service, which is an abstraction on top of a number of pods, typically requiring to run a proxy on top, for other services to communicate with it via a Virtual IP address.
This is where you can configure load balancing for your numerous pods and expose them via a service.
Kubernetes components
A K8s setup consists of several parts, some of them optional, some mandatory for the whole system to function.
This is a high-level diagram of the architecture
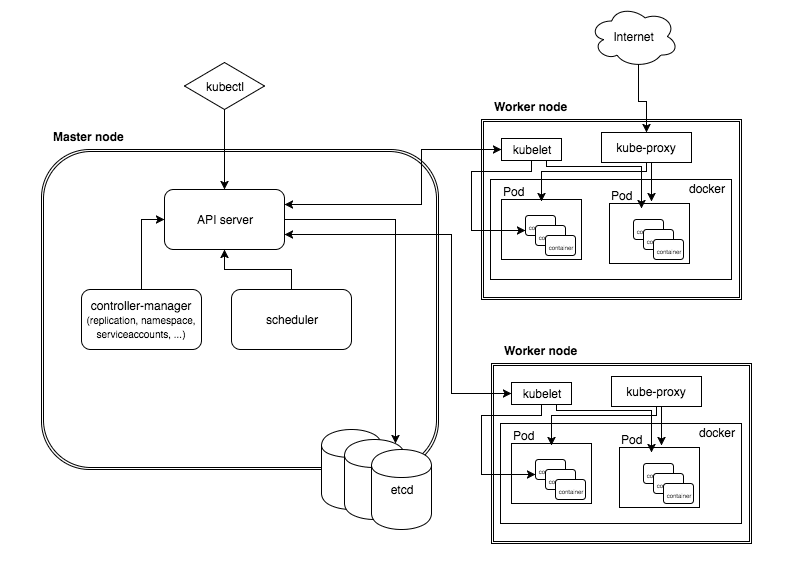
Let’s have a look into each of the component’s responsibilities.
Master Node
The master node is responsible for the management of Kubernetes cluster. This is the entry point of all administrative tasks. The master node is the one taking care of orchestrating the worker nodes, where the actual services are running.
Let's dive into each of the components of the master node.
API server
The API server is the entry points for all the REST commands used to control the cluster. It processes the REST requests, validates them, and executes the bound business logic. The result state has to be persisted somewhere, and that brings us to the next component of the master node.
etcd storage
etcd is a simple, distributed, consistent key-value store. It’s mainly used for shared configuration and service discovery.
It provides a REST API for CRUD operations as well as an interface to register watchers on specific nodes, which enables a reliable way to notify the rest of the cluster about configuration changes.
An example of data stored by Kubernetes in etcd is jobs being scheduled, created and deployed, pod/service details and state, namespaces and replication information, etc.
scheduler
The deployment of configured pods and services onto the nodes happens thanks to the scheduler component.
The scheduler has the information regarding resources available on the members of the cluster, as well as the ones required for the configured service to run and hence is able to decide where to deploy a specific service.
controller-manager
Optionally you can run different kinds of controllers inside the master node. controller-manager is a daemon embedding those.
A controller uses apiserver to watch the shared state of the cluster and makes corrective changes to the current state to change it to the desired one.
An example of such a controller is the Replication controller, which takes care of the number of pods in the system. The replication factor is configured by the user, and it's the controller’s responsibility to recreate a failed pod or remove an extra-scheduled one.
Other examples of controllers are endpoints controller, namespace controller, and serviceaccounts controller, but we will not dive into details here.
Worker node
The pods are run here, so the worker node contains all the necessary services to manage the networking between the containers, communicate with the master node, and assign resources to the containers scheduled.
Docker
Docker runs on each of the worker nodes, and runs the configured pods. It takes care of downloading the images and starting the containers.
kubelet
kubelet gets the configuration of a pod from the apiserver and ensures that the described containers are up and running. This is the worker service that’s responsible for communicating with the master node.
It also communicates with etcd, to get information about services and write the details about newly created ones.
kube-proxy
kube-proxy acts as a network proxy and a load balancer for a service on a single worker node. It takes care of the network routing for TCP and UDP packets.
kubectl
And the final bit – a command line tool to communicate with the API service and send commands to the master node.
Sample setup
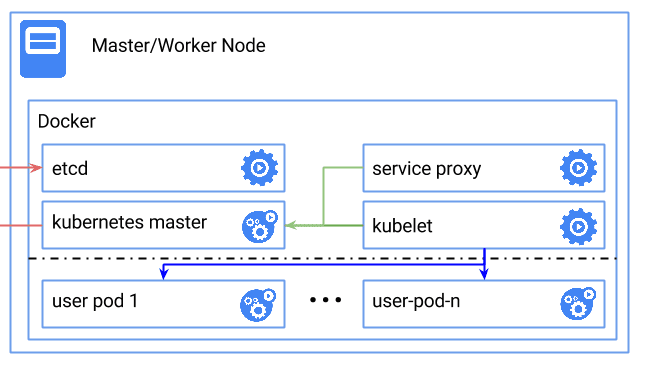
The easiest way to start is to run all the described components inside a docker container.
Kubernetes provides a ready docker instance that would start up other parts of the system, and eventually, the picture of the setup looks like this
Prerequisites
The only thing you need for this setup is a docker daemon. The rest is taken care of the docker image.
This example is for educational purposes. In a normal setup, you would have the master and worker(s) separated and possibly running behind a firewall.
Dockerized deployment
Let’s start by retrieving and setting the latest version of Kubernetes as an environmental variable, so that we can use it in later calls.
Run this command on the host server, where the docker daemon is running.
export K8S_VERSION=$(curl -sS https://storage.googleapis.com/kubernetes-release/release/stable.txt)
This will make a request to the kubernetes stable release file and set the environmental variable K8_VERSION to the latest stable release version
We also assume that the host you are running on has the amd64 architecture(you can refer to other architectures in this discussion).
Exporting the system architecture as a variable on the host server
export ARCH=amd64
Next, we will run the hypercube docker instance, which will itself take care of downloading and starting the rest of the Kubernetes components.
The hypercube container is given special, extended privileges so that it can access resources of the host, as well as run other containers on the host.
That is achieved by, first of all, mapping the /root, /sys and /var/run of the host to the container directories in the read-write mode.
Secondly, the container is run with the --privileged option which grants access to all devices of the host to the container and allows starting new containers on the machine. This flag also requires the /var/lib/docker path to be a volume.
--net=host and --pid=host are allowing access to the network and PID namespace of the host basically allowing docker that we are running to see and control processed on the host and reuse the network configurations.
So, putting that all together, and specifying the gcr.io/google_containers/hyperkube-${ARCH}:${K8S_VERSION} image as well as the properties of the hypercube, we get to run the following command on the host:
docker run -d \
--volume=/:/rootfs:ro \
--volume=/sys:/sys:rw \
--volume=/var/lib/docker/:/var/lib/docker:rw \
--volume=/var/lib/kubelet/:/var/lib/kubelet:rw \
--volume=/var/run:/var/run:rw \
--net=host \
--pid=host \
--name=hyperkube-installer \
--privileged \
gcr.io/google_containers/hyperkube-${ARCH}:${K8S_VERSION} \
/hyperkube kubelet \
--containerized \
--hostname-override=127.0.0.1 \
--api-servers=http://localhost:8080 \
--config=/etc/kubernetes/manifests \
--allow-privileged --v=2
The started container runs the hyperkube binary which itself starts all the components we discussed so far.
This might take a moment, so after a while if you run the docker ps command, you should see an output similar to this:
docker ps
CONTAINER ID        IMAGE                                             COMMAND                  CREATED              STATUS              PORTS               NAMES
f267d9d1a24d        gcr.io/google_containers/hyperkube-amd64:v1.2.4   "/setup-files.sh IP:1"   About a minute ago   Up About a minute                       k8s_setup.eb843218_k8s-master-127.0.0.1_default_721118f359852533089009890ac21208_3765dd28
09fc01b04ba6        gcr.io/google_containers/hyperkube-amd64:v1.2.4   "/hyperkube scheduler"   About a minute ago   Up About a minute                       k8s_scheduler.dbfcc0_k8s-master-127.0.0.1_default_721118f359852533089009890ac21208_28c46205
4ac31a50c2bb        gcr.io/google_containers/hyperkube-amd64:v1.2.4   "/hyperkube apiserver"   About a minute ago   Up About a minute                       k8s_apiserver.1082c1e0_k8s-master-127.0.0.1_default_721118f359852533089009890ac21208_d5d50d58
375857e4dec5        gcr.io/google_containers/hyperkube-amd64:v1.2.4   "/hyperkube proxy --m"   About a minute ago   Up About a minute                       k8s_kube-proxy.a1014855_k8s-proxy-127.0.0.1_default_0cda4a663a246109121ac68b3c7e82b7_890d5a95
8b19a89a2695        gcr.io/google_containers/etcd:2.2.1               "/usr/local/bin/etcd "   About a minute ago   Up About a minute                       k8s_etcd.7e452b0b_k8s-etcd-127.0.0.1_default_1df6a8b4d6e129d5ed8840e370203c11_9e621ad8
3d6c9d9c60cd        gcr.io/google_containers/hyperkube-amd64:v1.2.4   "/hyperkube controlle"   About a minute ago   Up About a minute                       k8s_controller-manager.76914b67_k8s-master-127.0.0.1_default_721118f359852533089009890ac21208_cb0abac9
155351af7913        gcr.io/google_containers/pause:2.0                "/pause"                 About a minute ago   Up About a minute                       k8s_POD.6059dfa2_k8s-master-127.0.0.1_default_721118f359852533089009890ac21208_4365c22c
84b32314d407        gcr.io/google_containers/pause:2.0                "/pause"                 About a minute ago   Up About a minute                       k8s_POD.6059dfa2_k8s-etcd-127.0.0.1_default_1df6a8b4d6e129d5ed8840e370203c11_1003b43b
5e44113ee806        gcr.io/google_containers/pause:2.0                "/pause"                 About a minute ago   Up About a minute                       k8s_POD.6059dfa2_k8s-proxy-127.0.0.1_default_0cda4a663a246109121ac68b3c7e82b7_f37316b9
197cd920afc5        gcr.io/google_containers/hyperkube-amd64:v1.2.4   "/hyperkube kubelet -"   About a minute ago   Up About a minute                       hyperkube-installer
Looking at the names of the docker instances, it’s not hard to guess what each component stands for:
- The first container in the list
k8s_setup.k8s-master-127.0.0.1, takes care of setting up the master node, what it does, can be drilled down to creating of - the basic auth file for access to the Kubernetes api server
- service tokens for accessing the Kubernetes api server
- The CA cert and keys for HTTPS access to the Kubernetes api server
- You can see in the list, containers for each of the components we discussed –
k8s_scheduler,k8s_apiserver,k8s_kube-proxy,k8s_etcdandk8s_controller-manager - The next 3 pod containers are so-call “pause” containers, which are used to setup the networking initially, before launching the real container
- And finally the installer container we started to put this all together
Deploying new pod
Now that we have a small Kubernetes setup on our host, we should get the command line tool to deploy our first pod and service.
We will use the installer docker container to demonstrate the kubectl in action.
Enter the installer container using
docker exec -it hyperkube-installer /bin/bash
Export the K8S_VERSION variable again, while being inside the installer container
export K8S_VERSION=$(curl -sS https://storage.googleapis.com/kubernetes-release/release/stable.txt)
The following command will download the correct version of kubectl and place it inside the /usr/bin/kubectl
curl -sSL "http://storage.googleapis.com/kubernetes-release/release/$K8S_VERSION/bin/linux/amd64/kubectl" > /usr/bin/kubectl
Make it executable
chmod +x /usr/bin/kubectl
Now you should be able to run a simple kubectl version command and get a similar output
kubectl version
Client Version: version.Info{Major:"1", Minor:"2", GitVersion:"v1.2.4", GitCommit:"3eed1e3be6848b877ff80a93da3785d9034d0a4f", GitTreeState:"clean"}
Server Version: version.Info{Major:"1", Minor:"2", GitVersion:"v1.2.4", GitCommit:"3eed1e3be6848b877ff80a93da3785d9034d0a4f", GitTreeState:"clean"}
To list the nodes
kubectl get nodes
NAME STATUS AGE
127.0.0.1 Ready 1d
And finally, to deploy a sample nginx as a pod
kubectl run nginx --image=nginx --port=80
You can now exit the hyperkube-installer container we are in, using CTRL+D, and wait a bit for the nginx image to get downloaded. If you run the docker ps command on the host again, you will see 2 more containers appearing
docker ps
CONTAINER ID        IMAGE                                             COMMAND                  CREATED              STATUS              PORTS               NAMES
b99ae41911d9        nginx                                             "nginx -g 'daemon off"   31 minutes ago      Up 31 minutes                           k8s_nginx.c8c72836_nginx-198147104-sdqet_default_791e301f-358b-11e6-94ba-080027faa9e4_cde648eb
efff5259a994        gcr.io/google_containers/pause:2.0                "/pause"                 31 minutes ago      Up 31 minutes                           k8s_POD.cf58006d_nginx-198147104-sdqet_default_791e301f-358b-11e6-94ba-080027faa9e4_3e7040c5
As you can see, 2 containers have been created with our kubectl run command – the first one is the actual nginx container created and deployed by Kubernetes. The second one, as explained above, is an infrastructure container – this is the first container that is started for a pod, it sets up the network for the pod, then pauses. All other containers for a specific pod, join the network set up by this container.
In order to access the deployed nginx container, we would need to declare it as a service and obtain a concrete IP address that got assigned to it.
Login back to our playground container
docker exec -it hyperkube-installer /bin/bash
The following command exposes the nginx deployment as a service and maps port 80 of the nginx service to the port 8080 of the host
kubectl expose deployment nginx --port=8080 --target-port=80
Now, to see the list of services, we have we run kubectl get service nginx. The output should be similar to
NAME      CLUSTER-IP   EXTERNAL-IP   PORT(S)    AGE
nginx     10.0.0.185                 8080/TCP   12s
You can see the list of services, with assigned IP address and exposed ports.
Let’s take the IP address only and set it to a variable to try accessing nginx.
ip=$(kubectl get svc nginx --template=)
Now that the ip variable is pointing to the correct service (in this case that would be 10.0.0.185), we can run the curl for the default nginx page
curl "http://$ip:8080/"
The output should contain the usual nginx welcome page.
Summary
This guide gives you a high-level overview of the architecture and moving parts of a Kubernetes setup. We deployed a mini-kubernetes setup inside a docker container, and deployed our fist pod.
In order to get a deeper understanding, you are highly encouraged to deploy each of the components separately and setup their communication from scratch.
SHARE:


