
Unit tests are awesome. They not only improve the overall quality of your code, they also make it easier for you to test individual pieces of your app without having to manually run your app. Given Apple's extensive support for unit tests in Xcode and Swift, it's surprising that so few iOS developers write unit tests. It is my hope that after completing this simple tutorial, you will see just how easy it to get started with unit tests in Swift.
What is a unit test?
A unit test is a function you write that tests something about your app. A good unit test is small. It tests just one thing in isolation. For example, if your app adds up the total amount of time your user spent doing something, you might write a test to check if this total is correct. Unit tests should be automated, and they should run fast. That way, you can run them right after you build your app to see if any code changes you introduced broke your app.
We call these sorts problems regressions. It means your app has gone backwards in terms of functionality. In other words, some new change caused a problem and broke an existing feature. Unit tests are really helpful when it comes to stopping regressions. They test your functions to see if they produce the correct output from a set of given inputs. It’s like having a room full of robots testing your app far faster than any human ever could.
What sorts of things can you test?
Pretty much everything. If it is a product of your code, you can test it. In our iOS projects, we have written unit tests for all sorts of things. Here are some more examples.
-
Making sure a view controller has all of its outlets hooked up so our app doesn't crash unexpectedly when the controller is presented.
-
Making sure text that is only supposed to appear on a Monday only appears on a Monday without having to wait until next Monday to find out.
-
Making sure a tableview has a cell registered for a nib file that is external to it, and that it won't cause the app to crash when the tableview tries to get the cell.
If any of those scenarios sound familiar, wouldn't it be nice to have a way to know with near 100% certainty that there won't be any problems before you run the app? That is what unit tests are for.
Setting up your project
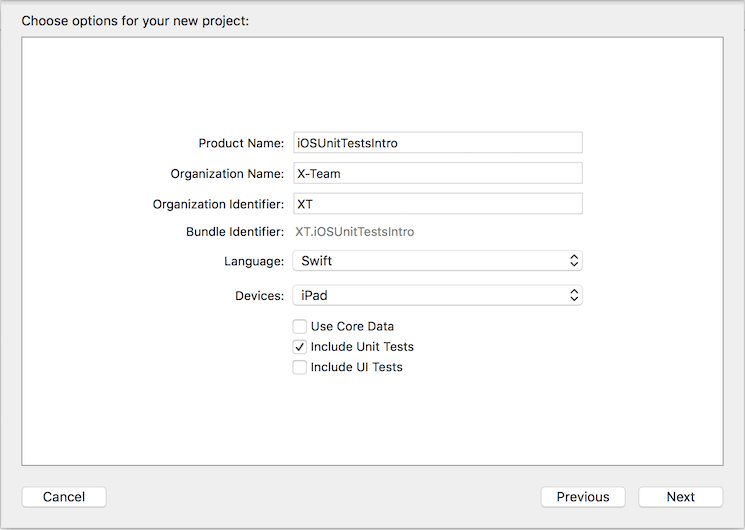
To get started, we are going to create a blank iOS project. You will want to have the include unit tests checkbox checked. This does all of the work of setting up unit tests, and a unit test target, for you. You will also see a checkbox for UITests. We’ll talk about that in a future article. They are another kind of test that looks specifically at the UI components of your app. For now, we are going to leave that box unchecked.
But what if I already have a project, and I want to add tests to it?
Most of us do. That’s probably how you stumbled upon this article. Never fear! It’s actually really easy.
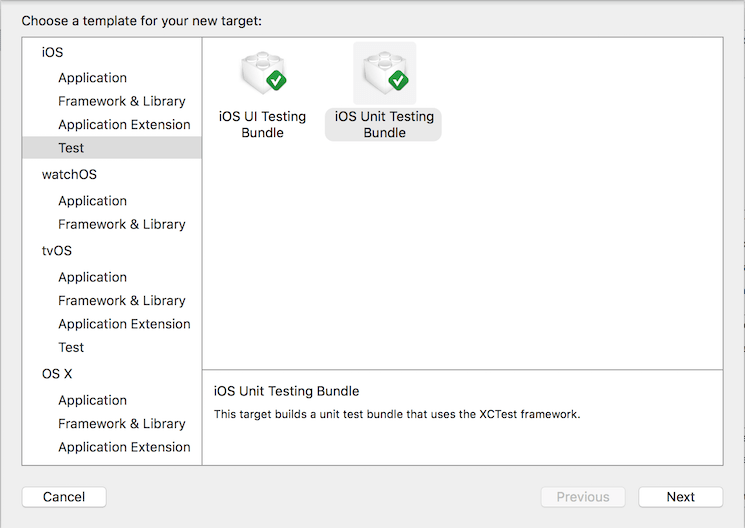
How To Add Unit Tests To An Existing iOS Project
- Go to File -> New -> Target.
- Select iOS Unit Testing Bundle.
- Click Next
This basically does the same thing the project setup wizard does when you check the include unit tests box.
For those of you new to iOS, a target is an end product that gets built and ultimately deployed to a device. Each app for each platform you create is a target. Unit tests are also a target, but they don’t get shipped with your app when it hits the App Store. They run on the device as a separate entity. None of your test code will ever make it to your users’ devices, and that’s exactly how you want it to be. Unit tests are for you, the developer, to ensure that your app works as expected.
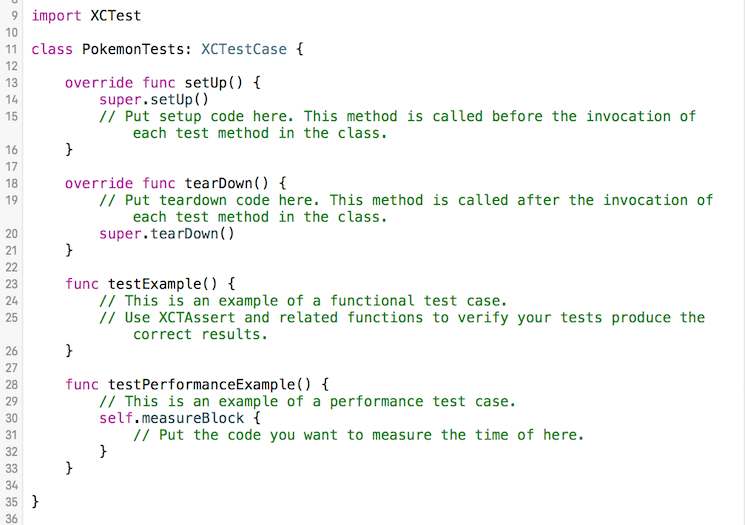
A Closer Look At Apple’s Example Test Case
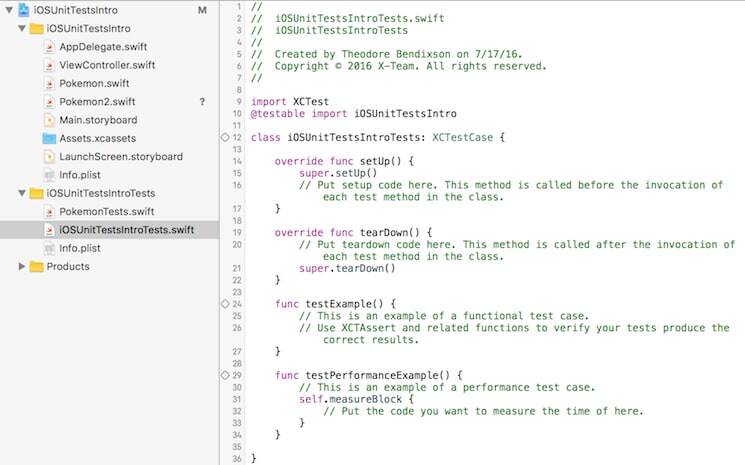
When your app is setup for testing, you will see a folder with your tests in it. Xcode sets up a template test for you, just so you can get a sense of how to do it yourself. There are a few things you may notice right away.
-
All unit tests rely on Apple’s XCTest framework. Every test case you write will import it.
There is this extra @testable import declaration. This is Apple’s way of helping you import your app code into the unit test target so you can run your tests. When you use @testable, there is no need to give any files in your application membership into your test target. Apple does this for you, creating a nice and clean separation. -
To create a unit test, you will be subclassing a thing called an XCTestCase. Test cases have two methods you override to set your tests up and to tear your tests down when they are finished running. We will go over that in more detail later, but the basic idea is to create a nice clean slate before you run every test. No unit test should ever depend on state created from a previous unit test. Otherwise, it is hard to know if you have setup the correct conditions to test your function.
-
What are those diamond thingies? Try putting your mouse cursor over them. They are an inline button that runs your test. Apple has setup an example test. If you hover over the diamond next to it, you can click to run the test. Your app and its test target will get built, the test will run, and you will see the test succeeded notification. Cool! If you want to run all of the tests in this test case, click the button next to the class declaration.
Offhand, this example test isn’t particularly useful. It doesn’t test anything. It just gives you a template to understand how to write tests. To see the real power of unit tests, we need to create something to test. If you want to, you can keep this example file for reference. Otherwise, feel free to get rid of it. We will end up building something like it later on.
Pokemon, Gonna Test This Brawl!
Pokemon Go is all the rage these days, so let’s test a familiar idea. We will test that a Water Pokemon’s attack is more powerful against a Fire Pokemon. To do that, we will need to create some models.
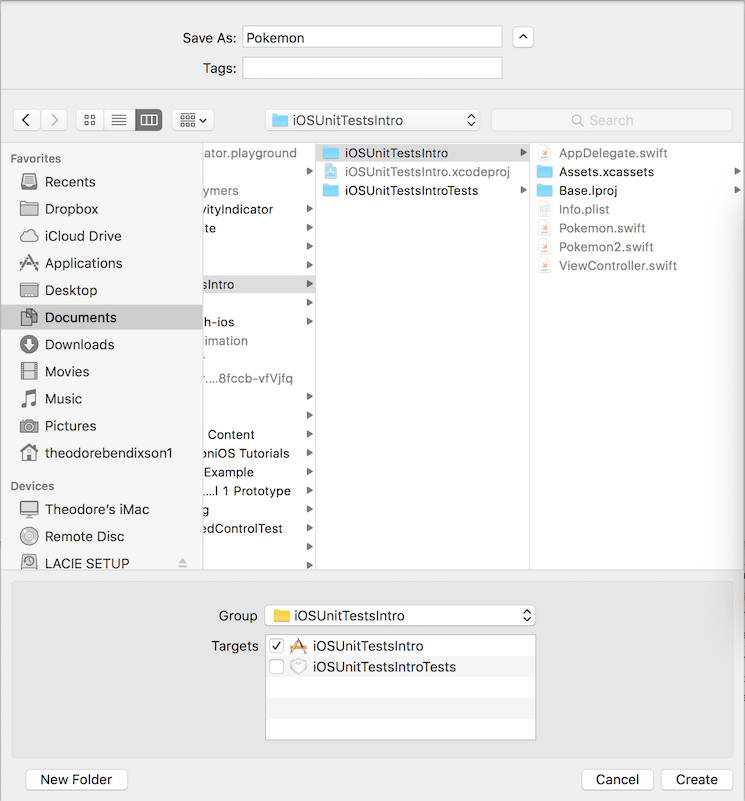
Go to File -> New File, and create a blank Swift file with membership in your main application target.
Click Next where you will be taken to a file dialog. Name the file Pokemon and save it into your main application’s source code folder. Also, make sure that this file is only a part of your main application target. Ever since Apple introduced the @testable import directive, there is no need to give your app code membership in the unit test target. @testable import handles this.
At this point, you will have a blank file called Pokemon. Because we won’t have that many new models, we will store all of the code we plan to test in this one file.
Creating Pokemon From Scratch
Let’s start with a basic Pokemon entity. So far, we know that Pokemon have health, so let’s create a Pokemon class with a default health value of 100 health points.
import Foundation

class Pokemon{
    var health:Int = 100
}
Okay, this works. But it’s not terribly interesting. After all, Pokemon are well known for having different types and different attacks. So let’s create those.
enum PokemonType{
    case Neutral
    case Fire
    case Water
}

enum PokemonAttackType{
    case Normal
    case Fire
    case Water
}
Enumerations are a useful way to create these limited sorts of sets. A single Pokemon can only have one kind of type and one kind of attack, and they are exclusive. So a fire Pokemon can’t be a Water Pokemon or vice versa. Now let’s add those properties to our Pokemon.
class Pokemon{

    var type:PokemonType
    var attackType:PokemonAttackType
    var health:Int = 100

    init(type:PokemonType, attackType:PokemonAttackType){
        self.type = type
        self.attackType = attackType
    }

}
Cool. With this code, we can now create a Pokemon with any type and attack using the Pokemon initializer. So a Squirtle would look like this:
let squirtle = Pokemon(type: .Water, attackType: .Water)
When Pokemon Attack, Episode 5000
But something is still missing. Although we have different Pokemon types and different Pokemon attacks, we still don’t have a way for Pokemon to attack each other. So let’s add an attack function to our Pokemon class.
class Pokemon{

    var type:PokemonType
    var attackType:PokemonAttackType
    var health:Int = 100

    init(type:PokemonType, attackType:PokemonAttackType){
        self.type = type
        self.attackType = attackType
    }

    func attack(enemy:Pokemon){

        var damage = 30

        if enemy.type == .Fire && attackType == .Water{
            damage = 60
        }

        if enemy.type == .Water && attackType == .Fire{
            damage = 10
        }

        enemy.health = enemy.health - damage

    }


}
When you break it down, the attack function works as you might expect. We start with a base amount of damage dealt. Then, depending on what we are fighting and which attack our Pokemon brings to the table, we either amplify or dampen the damage dealt. Finally, we take that damage and subtract it from the enemy’s health. That’s why the enemy Pokemon is passed into the function. We need to take away its health at the end.
Just in case you missed something, here is all of the code we just wrote to define our Pokemon, its types, and the kinds of attacks it can do.
import Foundation

class Pokemon{

    var type:PokemonType
    var attackType:PokemonAttackType
    var health:Int = 100

    init(type:PokemonType, attackType:PokemonAttackType){
        self.type = type
        self.attackType = attackType
    }

    func attack(enemy:Pokemon){

        var damage = 30

        if enemy.type == .Fire && attackType == .Water{
            damage = 60
        }

        if enemy.type == .Water && attackType == .Fire{
            damage = 10
        }

        enemy.health = enemy.health - damage

    }


}

enum PokemonType{
    case Neutral
    case Fire
    case Water
}

enum PokemonAttackType{
    case Normal
    case Fire
    case Water
}
Creating A Unit Test Case
Remember what we are testing. We want to test that a water attack does more damage against a fire Pokemon than it does against a water Pokemon. We will need to keep that in mind as we setup our test case.
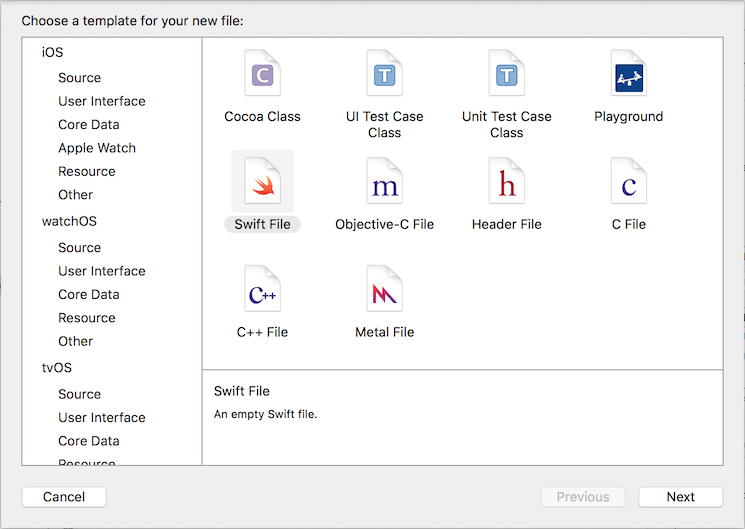
To create new unit case in iOS, go to File -> New -> File, and then select Unit Test Case Class.
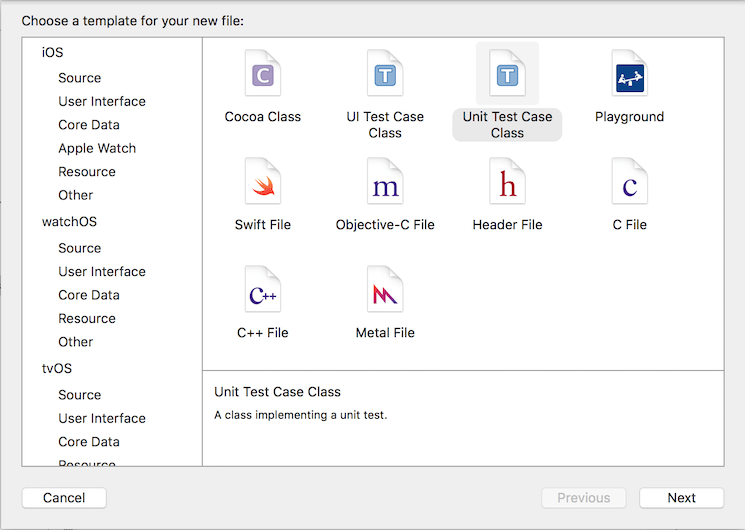
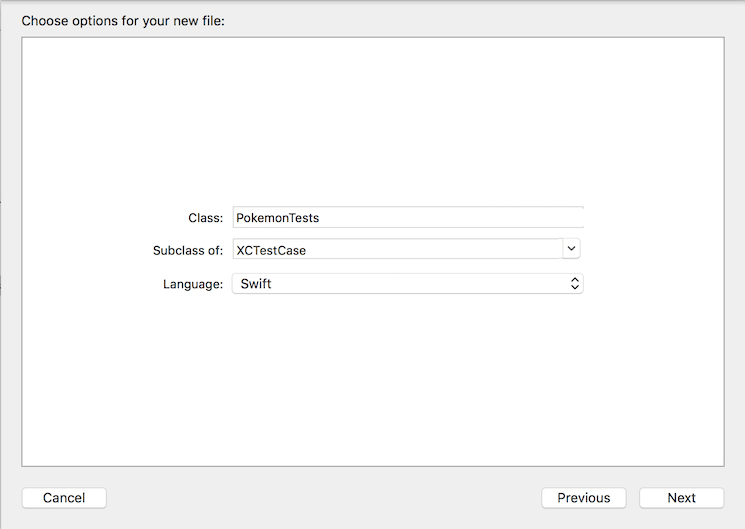
Doing so creates a template just like the one you got with your project. In our case, we want to name the file to correspond with the new Pokemon-related data structures we have introduced. That is why we will name it PokemonTests.
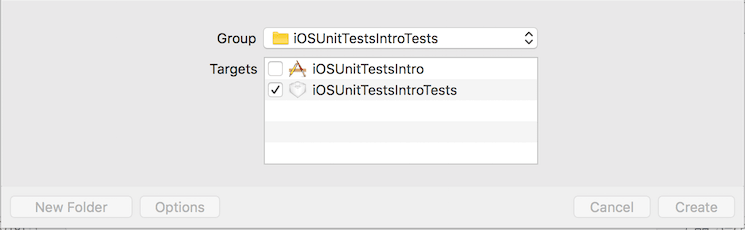
When you click Next, you will be taken to another screen where you will decide the new PokemonTests file should go. Make sure you create it in your Unit Tests Group, and also make sure it is only a part of the unit test target, not the app target. As it was said earlier, test cases don’t run inside of the actual application target. They belong in the test target.
Click Create, and you should see something pretty familiar. It’s another test case, but this time it’s for testing our Pokemon. Most of the work is done for us, but we still need to add a few things before we can pit our different Pokemon types against each other in a test environment.
- Use @testable to import your application code. In our case, we will write @testable import iOSUnitTestsIntro. You do this before you declare your test case class, PokemonTests.
	import XCTest
	@testable import iOSUnitTestsIntro
- Declare the things you want to test. We are going to have a water Pokemon attack a fire Pokemon and another water Pokemon. We will declare them as implicitly unwrapped optionals (!) because by the time our test case has set them up, we can guarantee they will be initialized and ready to fight one another. Putting a ! in front of a variable in Swift means your code can expect the variable to always have a value when you use it.
class PokemonTests: XCTestCase {
    var squirtle:Pokemon!
    var charmander:Pokemon!
    var psyduck:Pokemon!
}
- To setup your Pokemon under test, we will override the setup() method. The Pokemon will get setup with their corresponding types and attack types. Water Pokemon will have water attacks and fire Pokemon will have fire attacks.
class PokemonTests: XCTestCase {

    var squirtle:Pokemon!
    var charmander:Pokemon!
    var psyduck:Pokemon!

    override func setUp() {
        super.setUp()
        // Put setup code here. This method is called before the invocation of each test method in the class.
        squirtle = Pokemon(type: .Water, attackType: .Water)
        charmander = Pokemon(type: .Fire, attackType: .Fire)
        psyduck = Pokemon(type: .Water, attackType: .Water)
    }

}
- We also want to make sure we clear everything out when each test finishes running. To that end, we need to override the tearDown() function on XCTestCase. Here we will simply set our Pokemon to nil, removing any state they had. Here’s what the test case looks like after going through that work.
class PokemonTests: XCTestCase {

    var squirtle:Pokemon!
    var charmander:Pokemon!
    var psyduck:Pokemon!

    override func setUp() {
        super.setUp()
        // Put setup code here. This method is called before the invocation of each test method in the class.
        squirtle = Pokemon(type: .Water, attackType: .Water)
        charmander = Pokemon(type: .Fire, attackType: .Fire)
        psyduck = Pokemon(type: .Water, attackType: .Water)
    }

    override func tearDown() {
        // Put teardown code here. This method is called after the invocation of each test method in the class.
        super.tearDown()
        squirtle = nil
        charmander = nil
        psyduck = nil
    }

}
What do setup and tear down do?
Every time a test runs, both the setup and tear down functions are called. setup() happens before the test runs (its sets the test up), and tearDown() happens right after the test runs. To simplify things, we initialize the Pokemon we want to test in the setup function, and we clear them out in the tearDown function. This ensures a clean baseline state every time new tests start up. Every separate function that is a test will have these functions called before and after it is run.
How a function becomes a test
You may have noticed that you can’t just add a function to your test case and have it become a test you can run. That’s because, with iOS unit tests, the actual word “test” is kind of special. If a function starts with the word “test,” it becomes a test. Try it out. Create a function called “testFoo()” and see what happens. Create another function called “foo(),” and you will see that it doesn’t get turned into a test. Neat!
Writing Your First Real Test
Now that we’ve setup a test case to pit our Pokemon against each other, we need to write a test that demonstrates how a water Pokemon does more damage against a fire Pokemon than it does against another water Pokemon. So we will name our first test “testThatAWaterPokemonDoesMoreDamageToAFirePokemon()”
Yeeesh 😬. That seems like a lot of text to describe a function. I would still argue that it’s totally necessary. This is a very specific sort of thing we are testing, so the language needs to be specific to match it. If you find yourself having a hard time naming your test function, you can always write some extra comments below so other people you’re working with can understand what the test is testing.
Start the attack!
All programming is simulation. In order to test that a water Pokemon does more damage against a fire Pokemon, we need to simulate an attack or two. So let’s have our Squirtle attack our Charmander. Inside of testThatAWaterPokemonDoesMoreDamageToAFirePokemon(), which is inside of PokemonTests, add this code at the beginning.
//1. Have Squirtle Attack Charmander
squirtle.attack(charmander)
Alright, that’s only the first part of the test. Now that Charmander is wounded, we need to have our Squirtle attack a Pokemon of a different type. So let’s have him attack Psyduck.
//It was Super Effective!
//2. Now Have Squirtle Attack Psyduck
squirtle.attack(psyduck)
At this point, we have two Pokemon that were attacked. One of them is a fire type, and another is a water type. If the thing we are testing is true (that water Pokemon do more damage to fire Pokemon), then we should expect the fire type to have taken more damage than the water type. In other words, the Charmander should have less health than the Psyduck.
//Oooh. That had to hurt.

//Who took more damage? Charmander or Psyduck?

//If a Water Pokemon Does More Damage To A Fire Pokemon,
//We would expect Charmander to have less health than Psyduck.

//3. Test it
XCTAssertTrue(charmander.health < psyduck.health)
Assertions
That last line of code you see is an assertion. It is a pass/fail sort of test. If the assertion passes, your test will pass. If the assertion fails, your test will fail. Try it out by running this test (tapping on the diamond next to the test function you have created). You will see the test passes because Charmander has less health than Psyduck after the attack.
A simulated regression
Now let’s say someone from your team unintentionally made a change to your Pokemon class. They removed the lines of code that amplify the damage taken when a water attack is directed toward a fire Pokemon. To simulate this, go into your Pokemon class and comment out those lines (lines 26 - 28).
Run your test again. You should see that it has failed. The test failed because water attacks no longer do extra damage against fire Pokemon. After the two attacks, both the Charmander and the Psyduck have the same health. You asserted that Charmander's health would be less than Psyduck's heath, and it wasn't. So your test failed.
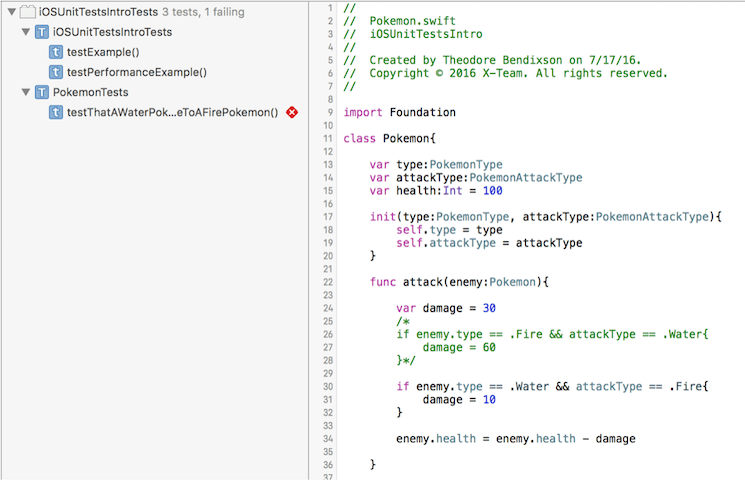
This is a really great thing to know! It’s no fun that your tests are failing, but it’s better to find out about a regression this way than to find out from your customers. Now you know exactly what part of your app is failing and what you have to do to fix it. Uncomment those lines, beef up that water attack, run your test, and it will succeed. 🌊💪
Let’s take a step back and look at everything we have covered so far
- How to setup your Xcode project to support unit tests.
- How to make your app code available for unit testing (@testable import yourApp)
- How to create individual unit test cases.
- How to write a basic iOS Unit test.
- How awesome it is to be protected from regressions.
There is so much more to say about iOS unit tests. When you start writing tests, you will want to test everything, and that includes many other parts of your app. Don’t get discouraged if you don’t know how to test it all right away. View Controllers are particularly thorny and difficult to test. You want to move as much code out of them as you can. Of course, that’s a whole other topic that really deserves its own article. We’ll come back to it later.
Thanks for reading, and if you enjoyed this, check out the example source code on github. . Also, take a look at Ted Bendixson’s iOS blog
SHARE:


