
These days, every company needs some kind of web API. It’s not just for people who want to open their platforms to developers anymore. With the rise of Javascript SPA (Single Page Application) frameworks like AngularJS, Ember.js or React, software companies need to build internal web APIs for themselves too.
And that’s not even the main reason why you must know how to create web APIs. More and more people use the Internet using only what fits in their pocket: their smartphone. Last year, Google confirmed that there were more searches on mobile than desktop. You obviously know what that means. More mobile users mean more users for mobile applications that transform the mobile experience and save us from clunky non-responsive websites. You also know what most mobile applications need in the backend to provide awesome features. Yes, you guessed it, web APIs.
Since learning how to create web APIs is becoming so fundamental, that’s what we are going to do today. Let’s build a simple Ruby API with Sinatra!
What is Sinatra?
Sinatra is a simple (yet powerful and flexible) micro web framework built with Ruby. It is described as a DSL by the makers and leverages the power of Ruby meta-programing to make the creation of web applications and web APIs a breeze.
Here are a few more facts about Sinatra:
- A few things made with Sinatra
- Built by Blake Mizerany with the support of Heroku, GitHub and Engine Yard. Today, Travis CI takes care of it.
Finally, why is it called Sinatra?
“[Thanks to] Frank Sinatra (chairman of the board) for having so much class he deserves a web-framework named after him.” – Sinatra website
What are we going to build with Sinatra?
To learn more about Sinatra and its simplicity, we are going to build a book library called BookList. It might sound simple like this, because it is. We will only have a Book model and the needed endpoints to interact with them. The simplicity of our application semantics will allow us to focus on the tricky parts of web API creation.
Let’s create something awesome, yet simple.
Setting up the environment
Before we can write any code, we need to make sure we have everything needed. That means having Ruby installed; any version above 2.0 will do.
If you are using a Linux distribution or OS X, you can get Ruby quickly with RVM (Ruby Version Manager) by using the two commands provided on their website.
If you are using Windows, I recommend setting up Virtual Box and using an easy Linux distribution like Ubuntu as a virtual machine. You can also use RubyInstaller, but you should really consider switching to Linux for Ruby development.
Creating the project
Now that we have Ruby, it’s time to create the project. Create the folder booklist wherever you want on your computer.
mkdir booklist
Then, create the file server.rb inside.
Due to the simplicity of our application, we will only use this file to store all of BookList source code.
cd booklist && touch server.rb
We are going to start with the bare minimum to run our application.
First, let’s install the Sinatra gem; later on, we will switch to using a Gemfile to simplify things.
gem install sinatra
And here is the content for the server.rb file.
# server.rb
require 'sinatra'

get '/' do
  'Welcome to BookList!'
end
Can’t get much simpler than that, right? Well, that’s actually enough to run our application.
Switch to your terminal, get inside the booklist folder if you haven’t yet and run:
ruby server.rb
Now open a browser and go to http://localhost:4567/ to checkout the result of our hard work:

Since Sinatra does not auto-reload the code when we make a change, kill your server for now. We will need to stop and restart the application any time we change something. If you don’t like this, checkout the Shotgun gem. It will require using Rack to run the application which goes beyond the scope of this tutorial.
Don’t forget to applaud Sinatra for its efforts.
== Sinatra has ended his set (crowd applauds)
Adding Mongoid and the Book model
We need some kind of persistence to store our books so let’s use MongoDB and the Mongoid gem. Not having to run migrations makes it much easier to use MongoDB for this tutorial, especially since we are not using Rails.
Let’s install MongoDB first. If you are using a Mac, just use Homebrew to install it:
brew update && brew install mongodb
Don’t forget to start MongoDB afterward, using the indications given by the Homebrew installer.
If you are using a different operating system, check the following links to install MongoDB (you should really use Homebrew on OS X though):
Don’t forget to start MongoDB once it has been installed. Homebrew will tell you how to do it after the installation. If you used something else to install it, check the appropriate documentation.
Once we have Mongodb, we need to install mongoid. To do so, we can just run the following command:
gem install mongoid
Next, we need a configuration file to tell our application where to find the MongoDB database. Create the file mongoid.config at the root of the application folder.
touch mongoid.config
And here is the content of this configuration file. We just specify where our database is running for the development environment.
development:
  clients:
    default:
      database: booklist_dev
      hosts:
        - localhost:27017
Now we need to update the server.rb file. We have three things to do to have functional models.
- Require
mongoid - Load the Mongoid configuration with
Mongoid.load! "mongoid.config" - Create a Ruby class that includes
Mongoid::Documentto create our model. We also need to define the fields for this model.
Here is the complete code for the server.rb file. Note the changes we just mentioned and pay close attention to the Book class.
We defined three fields for our books: title, author, isbn and excerpt. They don’t really matter; they are only here to give more life to our application. We also added some validations and a unique index on the ISBN which are meant to be unique.
# server.rb
require 'sinatra'
require 'mongoid'

# DB Setup
Mongoid.load! "mongoid.config"

# Models
class Book
  include Mongoid::Document

  field :title, type: String
  field :author, type: String
  field :isbn, type: String

  validates :title, presence: true
  validates :author, presence: true
  validates :isbn, presence: true

  index({ title: 'text' })
  index({ isbn:1 }, { unique: true, name: "isbn_index" })
end

# Endpoints
get '/ ' do
  'Welcome to BookList!'
end
If you’re familiar with Rails, you have probably used rails console before. We can easily access a similar console for our Sinatra application usingirb.
irb
Once you are inside, run the command require './server' to load the application inside irb:
irb(main):001:0> require './server'
=> true
Then run this one to create the indexes for the Book model:
Book.create_indexes
Finally, here are some sample books to populate the database. Just run each command in irb to get them persisted inside the MongoDB database.
Book.create(title:'Foundation', author:'Isaac Asimov', isbn:'0553293354')
Book.create(title:'Dune', author:'Frank Herbert', isbn:'0441172717')
Book.create(title:'Hyperion (Hyperion Cantos)', author:'Dan Simmons', isbn:'0553283685')
You should see something similar to this in your console:

Now, let’s add a Gemfile to keep our dependencies in one place.
Adding a Gemfile
Create the file Gemfile at the root of your application folder.
touch Gemfile
And put the following content in it:
# Gemfile
source 'https://rubygems.org'

gem 'sinatra'
gem 'mongoid'
# Required to use some advanced features of# Sinatra, like namespaces
gem 'sinatra-contrib'
We added one more gem sinatra-contrib to use the namespace feature later on. Finally, run bundle install to get everything in place. From now on, we will use bundle exec ruby server.rb to start our web API.
Note that we could also have created a config.ru file and run the application with Rack but to keep this tutorial short, simply using the bundle command is easier.
Adding a namespace
Creating a namespace for our API endpoints is important if we want to be able to version it and add a v2 later, for example.
The best practice here is usually to define the API version using HTTP headers. However, for tutorials, it’s much simpler to have it in the URL because we can easily test some endpoints using a browser.
Add the namespace /api/v1 after the root endpoint. We will add all the books endpoints inside this namespace block. We also need to requiresinatra-namespace to have the namespace feature.
# server.rb
require 'sinatra'
require "sinatra/namespace"
require'mongoid'

# DB Setup - Hidden

# Models - Hidden

# Endpoints
get '/' do
  'Welcome to BookList!'
end

namespace '/api/v1' do

end
We are done with preparing our API, and we can now create the five endpoints (Index, Show, Create, Update, Delete) for the books.
The Index Endpoint: GET /books
It’s time to start returning meaningful data from our web API, and the first thing we are going to do is add the index endpoint that will return a list of books from the database.
Basic
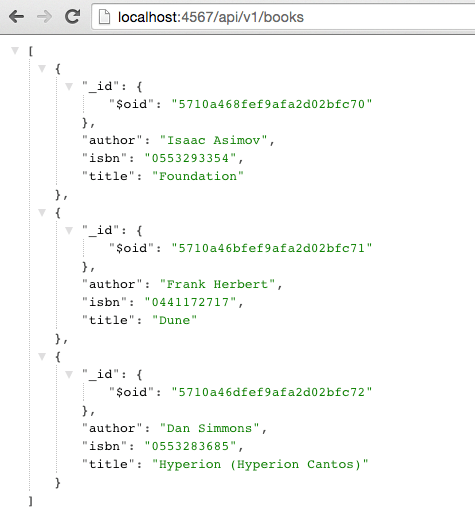
The minimum code for this endpoint is the following. Add it after the get '/' endpoint. All we do in this code is get all the books, serialize them to JSON and return them.
# Endpoints
# get '/'

namespace '/api/v1 ' do

  before do
    content_type 'application/json'
  end

  get '/books' do
    Book.all.to_json
  end
end
Start (or restart) the server with bundle exec ruby server.rb and head over to http://localhost:4567/api/v1/books.
Filtering
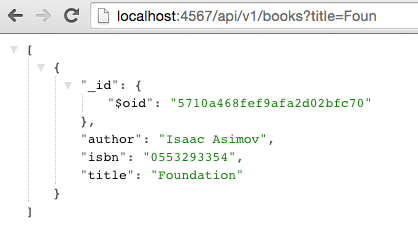
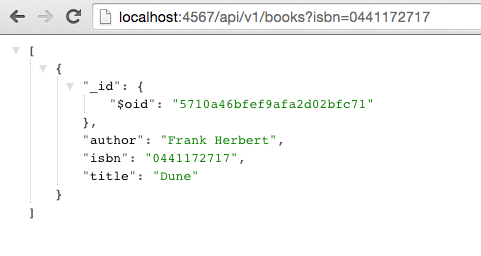
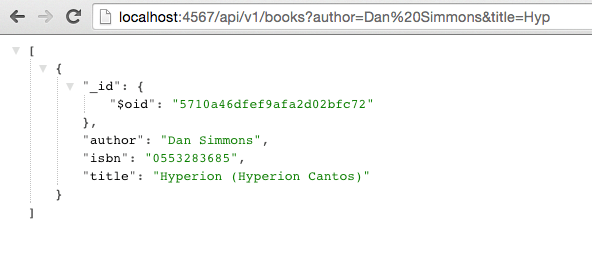
Just listing all the books is not enough. We want people to be able to search for any book by name, isbn, and author. How do we do that?
Well, we are going to use a combination of scopes and just use URL parameters to let the client filter the books.
First, we need to add some code to the Book model. We are going to add three scopes, title, isbn and author that will all take one parameter and return the books that match the given value. The title scope is a bit different from the two others since we want it to do partial matches. That’s why we use the regex /^#{title}/, where ^ indicates the beginning of the text, in order to get any book that starts with the given value.
This regex is case-sensitive which can easily be changed to /^#{title}/i to do case-insensitive searches. However, you should know that such searches would greatly impact the search performances in a real system.
# server.rb
# ...

# Models
class Book
  include Mongoid::Document

  field :title, type: String
  field :author, type: String
  field :isbn, type: String

  validates :title, presence: true
  validates :author, presence: true
  validates :isbn, presence: true

  index({ title: 'text' })
  index({ isbn:1 }, { unique: true, name: "isbn_index" })

  scope :title, -> (title) { where(title: /^#{title}/) }
  scope :isbn, -> (isbn) { where(isbn: isbn) }
  scope :author, -> (author) { where(author: author) }
end

# Endpoints
# ...
Next, we just need to add a small loop in the index endpoint that will go through each scope we defined and filter the books if a value was given for this specific scope.
get '/books' do
  books = Book.all

  [:title, :isbn, :author].each do |filter|
    books = books.send(filter, params[filter]) if params[filter]
  end

  books.to_json
end
Let’s run some tests on our filtering system.
When searching by name with Foun:
When searching by ISBN with 0441172717:
When searching by author and book name with Dan Simmons and Hyp:
There is one issue with the JSON documents we return. Because we are using MongoDB, the returned id looks like:
{
  "_id": {
    "$oid": "5710a468fef9afa2d02bfc70"
  }
}
Also, we don’t necessarily want to send all the book attributes to the client. To fix this, we are going to create a small Ruby class that will serialize books into JSON documents.
Creating a Book JSON serializer
Our serializer is going to be a PORO (Plain-Old Ruby Object) with one method called as_json that will be called whenever to_json is called on an instance.
# server.rb
# ...

# Models
class Book
  # ...
end

# Serializers
class BookSerializer
  def initialize(book)
    @book = book
  end

  def as_json(*)
    data = {
      id:@book.id.to_s,
      title:@book.title,
      author:@book.author,
      isbn:@book.isbn
    }
    data[:errors] = @book.errors if@book.errors.any?
    data
  end
end

# Endpoints
# ...
Let’s replace how we generate the JSON document in the index endpoint with our new class. We are going to loop through the book list and serialize each one of them before calling to_json on the whole array.
# server.rb
# ...
# Endpoints
# ...
namespace '/api/v1 ' do

  before do
    content_type 'application/json'
  end

  get '/books' do
    books = Book.all
    [:title, :isbn, :author].each do |filter|
      books = books.send(filter, params[filter]) if params[filter]
    end

    # We just change this from books.to_json to the following
    books.map { |book| BookSerializer.new(book) }.to_json
  end
end
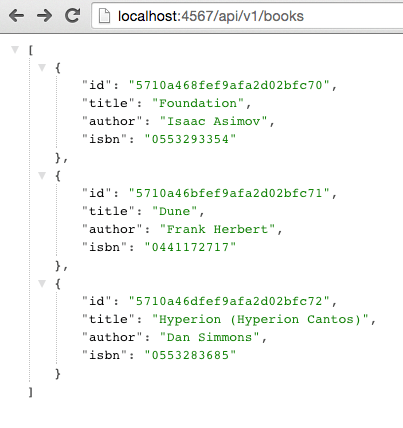
Restart your server, and you will now see the following in your browser.
The Show Endpoint: GET /books/abc
Now let’s add the show endpoint to access the details of one specific book. If the book is not found, we want to tell the client using the HTTP status404.
# server.rb
# ...
# Endpoints
# ...
namespace '/api/v1 ' do
  # Before
  # get /books

  get '/books/:id ' do |id|
    book = Book.where(id: id).first
    halt(404, { message:'Book Not Found'}.to_json) unless book
    BookSerializer.new(book).to_json
  end
end
And here is the result in a browser:

We will soon come back to this endpoint and clean it up using helper methods.
The Create Endpoint: POST /books
Being able to add books is an important feature for BookList. We will follow best practices for our create endpoint and return 201 to the client while using the Location header to tell the client where it can find the newly created book, if it wants to.
That means we need to be able to generate the base url so let’s add a helper to do this. We also need a helper to parse the request body and return an error to the client if the parsing fails.
# server.rb
# ...
# Endpoints
# ...
namespace '/api/v1 ' do
  # before

  helpers do
    def base_url
      @base_url ||= "#{request.env['rack.url_scheme']}://{request.env['HTTP_HOST']}"
    end

    def json_params
      begin
        JSON.parse(request.body.read)
      rescue
        halt 400, { message:'Invalid JSON' }.to_json
      end
    end
  end

  # get /books
  # get /books/:id
end
And here is our create endpoint which will try to save the book and return 201 with the resource URL in the Location header or return 422 if some validations failed.
# server.rb
# ...
# Endpoints
# ...

namespace '/api/v1' do
  # before
  # helpers
  # get /books
  # get /books/:id

  post '/books ' do
    book = Book.new(json_params)
    if book.save
      response.headers['Location'] = "#{base_url}/api/v1/books/#{book.id}"
      status 201
    else
      status 422
      body BookSerializer.new(book).to_json
    end
  end
end
Let’s run a few cURL requests to see if everything is handled correctly.
- With invalid JSON
curl -i -X POST -H "Content-Type: application/json" -d'{"title":"The Power Of Habit"' http://localhost:4567/api/v1/books
HTTP/1.1400 Bad Request
Content-Type: application/json
...

{"message":"Invalid JSON"}
- Without all the required parameters
curl -i -X POST -H "Content-Type: application/json" -d'{"title":"The Power Of Habit"}' http://localhost:4567/api/v1/books
HTTP/1.1422 Unprocessable Entity
Content-Type: application/json
...

{"id":"5710b79bfef9afa7a8e5db80","title":"The Power Of Habit","author":null,"isbn":null,"errors":{"author":["can't be blank"],"isbn":["can't be blank"]}}
- With valid parameters
curl -i -X POST -H "Content-Type: application/json" -d'{"title":"The Power Of Habit", "author":"Charles Duhigg", "isbn":"081298160X"}' http://localhost:4567/api/v1/books
HTTP/1.1201 Created
Content-Type: application/json
Location:http://localhost:4567/api/v1/books/5710b7b6fef9afa7a8e5db81
...
We basically just ran some tests that could, and should, be automated. Unfortunately, it would be too much for this tutorial. Write automated tests; they will help you sleep at night.
The Update Endpoint: PATCH /books/abc
Now let’s add a way to update our books. It’s a bit of a mix between the show and the create endpoint. We first retrieve the book, return 404 if we don’t find it, then update the attributes before returning the updated book.
# server.rb
# ...
# Endpoints
# ...

namespace '/api/v1' do
  # before
  # helpers
  # get /books
  # get /books/:id
  # post /books

  patch '/books/:id ' do |id|
    book = Book.where(id: id).first
    halt(404, { message:'Book Not Found'}.to_json) unless book
    if book.update_attributes(json_params)
      BookSerializer.new(book).to_json
    else
      status 422
      body BookSerializer.new(book).to_json
    end
  end
end
Once again, here are some cURL requests to test this endpoint. To run those, you will need to change the id used (mine is 5710b7b6fef9afa7a8e5db81) by an id you have in your database.
- Invalid JSON document
curl -i -X PATCH -H "Content-Type: application/json" -d ' {"title":"Foundation"' http://localhost:4567/api/v1/books/5710b7b6fef9afa7a8e5db81
HTTP/1.1400 Bad Request
Content-Type: application/json
...

{"message":"Invalid JSON"}
- Invalid Title
curl -i -X PATCH -H "Content-Type: application/json" -d '{"title":""}' http://localhost:4567/api/v1/books/5710b7b6fef9afa7a8e5db81
HTTP/1.1422 Unprocessable Entity
Content-Type: application/json
...

{"id":"5710a468fef9afa2d02bfc70","title":"","author":"Isaac Asimov","isbn":"0553293354","errors":{"title":["can't be blank"]}}
- Valid Title
curl -i -X PATCH -H "Content-Type: application/json" -d '{"title":"Foundation, Asimov"}' http://localhost:4567/api/v1/books/5710b7b6fef9afa7a8e5db81
HTTP/1.1200 OK
Content-Type: application/json
...

{"id":"5710b7b6fef9afa7a8e5db81","title":"Foundation, Asimov","author":"Isaac Asimov","isbn":"0553293354"}
Now we can attack the last endpoint we need to build, and that will allow us to delete books.
The Delete Endpoint: DELETE /books/abc
Finally, we are on the last endpoint we need. Here, we are going to retrieve a book, delete it if it exists and return 204 No Content to the client.
# server.rb
# ...
# Endpoints
# ...

namespace '/api/v1' do
  # before
  # helpers
  # get /books
  # get /books/:id
  # post /books
  # patch /books/:id

  delete '/books/:id' do |id|
    book = Book.where(id: id).first
    book.destroy if book
    status 204
  end
end
Here is a cURL request to delete our beloved Foundation from BookList. Replace the id with one from your database before running it.
curl - i -X DELETE -H "Content-Type: application/json" http://localhost:4567/api/v1/books/5710b7b6fef9afa7a8e5db81
HTTP/1.1204 No Content
...
Simplifying our endpoints
We can find a lot of repeated code in our endpoints. We can change that by using some helpers and refactoring a bit the code of each endpoint.
This is exactly what the code below does. By adding a few helpers (book, halt_if_not_found! and serialize) we were able to reduce and improve the code in our endpoints.
In the code below, you will find comments, describing what we changed and why.
# server.rb
# ...
# Endpoints
# ...

namespace '/api/v1' do

  before do
    content_type 'application/json'
  end

  helpers do
    def base_url
      @base_url ||= "#{request.env['rack.url_scheme']}://{request.env['HTTP_HOST']}"
    end

    def json_params
      begin
        JSON.parse(request.body.read)
      rescue
        halt 400, { message:'Invalid JSON' }.to_json
      end
    end

    # Using a method to access the book can save us
    # from a lot of repetitions and can be used
    # anywhere in the endpoints during the same
    # request
    def book
      @book ||= Book.where(id: params[:id]).first
    end

    # Since we used this code in both show and update
    # extracting it to a method make it easier and
    # less redundant
    def halt_if_not_found!
      halt(404, { message:'Book Not Found'}.to_json) unless book
    end

    def serialize(book)
      BookSerializer.new(book).to_json
    end
  end

  get '/books' do
    books = Book.all

    [:title, :isbn, :author].each do |filter|
      books = books.send(filter, params[filter]) if params[filter]
    end

    books.map { |book| BookSerializer.new(book) }.to_json
  end

  get '/books/:id' do |id|
    halt_if_not_found!
    serialize(book)
  end

  # We switched from an if...else statement
  # to using a guard clause which is much easier
  # to read and makes the flow more logical
  post '/books ' do
    book = Book.new(json_params)
    halt 422, serialize(book) unless book.save

    response.headers['Location'] = "#{base_url}/api/v1/books/#{book.id}"
    status 201
  end

  # Just like for the create endpoint,
  # we switched to a guard clause style to
  # check if the book is not found or if
  # the data is not valid
  patch '/books/:id' do |id|
    halt_if_not_found!
    halt 422, serialize(book) unless book.update_attributes(json_params)
    serialize(book)
  end

  delete '/books/:id' do |id|
    book.destroy if book
    status 204
  end
end
Going Further
If you’ve enjoyed this article, you might be interested in the book I’m currently writing titled Master Ruby Web APIs. Think about the Rails tutorial but focusing on building APIs with different Ruby frameworks.
If you’d like to keep working on the API we just built, here are a few ideas for you to improve the application:
- Locking down the API with HTTP auth.
- Writing automated tests.
- Splitting the application into different files.
Source Code
The source code is available on GitHub.
Final Thoughts
We just built a simple web API using Sinatra. There are many things we didn’t have time to review and we haven’t even touched the hypermedia part. Web APIs are a huge topic with still a long way to go before they are up to the web standards.
TABLE OF CONTENTS


