
Previously, I wrote about using the state pattern to manage application state. We will build on this idea with finite state machines. A finite state machine is a way to model state transitions in a system. For example, a microwave behaves differently depending on if its door is closed, open, or if it is cooking. If you press start while the door is open, nothing will happen. If the door is already closed, then pressing the start button will initiate cooking.
There are many other behaviors the microwave can exhibit. You could code each use case with a conditional statement or switch statement. But this can easily complicate your logic as you try to define every combination of state, input, and transition. Instead, you can use a finite state machine to simplify and manage your application state. In this post, I will show you how to use a finite state machine to model an audio player in React.
Finite State Machine Overview
The audio player has a list of songs. The player starts with no songs playing. When it is playing, you will be able to skip to the next song or go to the previous song. You can also press stop which resets the player by stopping all audio and setting the song list back to the beginning. Before you see how to model this, these are the basic parts that make up a finite state machine:
- States: the condition or behavior of the system
- Starting state: the initial condition of the system
- Inputs: the actions or events that can be triggered
- Transition function: logic for determining the next state for each input and state pair
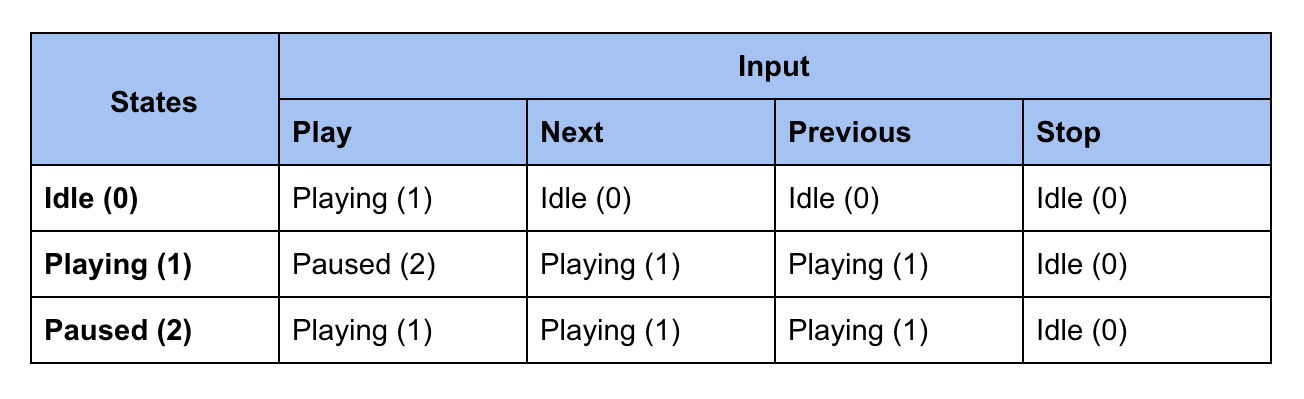
For the audio player, the states will be idle, playing, and paused. The starting state is idle. The inputs are play, next, previous, and stop. According to the state pattern, each state is put into its own object. Another object called the context is used as an interface for interacting with the system. Each state can be responsible for changing to the next state. However, for the finite state machine, the transition logic will be within the context. To model the transitions you will use a state table.
State Tables
A state table is one way to show all of your state changes. It can help you to see states that can be removed or actions that need to be added. Changing the table is much easier than changing the code. However, if you have already implemented the code and decide that the state table needs to change, changing the transition logic in your code means that each state will have to change.
In this example, each state has been assigned a number, which we will use when we implement the finite state machine in our code. Each entry contains the next state for each state-input pair. This is what the state table looks like for our player:
Converting the State Table to Classes
Once you have created a state table, you have the all the information needed to implement the finite state machine. Each state will be an object that has state-specific behavior. The inputs will be event handlers in our states and context. In situations where the state does not change, the event handler will do nothing. Based on our state table, these are the classes for the audio player:
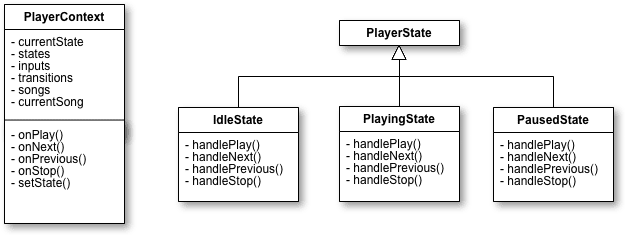
Some implementations of a finite state machine design the state objects to inherit from a parent class. In the diagram, the IdleState, PlayingState, and PausedState inherit from the PlayerState class. However, for our implementation, the state objects won't be subclassed from a parent state object. Since we will be using React, all objects will be subclassed from React.Component.
The context will have a reference to each state object stored in the states array. The currentState is an integer you will use to access the states array. And the transitions property is a multidimensional array that represents the state table. Each row is a state, each column is an input, and each element is the integer that represents the state. This is what the transitions array will contain:
[
  [1,0,0,0],
  [2,1,1,0],
  [1,1,1,0]
],
Putting it all together
Player.js
import React from 'react';
import IdleState from './IdleState';
import PlayingState from './PlayingState';
import PausedState from './PausedState';

export default class Player extends React.Component {
 constructor(props) {
  super(props);
  this.state = {
   currentState: 0,
   states: [new IdleState(), new PlayingState(), new PausedState()],
   inputs: {PLAY: 0, NEXT: 1, PREVIOUS: 2, STOP: 3},
   transitions: [
    [1,0,0,0],
    [2,1,1,0],
    [1,1,1,0]
   ],
   songs: ['Worst Behavior', 'Proud', 'Diamonds'],
   currentSong: 0
  };
 }

 onPlay() {
 this.state.states[this.state.currentState].handlePlay(this);
 }

 onNext() {
  this.state.states[this.state.currentState].handleNext(this);
 }

 onPrevious() {
  this.state.states[this.state.currentState].handlePrevious(this);
 }

 onStop() {
  this.state.states[this.state.currentState].handleStop(this);
 }
}
The code for the view will also be placed inside of the Player class. To do this add the imports for the images used and a render method to the class.
render() {
  return (
   <div> <h1>{this.state.songs[this.state.currentSong]}</h1> <div className="player"> <img alt="previous" src={prevIcon} onClick={()=>this.onPrevious()} /> <img alt="play/pause" src={this.state.currentState === 1 ? pauseIcon : playIcon} onClick={()=>this.onPlay()} /> <img alt="stop" src={stopIcon} onClick={()=>this.onStop()} /> <img alt="next" src={nextIcon} onClick={()=>this.onNext()}/> </div> <h2>{this.state.stateNames[this.state.currentState]}</h2> </div>
  )
 }
PlayingState.js
import React from 'react';

export default class PlayingState extends React.Component {
 handlePlay(player) {
  const stateId = player.state.currentState;
  const inputId = player.state.inputs.PLAY;
  const currentState = player.state.transitions[stateId][inputId];

  player.setState({
   currentState: currentState
  });
 }

 handleNext(player) {
  let songId = player.state.currentSong;
  const maxSongs = player.state.songs.length - 1;
  const currentSong = (songId === maxSongs) ? songId : ++songId;

  player.setState({
   currentSong: currentSong
  });
 }

 handlePrevious(player) {
  let songId = player.state.currentSong;
  const currentSong = (songId === 0) ? songId : --songId;

  player.setState({
   currentSong: currentSong
  });
 }

 handleStop(player) {
  const stateId = player.state.currentState;
  const inputId = player.state.inputs.STOP;
  const currentState = player.state.transitions[stateId][inputId];

  player.setState({
   currentState: currentState,
   currentSong: 0
  });
 }
}
Here are the other state classes. Their method implementation has been omitted for brevity.
IdleState.js
import React from 'react';

export default class IdleState extends React.Component {
 handlePlay(player) {...}

 handleNext() {...}

 handlePrevious() {...}

 handleStop() {...}
}
PausedState.js
import React from 'react';

export default class PausedState extends React.Component {
 handlePlay(player) {...}

 handleNext(player) {...}

 handlePrevious(player) {...}

 handleStop(player) {...}
}
Exercise
- List the use cases for a microwave.
- Write a conditional statement based on your use cases.
- List the states, starting state, and inputs for the microwave.
- Create a state table from the information in step 3.
- Draw a UML diagram based on the state table.
- Code the microwave classes from the UML diagram.
Conclusion
The point in using a finite state machine as opposed to a conditional statement or switch statement is to move away from coding to cases. For the microwave example, it may not be clear what all of the cases are. You can try to handle each case in a conditional statement. As you discover new cases, you can add an if block. You may think a long conditional statement can be made more readable by replacing the block with a function. But you must consider if this design can be easily changed. Is it easy to understand? Is it safe from bugs?
The state pattern along with finite state machines encourage separation of concerns and loose coupling. The behavior for each state needs to be localized in its own object. That way the states can vary independently from the rest of the code. If you need to modify a state, you only touch its class. Instead of thinking of the scenarios your application can be used in, which leads to if this then that logic, you can see your app as being in different states. Then you ask yourself, what input or events can change the state?
Putting the state changes in an adjacency matrix eliminates the need to define every use case in your system. And creating a state table before coding is a useful technique for planning the design of your system. There are other variations to finite state machines besides the example shown. There are machines that produce output. And there are machines where the output is determined by the current state alone regardless of the input. Consider using these techniques for modeling a finite state machine the next time you find yourself struggling to clean up your app state.
Resources
SHARE:


