
What is state? An object's state is its data, its properties. For a book object, the state could include the title, author, and ISBN code. For a customer object, the state could be a first name, last name, and address. There is another use of the word state that applies to an object’s behavior. A game can have a loading state, a playing state, and a win state. A checkout form can have a logged in state, a confirmed state, and an error state. The question is, how do you organize all this? The answer is, with the state pattern. In this post, I will show you how to get started with examples using JavaScript and React.
Overview of the State Pattern
You might think to put the related data and behavior for each state in its own class. However, having state in multiple places in the codebase makes it more difficult to maintain. Also, if different objects modify the same data, it can lead to inconsistent behavior when states don't match up.
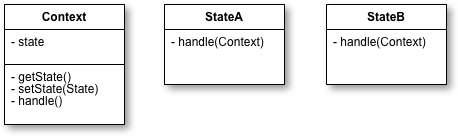
The state pattern solves these problems by localizing all of an object's data and partitioning the behavior for each state into objects. According to the Gang of Four in their book Design Patterns, the state pattern allows an object to change its behavior when its state changes. This object is referred to as the context. The context provides the interface for the user to interact with the object. The second part of the state pattern is the states. Each state is a separate object that has only the behavior associated with that state. This is a class diagram representing the state pattern:
Lightswitch Example
We can model a light switch using the state pattern. The switch is the context. When the switch is flipped or pressed, the user is able to send input to change the state of the light. The light can be in one of two states, on or off.
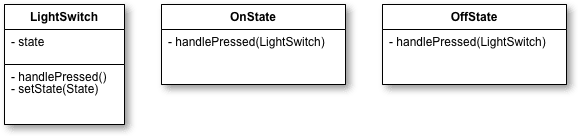
Each state has a method, handlePressed that makes the state change. The switch also has a handlePressed method which calls the current state’s handlePressed method. In the on state, we can transition to the off state. And in the off state, we can transition to the on state. This is what the implementation of the classes looks like using plain JavaScript:
//OnState.js
class OnState {
  handlePressed(lightSwitch){
    console.log('Light is on. Changing to off.');
    lightSwitch.setState(new OffState());
  }
}

//OffState.js
class OffState {
  handlePressed(lightSwitch){
    console.log('Light is off. Changing to on.');
    lightSwitch.setState(new OnState());

  }
}

//LightSwitch.js
class LightSwitch {
  constructor(){
    this.state = new OffState()
  }

  setState(state){
    this.state = state;
  }

  handlePressed(){
    this.state.handlePressed(this);
  }
}

const light = new LightSwitch()
light.handlePressed();  //Light is on. Changing to off.
This example could have been implemented just as easily using an if/else statement. This is an alternative way to implement the same code:
class LightSwitch {
  constructor(){
    this.state = 'OFF';
  }

  handlePressed(){
    if (this.state == 'ON'){
      console.log('Light is off. Changing to on.');
      this.state = 'OFF';
    } else {
      console.log('Light is on. Changing to off.');
      this.state = 'ON';
    }
  }
}
As you can see, the logic for each state has been moved to a block in the if statement.
Traffic Light Example
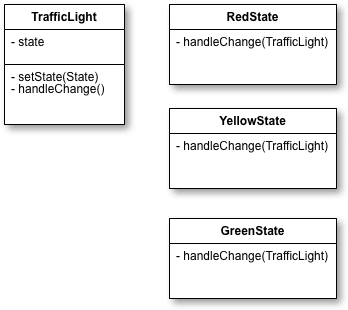
A traffic light is another example of an object that can be in multiple states. The traffic light is the context. Its states are red, yellow, and green. Starting with the red state, we can transition to the green state. From the green state, we can transition to the yellow state. And in the yellow state, we can transition back to the red state.
This is how we would model the classes for a traffic light:
This is how you would implement context:
class TrafficLight {
  constructor() {
    this.state = new RedState();
  }

  setState(state) {
    this.state = state;
  }

  handleChange() {
    this.state.handleChange(this);
  }
}
These are the state classes:
//Redstate.js
class RedState {
  handleChange(trafficLight) {
    console.log('Light is red. Changing to green.');
    trafficLight.setState(new GreenState());
  }
}

//GreenState.js
class GreenState {
  handleChange(trafficLight) {
    console.log('Light is green. Changing to yellow.');
    trafficLight.setState(new YellowState());
  }
}

//YellowState.js
class YellowState {
  handleChange(trafficLight) {
    console.log('Light is yellow. Changing to red.');
    trafficLight.setState(new RedState());
  }
}
This is how you would use the TrafficLight class:
const trafficLight = new TrafficLight();
trafficLight.handleChange();    //Light is red. Changing to green.
This is an alternative way to implement the same code using an if/else statement:
class TrafficLight {
  constructor() {
    this.state = 'RED';
  }

  handleChange() {
    if(this.state == 'RED') {
      console.log('Light is red. Changing to green.');
      this.state = 'GREEN';
    } else if(this.state == 'GREEN') {
      console.log('Light is green. Changing to yellow.');
      this.state = 'YELLOW';
    } else {
      console.log('Light is yellow. Changing to red.');
      this.state = 'RED';
    }
  }
}
You may ask yourself, what is the problem with using if statements? With the state pattern, we've created multiple objects. Whereas with an if statement all of the code is restricted to one class. This is fine when there are few cases and you don't expect them to change. However, if there are many states, a monolithic conditional statement is not something you want to maintain.
If you need to add a new state or update a state, you will be making changes to this piece of code. We should not have to modify this class when we need to update our states. The states need to be more loosely coupled with the component that manages the state. So when we need to modify the behavior of a state, we can change it independently of the other state objects.
Audio Player Example
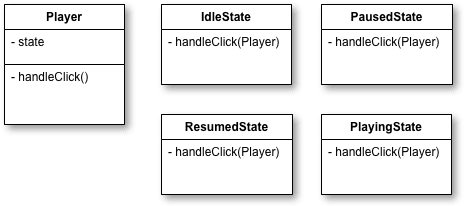
Lastly, you will see how an audio player is implemented with the state pattern using React. This player has one button that changes its functionality depending on the state. The player has the following states:
- Idle — no audio playing, the player has not started
- Playing — song starts from the beginning
- Paused — song paused at the current position
- Resumed — song starts playing at the current position
As you can see, the player does not have a setState method defined because React components already have this method. This is the class for the context:
import React from 'react';
import IdleState from './IdleState';
import playIcon from './play.png';

class Player extends React.Component {
  constructor(props) {
    super(props);
    this.state = {
      currentState: new IdleState(),
      src: playIcon
    };
  }

  handleClick() {
    this.state.currentState.handleClick(this);
  }

  render() {
    return (
      <div> <img onClick={()=>this.handleClick()} src={this.state.src} /> </div>
    )
  }
}

export default Player;
The player’s state is initialized to the idle state.
import React from 'react';
import PlayingState from './PlayingState';
import pauseIcon from './pause.png';

class IdleState extends React.Component {
  handleClick(player) {
    player.setState({
      currentState: new PlayingState(),
      src: pauseIcon
    });
  }
}

export default IdleState;
When the button is first pressed, the player will change to the playing state.
import React from 'react';
import PausedState from './PausedState';
import playIcon from './play.png';

class PlayingState extends React.Component {
  handleClick(player) {
    player.setState({
      currentState: new PausedState(),
      src: playIcon
    });
  }
}

export default PlayingState;
Pressing the button again will change the player to the paused state.
import React from 'react';
import ResumedState from './ResumedState';
import pauseIcon from './pause.png';

class PausedState extends React.Component {
  handleClick(player) {
    player.setState({
      currentState: new ResumedState(),
      src: pauseIcon
    });
  }
}

export default PausedState;
Additional button presses will alternate the states between resumed and paused.
import React from 'react';
import PausedState from './PausedState';
import playIcon from './play.png';

class ResumedState extends React.Component {
  handleClick(player) {
    player.setState({
      currentState: new PausedState(),
      src: playIcon
    })
  }
}

export default ResumedState;
As an exercise, you can try implementing the player using conditional statements to see the difference in design.
Conclusion
The benefit to using the state pattern is that it centralizes all state data. Additionally, having objects for states makes state transitions more explicit and allows for states to be reused in other contexts. When you are planning to apply the state pattern in your application, keep the following points in mind:
- Put all state data in one central place, the context.
- Create an object for each state that represents the state’s behavior.
- Tie the context and the state object together with an action.
SHARE:


