
NativeScript is becoming all the rage in the mobile development community lately. I hear about it at conferences, various reputable news websites, and even in mobile development forum boards. It is becoming so popular over the competition for a few major reasons, but before I go there, let me explain what it is in case this is your first time hearing of it.
Defined by the NativeScript website:
NativeScript enables developers to build native apps for iOS and Android while sharing the application code across the platforms. When building the application UI, developers use our libraries, which abstract the differences between the native platforms.
In short, yes it is a cross-platform, hybrid mobile framework similar to Apache Cordova. Where it is winning is in its ability to build these cross-platform applications into native applications without wrapping them in a web view at runtime. After all, web views are very slow.
To demonstrate the convenience of building a pure native Android and iOS applications with NativeScript, we’re going to take a look at a classic getting started example. We’re going to build a Todo List application. To kick it up a notch, our example will include plugins and code beyond a basic example application.
The application we’re building will look like what is seen in the below animated screen capture.
Getting Started with NativeScript
If this is your first time checking out NativeScript you’ll first need to install it. To do this you must have the Node Package Manager (NPM) installed. If you don’t have this installed you can install it by installing Node.js.
With Node.js installed, use NPM via the Terminal (Mac and Linux) or Command Prompt (Windows) to download and install NativeScript like so:
npm install -g nativescript
If you’re using a Mac or Linux computer you may need to use sudo. Essentially you are installing NativeScript to be used globally on your machine.
Creating a New Project for Android and iOS
Before we can start coding we need to create a new project. This can be done by executing the following from the Command Prompt (Windows) or Terminal (Linux and Mac):
tns create TodoProject
cd TodoProject
tns platform add android
tns platform add ios
There is something important to note here. If you’re not using a Mac, you cannot add and build for the iOS platform.
Going forward we’re going to assume TodoProject is the current working directory for our Command Prompt or Terminal. We’ll still be using it to install plugins and run our application.
Installing the Necessary Native Plugins
The application we’re creating will be making use of persisted storage, otherwise known as storage that will save our data even after our application has been closed. After all, we don’t want to lose our todo list data after we restart our application.
There are plenty of ways to store data in a NativeScript application. For example you could use a key-value store known as Application Settings, but for this example we’re going to use SQLite. It is easier to query for our data with SQL.
In this project, we’re going to use the NativeScript SQLite plugin by Nathanael Anderson. Enter the following via the Terminal or Command Prompt to install it in your project:
tns plugin add nativescript-sqlite
I’ve written about this plugin once before in a using SQLite to save data in NativeScript tutorial, but this particular article is going to take it to the next level. It is worth reading my other tutorial to further brush up on your skills.
No further plugins are required to get this application running.
Planning the Models, Views, and View Models (MVVM) of the Project
Our project as it stands right now is just a basic template designed by the NativeScript team. We’ll be spending all our time in the app directory of the project.
The application itself will have two different screens, one screen with a list of todo lists and one screen with a list of tasks for any particular todo list.
To make this possible, two directories need to be created. Create an app/lists and app/tasks directory. Each will represent the appropriate screens.
Create the following files and directories in your project:
- app/lists/lists.xml
- app/lists/lists.js
- app/lists/lists-view-model.js
- app/tasks/tasks.xml
- app/tasks/tasks.js
- app/tasks/tasks-view-model.js
Notice that every screen has three files. The XML file is the UI for the screen, while the JavaScript files are all the logic for each screen.
Each of the view-model.js files represents the data that will be bound on the screen. The other JavaScript files act kind of like controllers.
The screens are brought together through the navigation stack. We’ll go through the navigation stack in this article.
We won’t be using the component that came with the template so we need to update the default page. Open the app/app.js file and change the application.start to look like the following:
application.start({ moduleName: "lists/lists" });
Now the todo lists component will be the default screen.
Creating the Todo Lists Component
As previously mentioned, the goal of the lists component is to be able to have multiple lists for tasks. Users can create any number of lists and then create tasks for that list.
The Lists Model
The app/lists/lists.js file, also referred to as the lists model contains basic setup and controller logic. In it, we will create the database table that will store lists as well as a function for navigating to the tasks screen.
var Sqlite = require("nativescript-sqlite");
var FrameModule = require("ui/frame");
var createViewModel = require("./lists-view-model").createViewModel;

function onNavigatingTo(args) {
    var page = args.object;
    (new Sqlite("my.db")).then(db => {
        db.execSQL("CREATE TABLE IF NOT EXISTS lists (id INTEGER PRIMARY KEY AUTOINCREMENT, list_name TEXT)").then(id => {
            page.bindingContext = createViewModel(db);
        }, error => {
            console.log("CREATE TABLE ERROR", error);
        });
    }, error => {
        console.log("OPEN DB ERROR", error);
    });
}

function navigateToTasks(args) {
    FrameModule.topmost().navigate({moduleName: "tasks/tasks", context: {listId: args.object.bindingContext.lists.getItem(args.index).id}});
}

exports.onNavigatingTo = onNavigatingTo;
exports.navigateToTasks = navigateToTasks;
Above is the complete app/lists/lists.js file.
The onNavigatingTo function is called as soon as the page was navigated to, or in this case loaded. During this initialization phase, the SQLite database my.db is either created or opened. Once opened a lists table will be created if it doesn’t exist, otherwise it will be left alone.
We haven’t created it yet, but once we know the lists table is created, the app/lists/lists-view-model.js file is initialized. We’ll get to that in a moment.
The other function, navigateToTasks is called when a list view element is tapped. It is responsible for navigating to the list of tasks for the selected todo list. Take note of the following:
args.object.bindingContext.lists.getItem(args.index).id
lists is an ObservableArray that we’re going to create in the view model. It is an array of objects, and the object happens to contain an id field. This ObservableArray is the list of data bound to the list view in the UI.
The Lists View Model
The view model has all the data that is bound to the screen. This includes functions. So essentially we’ll have our lists which is an ObservableArray and two functions. The insert function will allow us to insert items into the database and select will get all elements from the database.
var Observable = require("data/observable").Observable;
var ObservableArray = require("data/observable-array").ObservableArray;
var Sqlite = require("nativescript-sqlite");
var Dialogs = require("ui/dialogs");
function createViewModel(database) {
var viewModel = new Observable();
viewModel.lists = new ObservableArray([]);
viewModel.insert = function() {
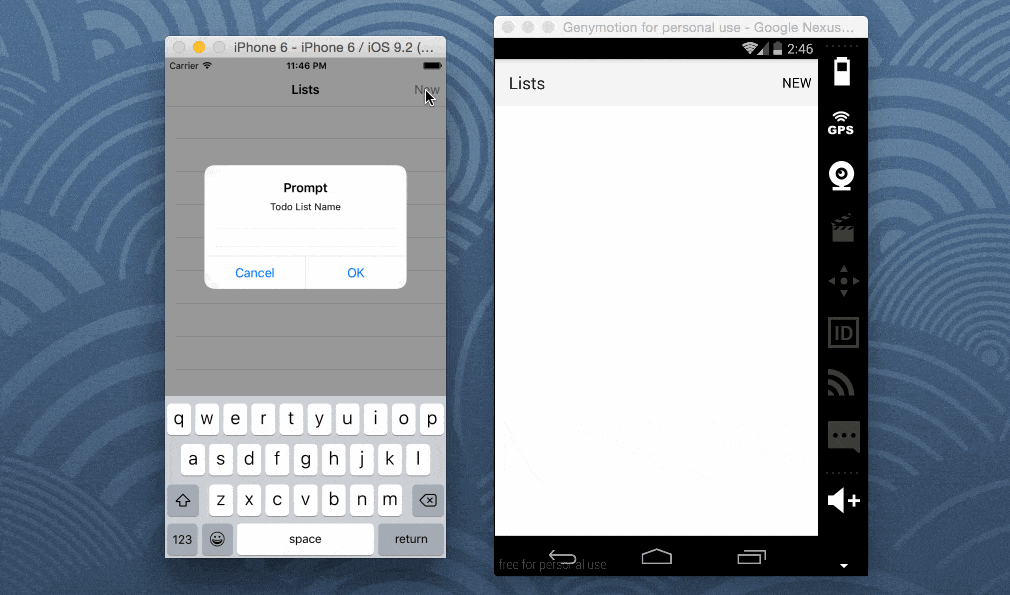
Dialogs.prompt("Todo List Name", "").then(result => {
database.execSQL("INSERT INTO lists (list_name) VALUES (?)", [result.text]).then(id => {
this.lists.push({id: id, list_name: result.text});
}, error => {
console.log("INSERT ERROR", error);
});
});
}
viewModel.select = function() {
this.lists = new ObservableArray([]);
database.all("SELECT id, list_name FROM lists").then(rows => {
for(var row in rows) {
this.lists.push({id: rows[row][0], list_name: rows[row][1]});
}
}, error => {
console.log("SELECT ERROR", error);
});
}
viewModel.select();
return viewModel;
}
exports.createViewModel = createViewModel;
Above is the full app/lists/lists-view-model.js file that contains the logic that I just described.
Let’s dig deeper into the two functions. The insert function will actually present an input popup for accepting user input. Whatever the user enters will be saved and displayed on the screen. The select function will loop through each result returned and push the rows into the ObservableArray to be displayed on the screen.
The Todo List UI
Now for the visuals. The UI is created from XML in the app/lists/lists.xml file. Our final file will look like this:
<Page xmlns="http://schemas.nativescript.org/tns.xsd" navigatingTo="onNavigatingTo">
    <Page.actionBar>
        <ActionBar title="Lists">
            <ActionBar.actionItems>
                <ActionItem text="New" tap="" ios.position="right" />
            </ActionBar.actionItems>
        </ActionBar>
    </Page.actionBar>
    <ListView items="" itemTap="navigateToTasks">
        <ListView.itemTemplate>
            <StackLayout>
                <Label text="" />
            </StackLayout>
        </ListView.itemTemplate>
    </ListView>
</Page>
The action bar appears at the top of the screen and in this case contains a single button. When it is tapped, the insert function of the view model will be called because remember the view model is bound to the UI.
The list view will iterate through each item in the ObservableArray. Because that array is an object we need to manually determine how to present the data. We only want to display the last_name property.
Creating the Todo Tasks Component
The tasks component is nearly identical to the lists component which the exception that the database table has a bit more complexity to it. Remember we want tasks to belong to a particular list. With that said, a lot of what comes next should look very familiar.
The Tasks Model
Like with the model for lists, the tasks model will do almost the same thing. When navigated to, the database will be opened and an attempt at creating a tasks table will be made. There are no navigation functions in this model because it is the deepest point of the application.
var Sqlite = require("nativescript-sqlite");
var FrameModule = require("ui/frame");
var createViewModel = require("./tasks-view-model").createViewModel;

function onNavigatingTo(args) {
    var page = args.object;
    (new Sqlite("my.db")).then(db => {
        db.execSQL("CREATE TABLE IF NOT EXISTS tasks (id INTEGER PRIMARY KEY AUTOINCREMENT, list_id INTEGER, task_name TEXT)").then(id => {
            page.bindingContext = createViewModel(db, page.navigationContext.listId);
        }, error => {
            console.log("CREATE TABLE ERROR", error);
        });
    }, error => {
        console.log("OPEN DB ERROR", error);
    });
}

exports.onNavigatingTo = onNavigatingTo;
Above is the full code for the app/tasks/tasks.js file. Notice something particularly different here.
Remember in the app/lists/lists.js file we had the navigation function and we determine which list item was tapped? That tapped element is sent to the tasks model. In this model, the tasks model, we are now receiving what was sent through the use of the following command:
page.navigationContext.listId
It is passed into our view model for tasks which we’ll create next.
The Tasks View Model
The tasks view model found in the app/tasks/tasks-view-model.js file will of course look familiar.
var Observable = require("data/observable").Observable;
var ObservableArray = require("data/observable-array").ObservableArray;
var Sqlite = require("nativescript-sqlite");
var Dialogs = require("ui/dialogs");

function createViewModel(database, listId) {
    var viewModel = new Observable();
    viewModel.tasks = new ObservableArray([]);
    viewModel.listId = listId;

    viewModel.insert = function() {
        Dialogs.prompt("Task Name", "").then(result => {
            database.execSQL("INSERT INTO tasks (list_id, task_name) VALUES (?, ?)", [this.listId, result.text]).then(id => {
                this.tasks.push(result.text);
            }, error => {
                console.log("INSERT ERROR", error);
            });
        });
    }

    viewModel.select = function() {
        this.tasks = new ObservableArray([]);
        database.all("SELECT task_name FROM tasks WHERE list_id = ?", [this.listId]).then(rows => {
            for(var row in rows) {
                this.tasks.push(rows[row]);
            }
        }, error => {
            console.log("SELECT ERROR", error);
        });
    }

    viewModel.select();

    return viewModel;
}

exports.createViewModel = createViewModel;
The database as well as the list id was passed into this view model. Like the lists view model, this view model contains an ObservableArray and two functions being insert and select. We also have the listId as part of our Observable and it is used in both queries.
The Tasks UI
The UI for tasks is a bit more simplistic because we aren’t storing an object in the ObservableArray. This time it is only strings. With that said, the app/tasks/tasks.xml file should look like the following:
<Page xmlns="http://schemas.nativescript.org/tns.xsd" navigatingTo="onNavigatingTo">
    <Page.actionBar>
        <ActionBar title="Tasks">
            <ActionBar.actionItems>
                <ActionItem text="New" tap="" ios.position="right" />
            </ActionBar.actionItems>
        </ActionBar>
    </Page.actionBar>
    <ListView items=""></ListView>
</Page>
The action bar here has the button for creating new tasks, but it also has a default back button to the previous view in the stack. We don’t define this via the XML code.
tasks is of course of ObservableArray and it is bound to the list view on the screen.
Conclusion
We just made a very attractive, native, mobile application for iOS and Android using Telerik’s NativeScript. If you were to decompile this application you’d find that it is native code rather than the comparable Apache Cordova lineup (PhoneGap, Ionic Framework, Onsen, etc.) which runs the web code via a web view.
There are so many things that can be done with NativeScript. The beauty of it is that since NativeScript can accept native Java and Objective-C within the JavaScript code, your options extend well beyond what you can do with JavaScript.
SHARE: