
The Android operating system is based on Linux. Applications run in their own sandboxes separated from each other and are strictly controlled by the Operating System. When you tap on an application icon in order to open it (assuming it is not running in the background already), the operating system starts a new process, loads the app into memory and then runs it. An application that cannot reach outside its own sandbox would be useless, but having no control over its actions would be dangerous for the user. Android uses System Permissions for managing what any given application can and cannot do.
Fine-grained permissions are used by Android to restrict access to sensitive resources (user and system information — mobile phone number, email addresses...), data (contacts, calendar events...), and hardware features (camera, telephony...). This tutorial will walk you through Android Permissions and show you how to request and use permission to send SMS messages on the user's behalf.
Prerequisites
Please refer to the base tutorial How To Get Started With Android Programming for an explanation of basic Android concepts. This tutorial directly expands on that base project — you can download the starting source code. The code has been written using Android Studio 1.5.1 with Target SDK set to 23.
This tutorial assumes you are running device or emulator with Android 6.0 or later (API 23+). This is necessary at least for the second part and testing Runtime Permissions.
1. Prepare the user interface
In activity_main.xml layout file, edit the main action button and header label to have meaningful texts.
From Palette drag and drop two EditTexts and align them however you like — do not forget to assign IDs that you are going to use later on. You should end up with XML similar to this (feel free to copy and paste it — pay attention to any warnings that might appear):
<?xml version="1.0" encoding="utf-8"?>
<RelativeLayout xmlns:android="http://schemas.android.com/apk/res/android" xmlns:tools="http://schemas.android.com/tools" android:layout_width="match_parent" android:layout_height="match_parent" android:paddingBottom="@dimen/activity_vertical_margin" android:paddingLeft="@dimen/activity_horizontal_margin" android:paddingRight="@dimen/activity_horizontal_margin" android:paddingTop="@dimen/activity_vertical_margin" tools:context="io.github.adamjodlowski.playground.MainActivity">

    <TextView android:layout_width="wrap_content" android:layout_height="wrap_content" android:text="Permissions test project" android:id="@+id/textView" />

    <Button android:layout_width="wrap_content" android:layout_height="wrap_content" android:text="Send SMS" android:id="@+id/button" android:layout_below="@+id/editTextMessage" android:layout_centerHorizontal="true" />

    <EditText android:layout_width="wrap_content" android:layout_height="wrap_content" android:inputType="phone" android:ems="10" android:id="@+id/editTextPhone" android:layout_below="@+id/textView" android:layout_alignParentLeft="true" android:layout_alignParentStart="true" android:hint="Phone number" android:isScrollContainer="false" />

    <EditText android:layout_width="wrap_content" android:layout_height="wrap_content" android:id="@+id/editTextMessage" android:layout_below="@+id/editTextPhone" android:layout_alignParentLeft="true" android:layout_alignParentStart="true" android:layout_alignRight="@+id/editTextPhone" android:layout_alignEnd="@+id/editTextPhone" android:hint="Message text" />

</RelativeLayout>
Notice two interesting properties that EditText can define:
android:inputType="phone"tells the framework, that it should provide special virtual keyboard suited for entering phone numbers[1] — you will see how it works when you run the appandroid:hint="Phone number"is a placeholder for text
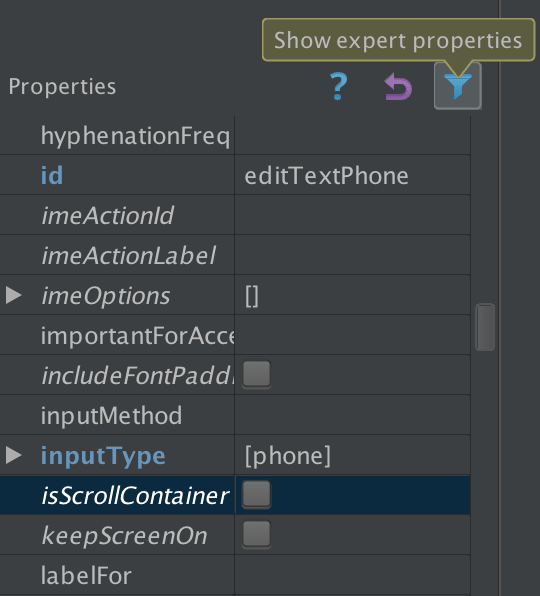
If you do not see the
inputTypeproperty in the Properties section when the Design tab is active and you have EditText highlighted, click the Show expert properties button right above View properties.
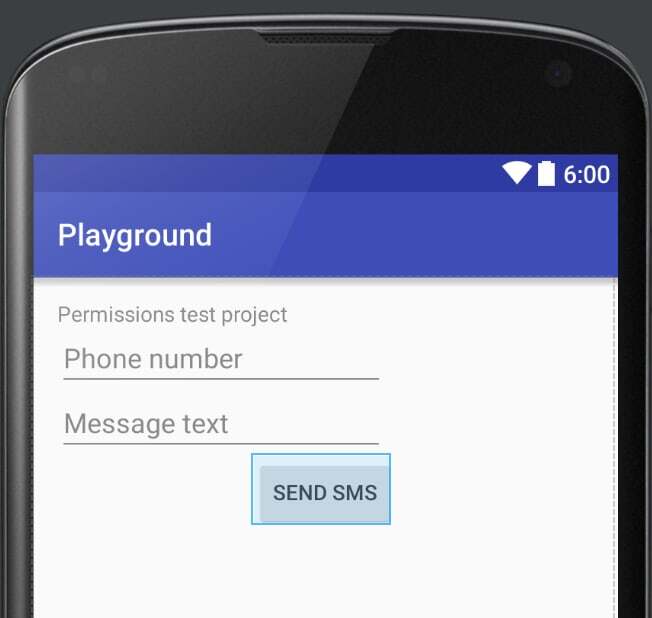
The entire layout should look like this:
2. Add code for sending SMS
Go to MainActivity.java and alter the code that gets invoked when a user clicks the button. We would like that to send SMS message to the number provided by the user.
package io.github.adamjodlowski.playground;

import android.support.v7.app.AppCompatActivity;
import android.os.Bundle;
import android.telephony.SmsManager;
import android.view.View;
import android.widget.Button;
import android.widget.EditText;
import android.widget.TextView;

public class MainActivity extends AppCompatActivity {

    TextView textView;
    EditText editTextPhone;
    EditText editTextMessage;

    @Override
    protected void onCreate(Bundle savedInstanceState) {
        super.onCreate(savedInstanceState);
        setContentView(R.layout.activity_main);

        textView = (TextView) findViewById(R.id.textView);
        editTextPhone = (EditText) findViewById(R.id.editTextPhone);
        editTextMessage = (EditText) findViewById(R.id.editTextMessage);

        Button button = (Button) findViewById(R.id.button);
        button.setOnClickListener(new View.OnClickListener() {
            @Override
            public void onClick(View v) {
                SmsManager smsManager = SmsManager.getDefault();
                smsManager.sendTextMessage(
                        editTextPhone.getText().toString(),
                        null,
                        editTextMessage.getText().toString(),
                        null,
                        null);

                textView.setText("SMS sent");
            }
        });
    }
}
As you can see, to send SMS messages we use the SmsManager class, and it is simple as that.
If you do not see the virtual keyboard popping up when you focus the EditText widget, it is because you enabled the hardware keyboard on your emulator — what you type on your computer's keyboard is passed to the emulator.
Run the application, provide any number and text you like, and hit the Send SMS button.
Aw, snap!

What you see is the worst nightmare of every Android developer — our users just got informed, that our application crashed. Go back to the Android Studio, look at the Android Monitor section and the logcat tab at the bottom. It gives you the reason for the crash:
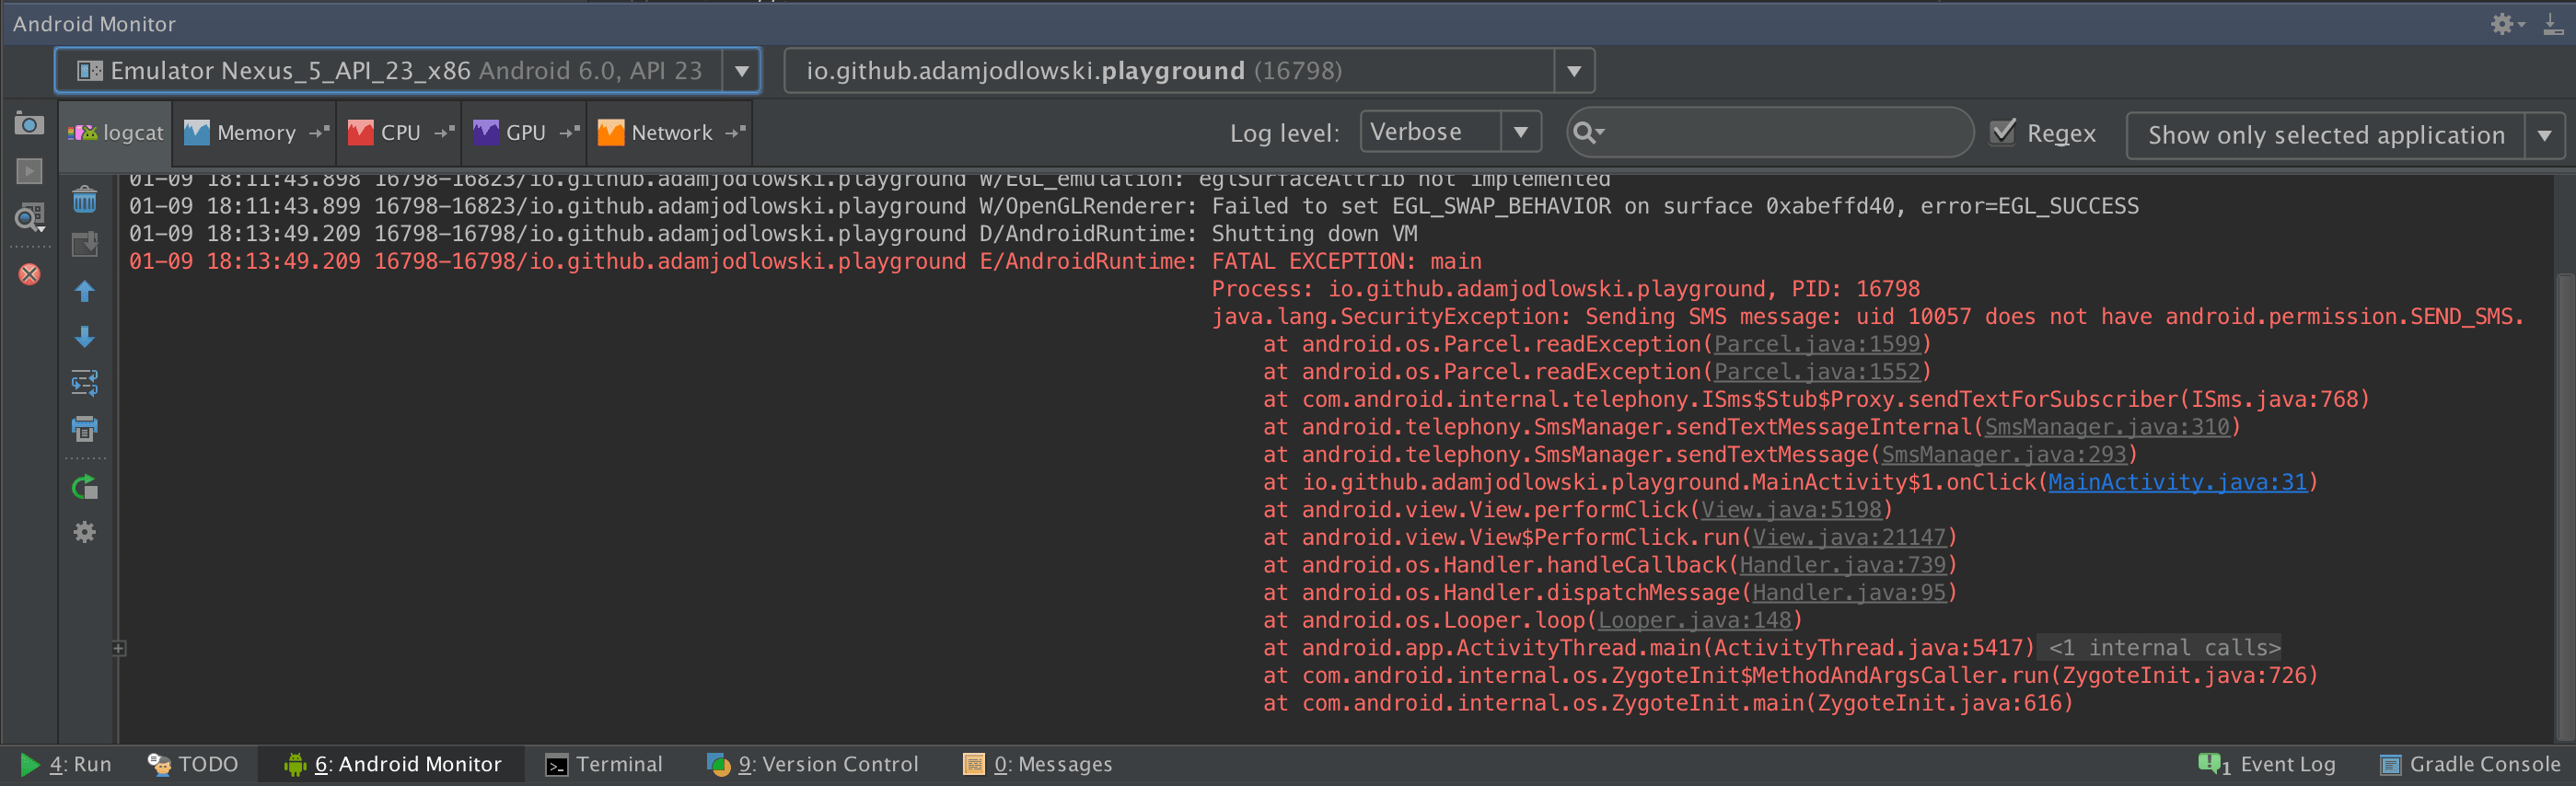
It looks like java.lang.SecurityException has occurred. You can even click the blue link to MainActivity.java:[XX] and go straight to the line in your source code that caused the exception. The message says that our application does not have the android.permission.SEND_SMS permission. This is Android security in action.
3. Request permission for sending SMS
Let us fix that by going to AndroidManifest.xml and adding the necessary request:
<?xml version="1.0" encoding="utf-8"?>
<manifest xmlns:android="http://schemas.android.com/apk/res/android" package="io.github.adamjodlowski.playground">

    <uses-permission android:name="android.permission.SEND_SMS" />

    <application>...</application>
</manifest>
<uses-permission> says that our application needs this particular permission, which is defined by the framework (hence the android prefix).
Additionally, go to the
/app/build.gradlefile, and temporarily settargetSdkVersionto22(anything below 23 will do). This is to show a very important change that recently happened to the Android Permission system.
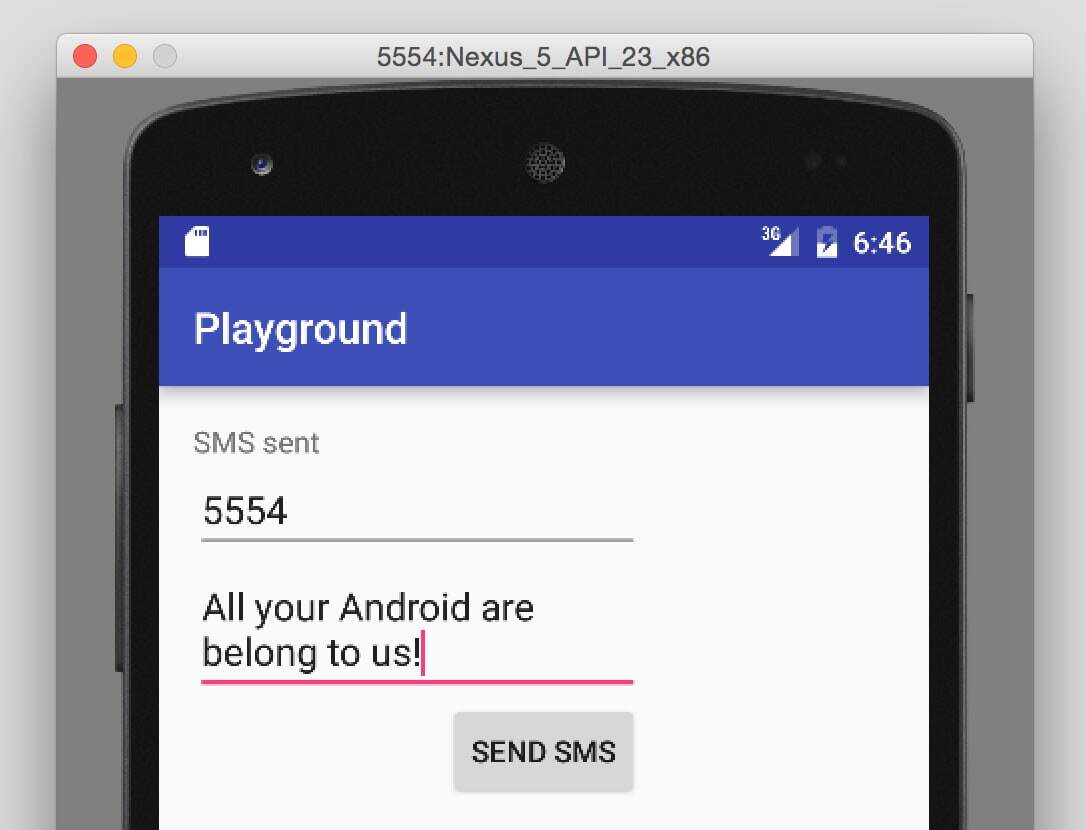
Sync the project, run it and try sending an SMS. You might get an error upon sending in the application on the emulator/device — accept the suggestion and let it reinstall. It should not crash anymore. Of course, you are not going to send an actual message to provided number — this is all emulated.
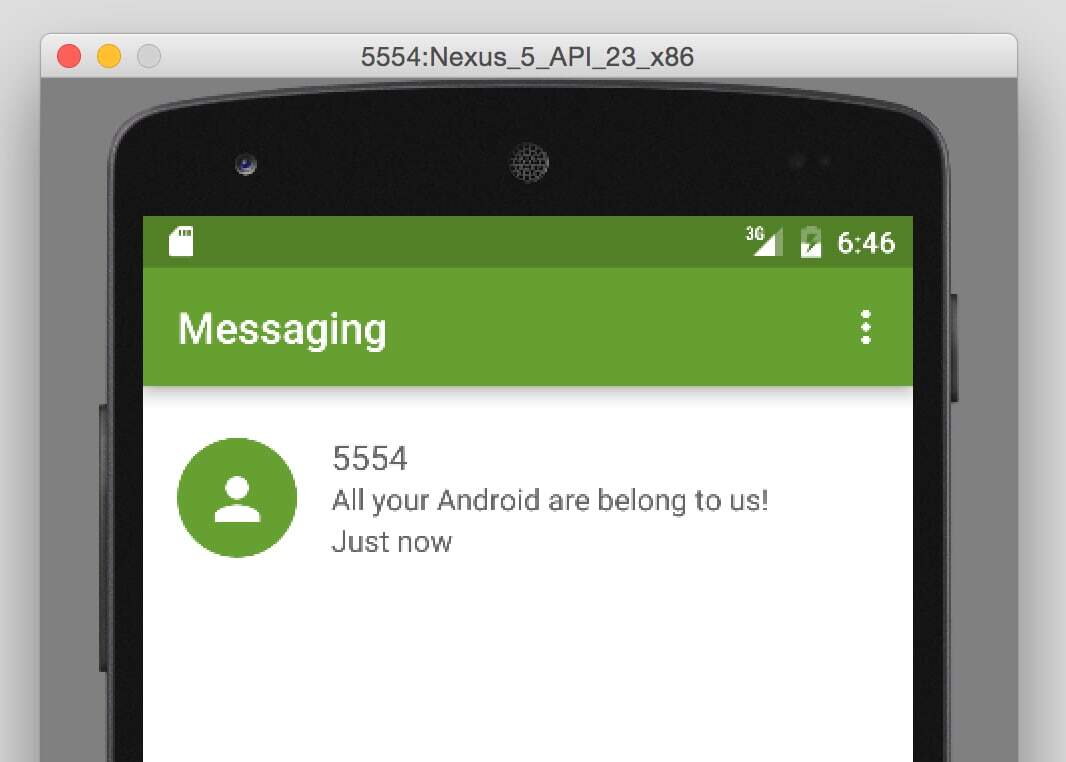
See if it really works by sending a message to the emulator itself. Its phone number is equal to the port on which it listens for connections — it is displayed in the title of emulator window, and by default, it is 5554. Go to the messaging app on the emulator and see if it has been received.
Traditional permission model
What you have seen up to this point is a traditional Android System Permission model. It works like this:
- required permissions are declared in the Android Manifest and the application can assume, that if it is installed, it has all of them granted
- if you do not request the permissions needed for certain actions, a Security Exception is raised and if it is not handled — the application crashes
- application install requires all of the permissions to be accepted by the user
- the only way to revoke them is to uninstall the application (all or nothing approach)
- new permissions prevent apps from auto-updating; they need additional review by the user[2]
Android 6.0 Marshmallow (SDK level 23) introduced the concept of Runtime Permissions, changing many aspects of managing them in Android. The move aims to improve user experience considerably, and it seems the Android Team did just that. On the other hand, developers need to incorporate those changes into their apps, which might not look that easy at first glance. Although this requires additional effort, it is highly encouraged.
New runtime permission model
Now, every permission falls into one of three protection levels:
- normal — applications get them by default at the time of installation (for instance Internet connectivity)
- dangerous — must be granted explicitly by the user
- signature — custom permissions based on signing certificates that should match in order to request them, typically used by applications by the same developer in order to exchange some private, proprietary data
In addition to protection levels, the new concept of permission groups has been introduced:
- a few separate permissions (like we are used to) might be grouped together into one group (for instance sending and receiving SMS)
- the user implicitly grants us all permissions from the group, that the requested permission belongs to (ask for sending SMS, you get as well permission to receive them)
- if we ask for more than one permission in a group, they are granted/denied in bulk, based on the user's decision regarding the group.
Don't assume that if you possess a permission from a particular group, you also have all the other permissions from that group — always ask for specific ones, because current behavior might change in the future.
What all of that means for your users, is they can just install any given app from the Play Store and start using it right away (no questions during installation asked). Permissions falling under the normal protection level are granted by default, and those should be enough for the typical app to function, at least at the beginning. The process of asking for permissions is pushed back to the last possible moment — the time when the user wants to perform an action requiring the dangerous permission, for example — the action of taking a photo would be briefly interrupted by a system dialog with a permission request. Finally, the user can grant or revoke[3] any permission at any time from system settings, without uninstalling app.
This new approach requires us to take extra care and prepare for few scenarios, making sure that we:
- declare required permissions in the Android Manifest as usual
- check on-the-fly whether we are actually granted permissions required to perform given actions
- disable certain UI controls or indicate in other ways that the application could perform those actions, if it had those permissions
- are prepared for permission revocation at any given time[4]
- make a clear distinction between permissions vital to your application and optional ones
- show disclaimers and reasoning behind requests — up-front or in context as they are needed
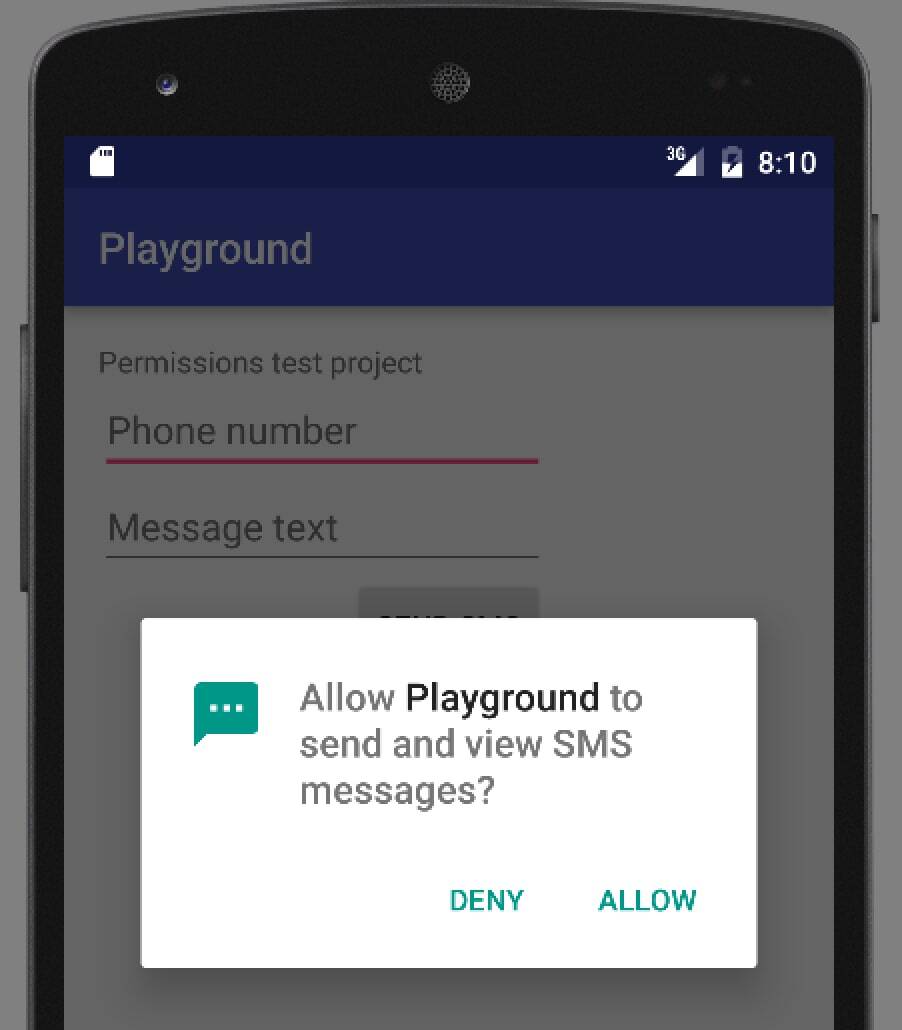
4. Asking for Runtime Permissions
1. Opt-in for Runtime Permissions
Revert the change we have made earlier — the Runtime Permissions that we are going to demonstrate are only available for applications built and run on platforms in version 23 and later. Make sure the following properties are set in /app/build.gradle:
compileSdkVersion 23
targetSdkVersion 23
2. Make sure to check if permissions have been granted and ask for them if necessary.
Every time the user opens our app, we need to make sure we have the permission required to send SMS. To do that, you will need to add a little bit more code to the MainActivity.java:
package io.github.adamjodlowski.playground;

import android.Manifest;
import android.content.pm.PackageManager;
import android.support.v4.app.ActivityCompat;
import android.support.v7.app.AppCompatActivity;
import android.os.Bundle;
import android.telephony.SmsManager;
import android.util.Log;
import android.view.View;
import android.widget.Button;
import android.widget.EditText;
import android.widget.TextView;

public class MainActivity extends AppCompatActivity {

    TextView textView;
    EditText editTextPhone;
    EditText editTextMessage;
    Button button;

    @Override
    protected void onCreate(Bundle savedInstanceState) {
        super.onCreate(savedInstanceState);
        setContentView(R.layout.activity_main);

        textView = (TextView) findViewById(R.id.textView);
        editTextPhone = (EditText) findViewById(R.id.editTextPhone);
        editTextMessage = (EditText) findViewById(R.id.editTextMessage);

        button = (Button) findViewById(R.id.button);
        button.setOnClickListener(new View.OnClickListener() {
            @Override
            public void onClick(View v) {
                SmsManager smsManager = SmsManager.getDefault();
                smsManager.sendTextMessage(
                        editTextPhone.getText().toString(),
                        null,
                        editTextMessage.getText().toString(),
                        null,
                        null);

                textView.setText("SMS sent");
            }
        });

        if (ActivityCompat.checkSelfPermission(this, Manifest.permission.SEND_SMS) != PackageManager.PERMISSION_GRANTED) {
            Log.d("PLAYGROUND", "Permission is not granted, requesting");
            ActivityCompat.requestPermissions(this, new String[]{Manifest.permission.SEND_SMS}, 123);
            button.setEnabled(false);
        } else {
            Log.d("PLAYGROUND", "Permission is granted");
        }
    }

    @Override
    public void onRequestPermissionsResult(int requestCode, String[] permissions, int[] grantResults) {
        if (requestCode == 123) {
            if (grantResults.length > 0 && grantResults[0] == PackageManager.PERMISSION_GRANTED) {
                Log.d("PLAYGROUND", "Permission has been granted");
                textView.setText("You can send SMS!");
                button.setEnabled(true);
            } else {
                Log.d("PLAYGROUND", "Permission has been denied or request cancelled");
                textView.setText("You can not send SMS!");
                button.setEnabled(false);
            }
        }
    }
}
As you can see, we have made few changes to the code, now:
- the button for sending an SMS and the status TextView are updated dynamically, considering the permission in question
- at the end of the
onCreate()method we find out if permission for sending an SMS is granted — if not, we request it usingActivityCompat's method (123is just an ID for the request, no magic number) - the result of the request is passed asynchronously to a separate callback method
onRequestPermissionsResult-- there is the logic for handling the response - you can request many permissions at once, passing an array to
ActivityCompat#requestPermissions()method - you can check approval/denial on single permission level — notice that the response contains requested permissions, and separate results for them
You are required to check permissions status every time you might need them, do not assume that you got permission once and it is available forever.
Log.d() method invokes the system logger and is often used for simple debugging. You can find its output in the Android Monitor section, logcat tab in Android Studio.
3. Run the app and experiment with Runtime Permissions
First, uninstall the application from your emulator/device, because Android OS might have saved information about permissions granted for the previous version of the app. Then run it and look into the logcat to see what's happening.
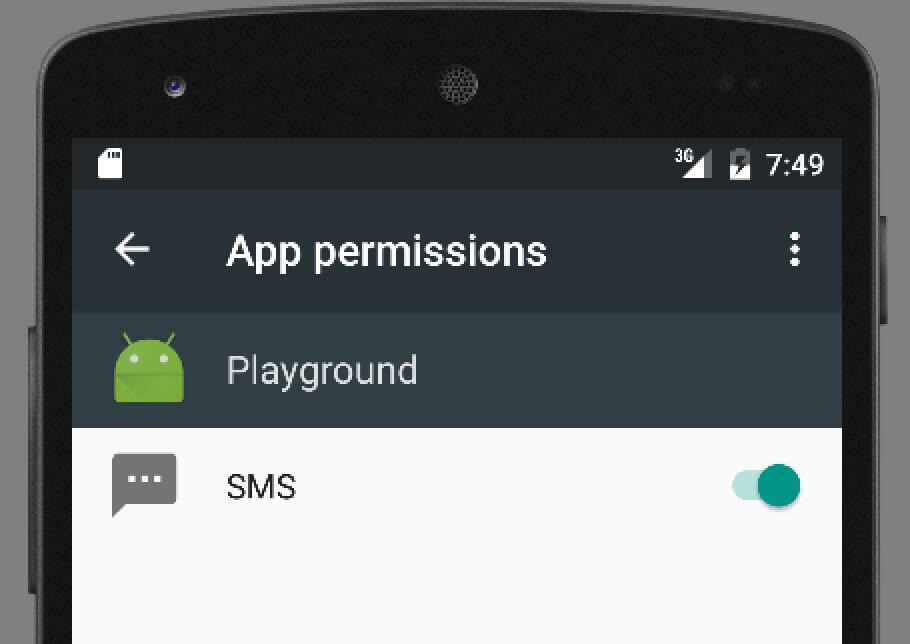
To experiment with it, deny the request, change app permissions using global system settings, kill (longpress on last apps system button) and rerun it to see different outcomes.

Additional considerations
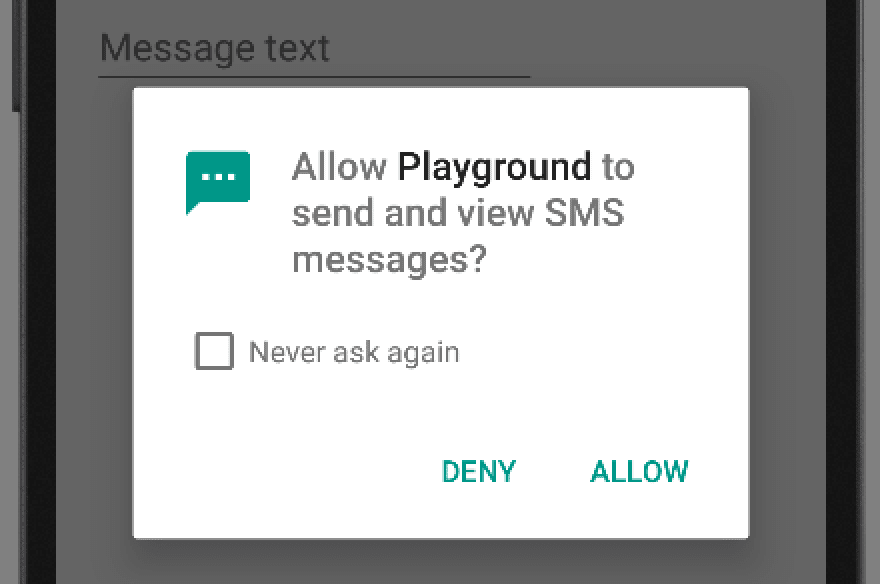
You might have noticed that after the first denial, the user is given the option not to bug them anymore with our request. This is virtually our last chance to explain to them the reasoning behind the request. In order to do that gracefully, the API contains a method that returns true, if we previously requested a particular permission, but the user denied the request. It is a good idea to add code for explaining why we really need that particular permission or warn the user what she or he is going to miss if they deny the request. Here is the sample code:
if (ActivityCompat.shouldShowRequestPermissionRationale(this, Manifest.permission.SEND_SMS)) {
	// the request has been denied previously, show explanation why you need this, then request permission again
} else {
	// ask without explanations
}
Please note, this method returns
falseif the user has already checked the Never ask again checkbox.
Summary
In this tutorial, you learned about the classic and modern approaches to managing Android Permissions. A few points to keep in mind:
- apps compiled with Target SDK < 23 are treated as usual
- many basic permissions are granted by default
- you still need to declare them in the Manifest
- you must make sure you have them every time you need them (
Activity#onCreate()is sufficient)
The source code for this tutorial can be found on GitHub.
-
See what other kinds of input types are available — highlight the inputType property and hit F1. ↩︎
-
That leads to developers requesting more permissions that they really need, in order to prevent already installed applications from bugging user again when new app features arrive. This is bad practice. ↩︎
-
This does not mean legacy apps are going to crash like crazy after you revoke permissions, throwing Exceptions all over the place. What really happens is, on Android 23+, API calls that had been restricted would return empty data sets or default values, as if there were no data available. ↩︎
-
When a user revokes permissions, our application's process gets killed. ↩︎
SHARE:


