Feeling inspired to create a NodeJS command-line script to solve a specific issue? Do you want to ship your command-line as an installable package? It should be simple, right? Fortunately, it is!
Here is a concise guide on things we should do to create a NodeJS command-line package.
This guide will walk you through the creation, mapping, and linking of a NodeJS command-line script.
1. Create a NodeJS package
Before doing anything else, we need to create NodeJS package, i.e. just a directory containing a package.json file. We can easily do that in 2 steps.
- Create an empty directory.
- Run:
npm initfrom inside the new directory.
That is nothing new, nor specific to creating a NodeJS command-line package as it is the starting point of any NodeJS package. Now that we have that let us create what will be our NodeJS command-line script.
2. Create a NodeJS command-line script
You may already know that we can execute a NodeJS script file by running: node script.js. That is fine in most cases, but a NodeJS command-line script is a regular JavaScript file, except that it contains a special shell-instruction. More about that shortly; first let us create a JavaScript file that will become the NodeJS command-line script.
Create a JavaScript file
The npm.js docs and popular NodeJS projects use to name JavaScript command-line file as cli.js. This a good practice because the name itself tells its purpose.
Convert the JavaScript file into a NodeJS command-line script
Similar to other shell scripts, we want to make our JavaScript file executable by the locally installed program. We do that by adding a shebang character sequence at the very top of our JavaScript file that looks as follow:
That way, we are telling *nix systems that the interpreter of our JavaScript file should be /usr/bin/env node which looks up for the locally-installed node executable.
In Windows, that line will just be ignored because it will be interpreted as a comment, but it has to be there because npm will read it on a Windows machine when the NodeJS command-line package is being installed.
Make the JavaScript command-line file executable
In most cases, new files are not allowed to be executed. As we are creating a NodeJS command-line script that will be executed, we need to modify its file permissions. In a *nix system you can do that as follows:
chmod +x cli.js
Now, let us add some code to our script file. We will create a simple Hello World that will also print any provided arguments.
Add code to our NodeJS command-line script file
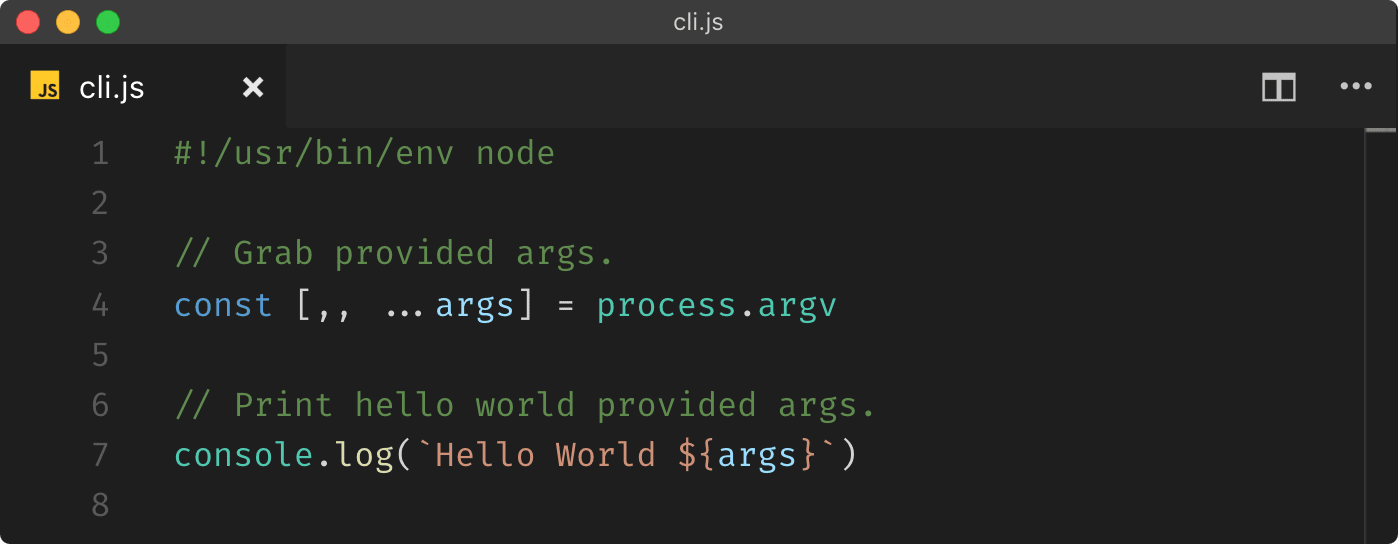
The code on line 4 will grab all given command line arguments after the third. Moreover, on line 7, we are just printing out Hello World, and we are adding any provided arguments (if any).
Awesome! Now we can run it on Linux or Mac OS X as ./cli.js or in Windows with node.cmd cli.js. Try it! Also, pass some argument to it.
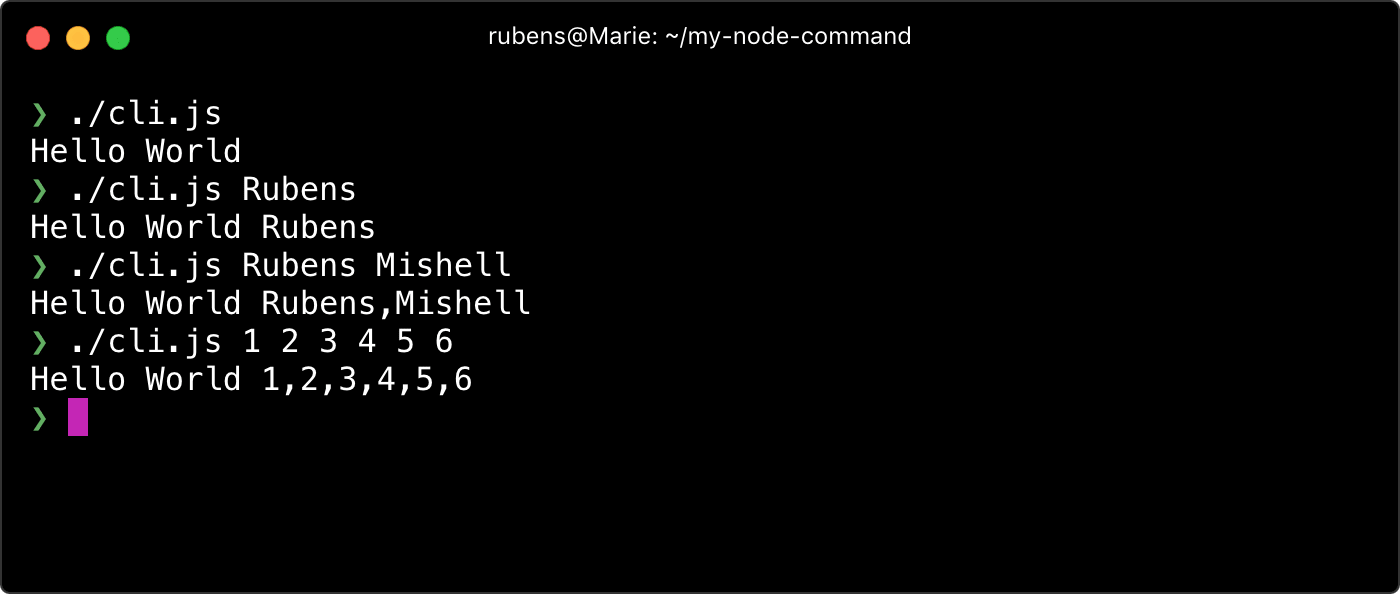
So far, we can run our NodeJS command-line file as a regular script in Linux and Mac OS X, but with still need to add node.cmd in Windows. Also, we are bound with the filename to execute our command-line script, which is not nice. In the next section, we will circumvent those issues.
3. Map a command-line script to a command name
So far, we converted a JavaScript file into a NodeJS command-line script file. However, we want to give it a more meaningful name that does not need to be the name of the NodeJS command-line script file. For that, we have to map our command-line script by configuring our package.json. About this topic the npmjs.com docs say:
supply a
binfield in yourpackage.jsonwhich is a map of the command name to the local file name.
This means we can specify a ‘command name’ for our local ‘command-line script’. Let us say we want our cli.js command-line file to be mapped to say-hello. We can do that by modifying our package.json and adding a bin field as aforementioned:
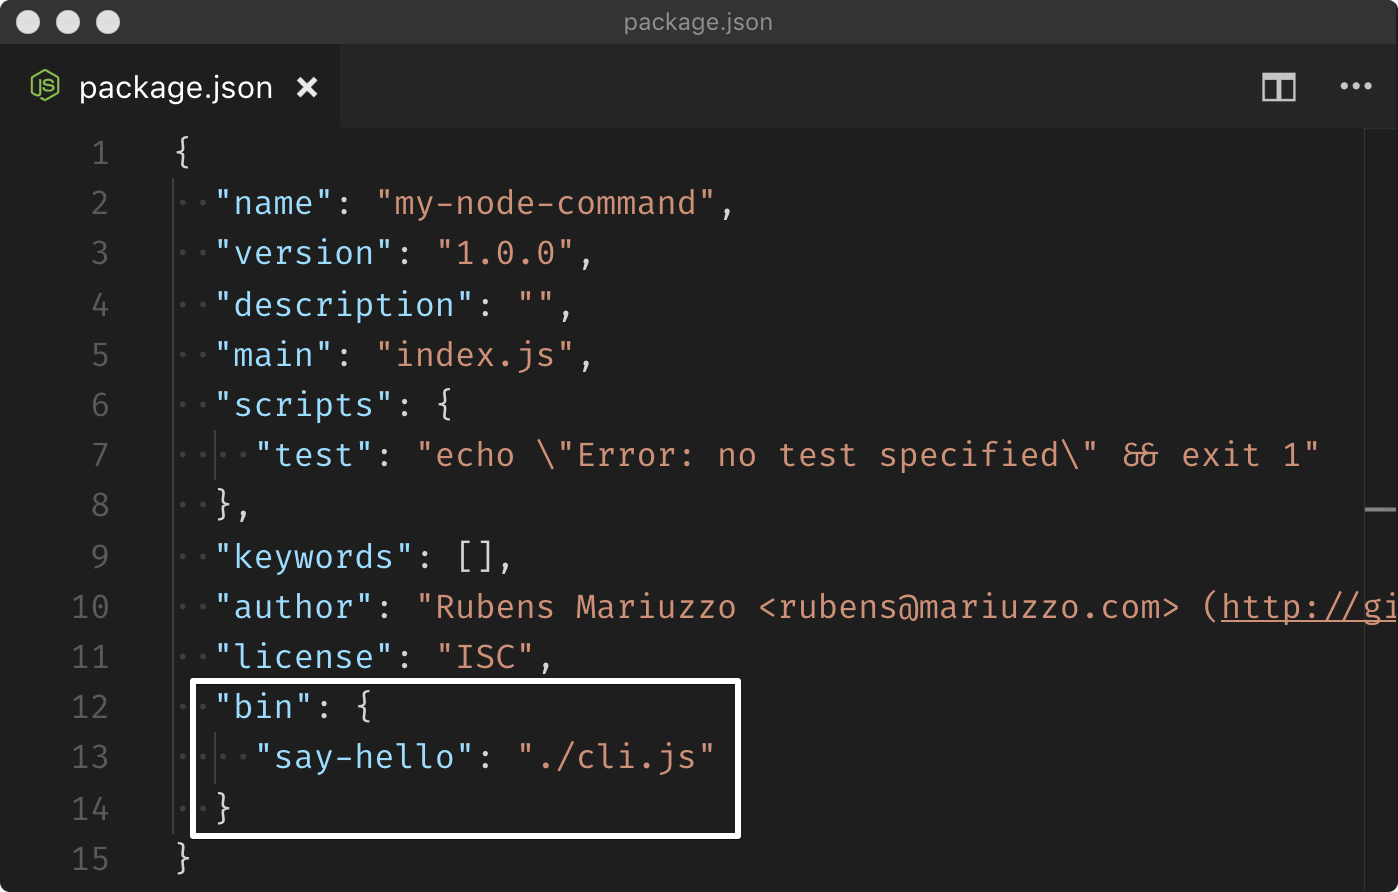
To see its full potential, we are assigning to the bin field an object where the keys become the command names, and the values are the NodeJS command-line script files mapped. That format allows us as developers to provide more than one script mapping. However, if we want to provide a single NodeJS command-line script with the same name as its file, we could just set a string instead of an object where the string would be the local file path.
Notes on naming a command
We can choose any name for a command, but we do not want it to clash with existing popular command names such as ls, cd, dir, and so on. If we use one existing name, chances are it will not be executed; instead, the already installed one will be (results may vary).
4. Link your command for development
As developers, sanity is more than just a word; it is life. That is why we need to be confident enough on how our NodeJS command-line script will be shipped as a package. Thankfully, npm comes with the link command that will provide our regular dose of sanity.
The npm link command allows us to locally ‘symlink a package folder’, and for our needs, it will locally install any command listed in the bin field of our package.json. In other words, npm link is like a NodeJS package installation simulator. It is worth to mention that npm link has a wider usage that exceeds the scope of this guide.
The npm link command is used from within the NodeJS package directory we want to symlink:
npm link
Once executed, we will see our command being symlinked globally. Now, we can execute our NodeJS command-line script with its own ‘command name’ say-hello:
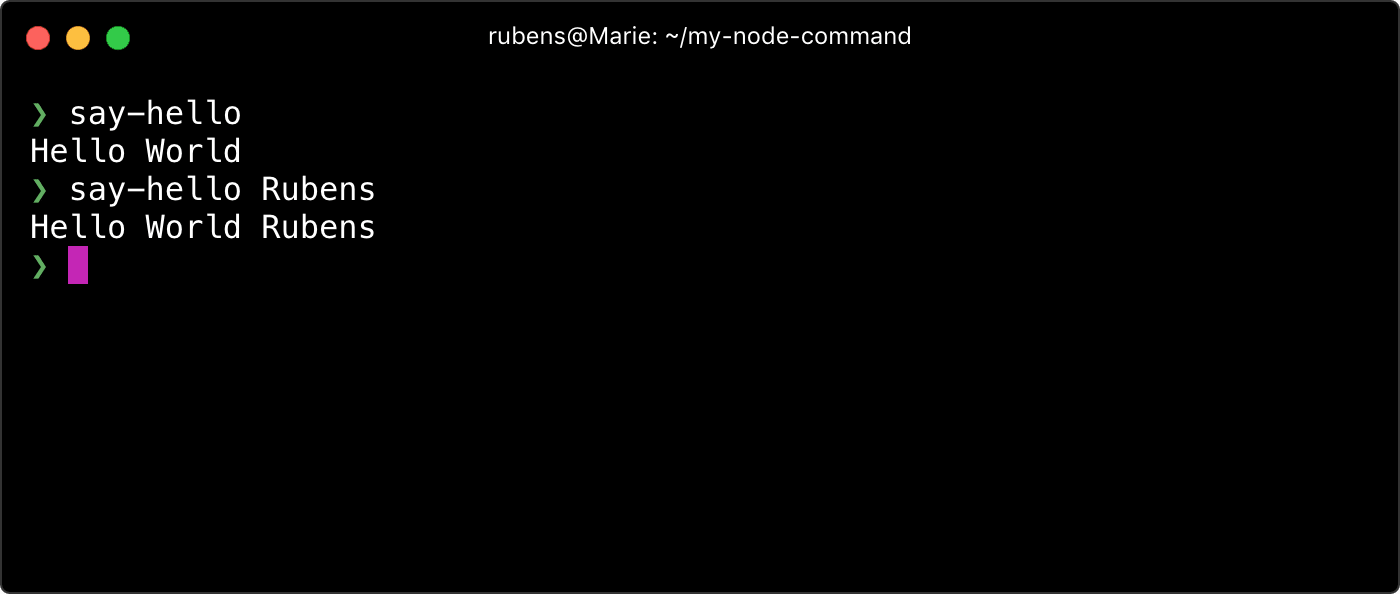
Pretty neat, right? That way, we can play with our NodeJS command-line script locally before even npm publish‘ing them.
Notes on npm link
Under the hood, npm link (also applies to npm install) symlink all files specified in the bin field of package.json. The npmjs docs add:
On install, npm will symlink […] file[s] into
prefix/binfor global installs, or./node_modules/.bin/for local installs.
On *nix systems, the npm link linking process is like creating a shortcut to our specified command file, which will be executed by the shell and then by node as specified with the shebang (#!/usr/bin/env node). While on Windows, npm will do the same (only if the shebang is specified) but will also create a {command-name}.cmd that calls node to execute our specified command file.
Keep your room clean
When we finish testing our symlinked command, we may want to remove it. We can achieve that by running the following code from inside the package directory.
npm unlink
Conclusion
That is it for a concise guide to creating a NodeJS command-line package. With those four steps, we have the basics to ship a NodeJS package that will install a command-line package.
Now, it is up to you to commit, push and unleash your creativity by coding a NodeJS command-line package.
Recommendations
Finally, here are some utilities I have used in my own personal command-line projects:
- meow – Simple command-line helper.
- chalk – Terminal string styling.
- yargs – Command-line opt-string parser.
Personal command-line projects
Here are some of my personal NodeJS command-line packages:
- php-array-to-json – Convert PHP configuration array files to JSON files.
- markdown-swagger – GenerteAPI docs from Swagger to Markdown.
- spotlight-never-index –
Exclude directories from Spotlight.app.
TABLE OF CONTENTS


_.jpg)

