Socket.IO with HAProxy on AWS
We all know this feeling… You’ve done all your dev work in a local environment, but it’s not working as planned on production. Now it looks like you’ve wasted too much time trying to figure out what’s wrong. Here are some highlights from my story to make your life easier.
Our setup
We deploy our services on Amazon ECS clusters.Everything was working fine, until a new project, heavily depending on real-time notifications, came up.
We decided to use two load balancers – ELB and HAProxy. These two share some responsibilities, but we used them to serve a different purpose. Our HAProxy is deployed as a Docker container, and the configuration is generated on the fly using consul-template. The ELB is used mainly for one reason – it’s static, so we could easily configure Route 53 (AWS Domain Name Server).
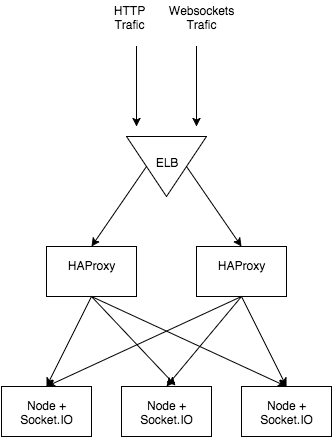
HAProxy + ELB + SocketIO stack
ELB Configuration
In order to use socket.io, we need to set up listeners in a correct way. WebSockets use TCP as a transport layer, so we need to configure ELB to transfer all TCP traffic from port 80 to our HAProxy port. The same goes for secure WebSockets (wss) – all traffic from SSL on port 443 needs to be forwarded to 8005 – a port which our HAProxy container is running on.
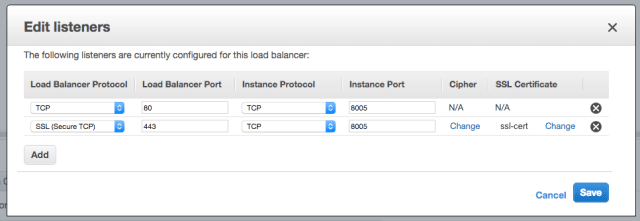
ELB listeners configuration
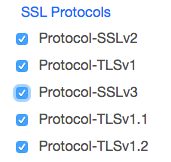
The last step to enable **wss ** is to check SSL Protocol setting under Cipher section:
Ciphers configuration
HAProxy Config
The main problem comes from socket.io performing its handshake in the beginning. This means that the second request must end up with the same server as the first one. There are multiple ways to ensure this outcome, but with ELB + HAProxy stack we are limited in options.
HAProxy gives us an option to select load balancing algorithm (https://cbonte.github.io/haproxy-dconv/configuration-1.5.html#4-balance), which means that connections will be assigned to a webserver based on IP address. We have to select that one specifically because it will allow our WebSocket session to stick.
The last but not least thing to do is to configure ELB listener to allow proxy on TCP. There is an excellent article on this issue (possibly doubling some knowledge here) written by Philippe Modard here.
And here is a configuration I came up with in the end:
global
  maxconn 4096

defaults
  mode http
  balance roundrobin
  option redispatch
  option forwardfor

  timeout connect 5s
  timeout queue 5s
  timeout client 50s
  timeout server 50s

frontend http-in
  bind *:8000
  default_backend servers

  # Any URL beginning with socket.io will be flagged as 'is_websocket'
  acl is_websocket path_beg /socket.io
  acl is_websocket hdr(Upgrade) -i WebSocket
  acl is_websocket hdr_beg(Host) -i ws

  # The connection to use if 'is_websocket' is flagged
  use_backend websockets if is_websocket

backend servers
  server server1 [Address]:[Port]
  server server2 [Address]:[Port]

backend websockets
  balance source
  option http-server-close
  option forceclose
  server ws-server1 [Address]:[Port] weight 1 maxconn 1024 check
  server ws-server2 [Address]:[Port] weight 1 maxconn 1024 check
HAProxy Stats
In order to ensure HAProxy is working as expected, it’s valuable to enable statistics. It will provide us with a visual breakdown of open sessions, server information, data flow, and much more. I highly encourage you to enable them, as statistics provide us with valuable information for load testing and performance monitoring.
frontend http-in
  bind *:8000

  (...)

  stats enable
  stats hide-version
  stats realm   Haproxy\ Statistics
  stats uri /haproxy?stats
  stats auth Username:Password
After stats are enabled, we can view the page by visiting http://[address]:[port]/haproxy?stats and authenticating with Username/Password specified in the config. It’s mainly useful to track and record important metrics as well as monitor the number of open connections, which will be useful for load balancing.
Load Testing
It’s always beneficial to see how our application behaves under a bigger load and test that nothing breaks. There are some noteworthy tools available for load testing like ApacheBench or JMeter, but I was looking for something simpler, especially to load test WebSockets.
The tool I found and used was https://github.com/M6Web/websocket-bench. With only a simple command I could test 1,000 concurrent connections and verify that nothing breaks:
$ websocket-bench -a 1000 -c 200 http://my-app.io
The main advantages of using websocket-bench over other tools are its simplicity and support for socket.io out of the box. Besides, it supports writing your own workflows (called generators), to load test more complex scenarios.
Distributed Load Testing
It’s pretty simple to use it to load balance one machine, but with a source load balancing algorithm it’s impossible to test it on multiple machines, as the traffic will only come from one IP.
What I ended up doing was going a similar route as the project with the coolest name ever – Bees with Machine Guns – spawn a couple of AWS t2.micro instances and start websocket-bench simultaneously on every machine.
Thanks to the fabric library, I ended up doing it quite painlessly, as it allows to execute commands via SSH on many machines in parallel. The command line to achieve it looks as follows:
$ fab -H [LIST OF HOSTS] -u [USER] -P -- websocket-bench -a 1000 -c 200 http://my-app.io
Conclusion
It was quite a journey to ensure that socket.io is working on every part of the stack. Working with ELB definitely wasn’t the most pleasurable experience, and many choices came from long hours of trial and error. I hope that you’ll find this story useful.
SHARE: