Ever had to work on multiple projects at the same time, with each project using a different tech stack? You probably have. It can quickly turn into a nightmare scenario with different programming languages, version conflicts, database conflicts, etc.
You can solve this problem by creating a virtual machine for each project, but it's a temporary solution at best, because you end up consuming your hard disk space really fast. Having to install everything locally to set up an environment for a project only worsens this problem.
This is where Docker and Docker Compose come to save the day. Docker is great for working with containers that isolate an app or database. You can painlessly install services and share dev environments with others, without having to install tools locally and getting the same versions of everything.
This article will explain how I work with Docker and Docker Compose to set up an easily sharable working environment for the graph database management system Neo4j and programming language Golang. To follow along, you must have installed Docker and Docker Compose.
Let's Get Started
Create a project folder that's called docker-go-neo4j. In the root of that directory, create a docker-compose.yml file with the following code:
version: "3.2"
services:
  neo4j:
    image: neo4j:latest
    container_name: 'devneo4j'
    volumes:
      - '$HOME/neo4j/data:/data'
      - '$HOME/neo4j/conf/:/conf/'
    ports:
      - 7474:7474
      - 7687:7687
    restart: on-failure
    networks:
        - neo4j_go_net
    command: neo4j

networks:
  neo4j_go_net:
    driver: bridge

volumes:
  dgraph:
I like to create separate networks for each environment that I set up. Save the file and run the following command from the root of your project:
docker-compose up -d
// -d flag will spin off the container in the background,
//if you want to see logs just run it without the flag `docker-compose up`
This will download the image for Neo4j and start the container in the background. Remember this command, because we'll run it each time we add a new service to our docker-compose.yml file.
Verify the container is running: docker-compose ps
You should see neo4j listed. Alternatively, you can verify that the database is working by going to http://localhost:7474/
Load Movie Data on Neo4j
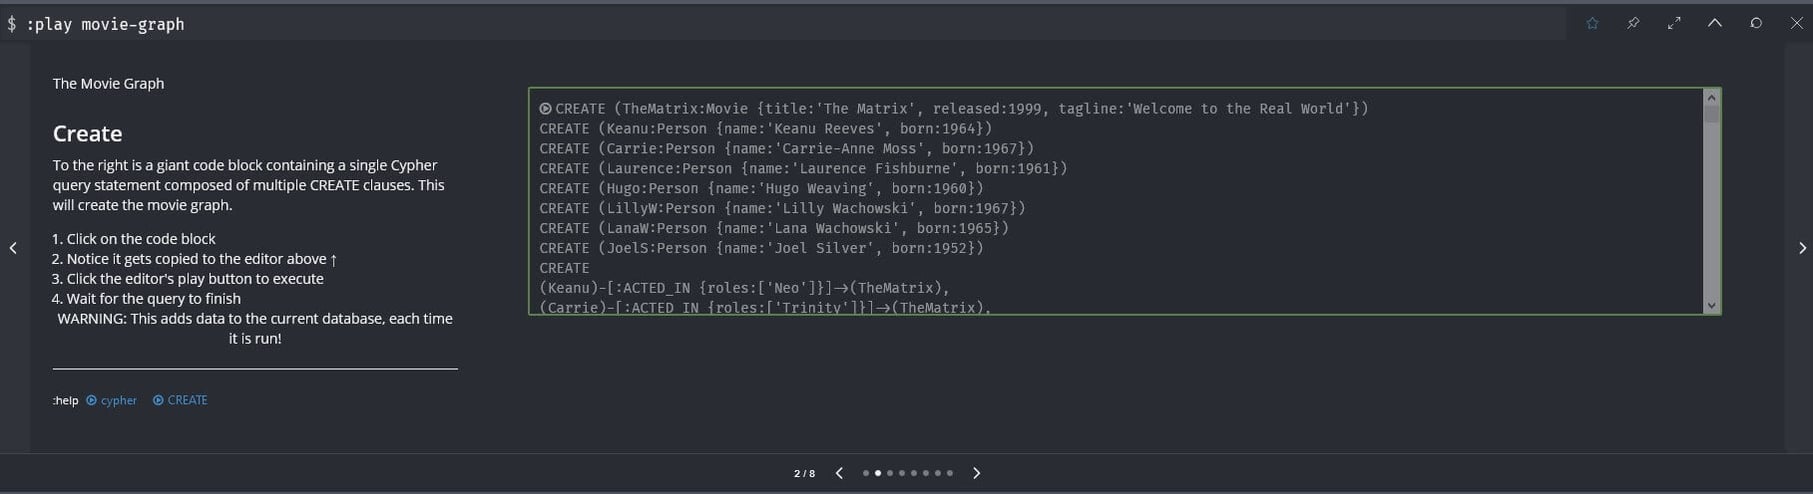
Once you're in the Neo4j UI, enter neo4j as password and set testing as a new password. Then, when you're logged in, type :play movie-graph in the editor and press the play button on the right.

Go to step 2 and click on the query to load it in the editor, then press the play button on the right to run the query.
Now that we have some data to query, let's add a backend service inside docker-compose.yml. This service will depend on the neo4j service we just created. Add the following:
backend:
    container_name: 'api-go'
    build: './backend'
    ports:
      - '8080:8080'
    volumes:
      - './backend:/go/src/app'
    depends_on:
      - 'neo4j'
    networks:
        - neo4j_go_net
The backend service will use a Dockerfile to set up Go, copy the local files into the container, install the dependencies, and set up hot reloading with the fresh package.
Before running any other command, create a backend folder. Inside that folder, create a file called Dockerfile without any extensions. Add the following to that file:
FROM golang:latest

WORKDIR /go/src/app
COPY . .

RUN go get github.com/pilu/fresh

CMD [ "fresh" ]
This file fetches the golang image from Docker Hub, sets up a working directory, copies everything from the backend folder into the working directory, installs the required packages, and runs the fresh command for hot reloading.
You can download the complete source code from docker-go-neo4j if you just want to jump in and play. Clone the repo and run the docker-compose up command.
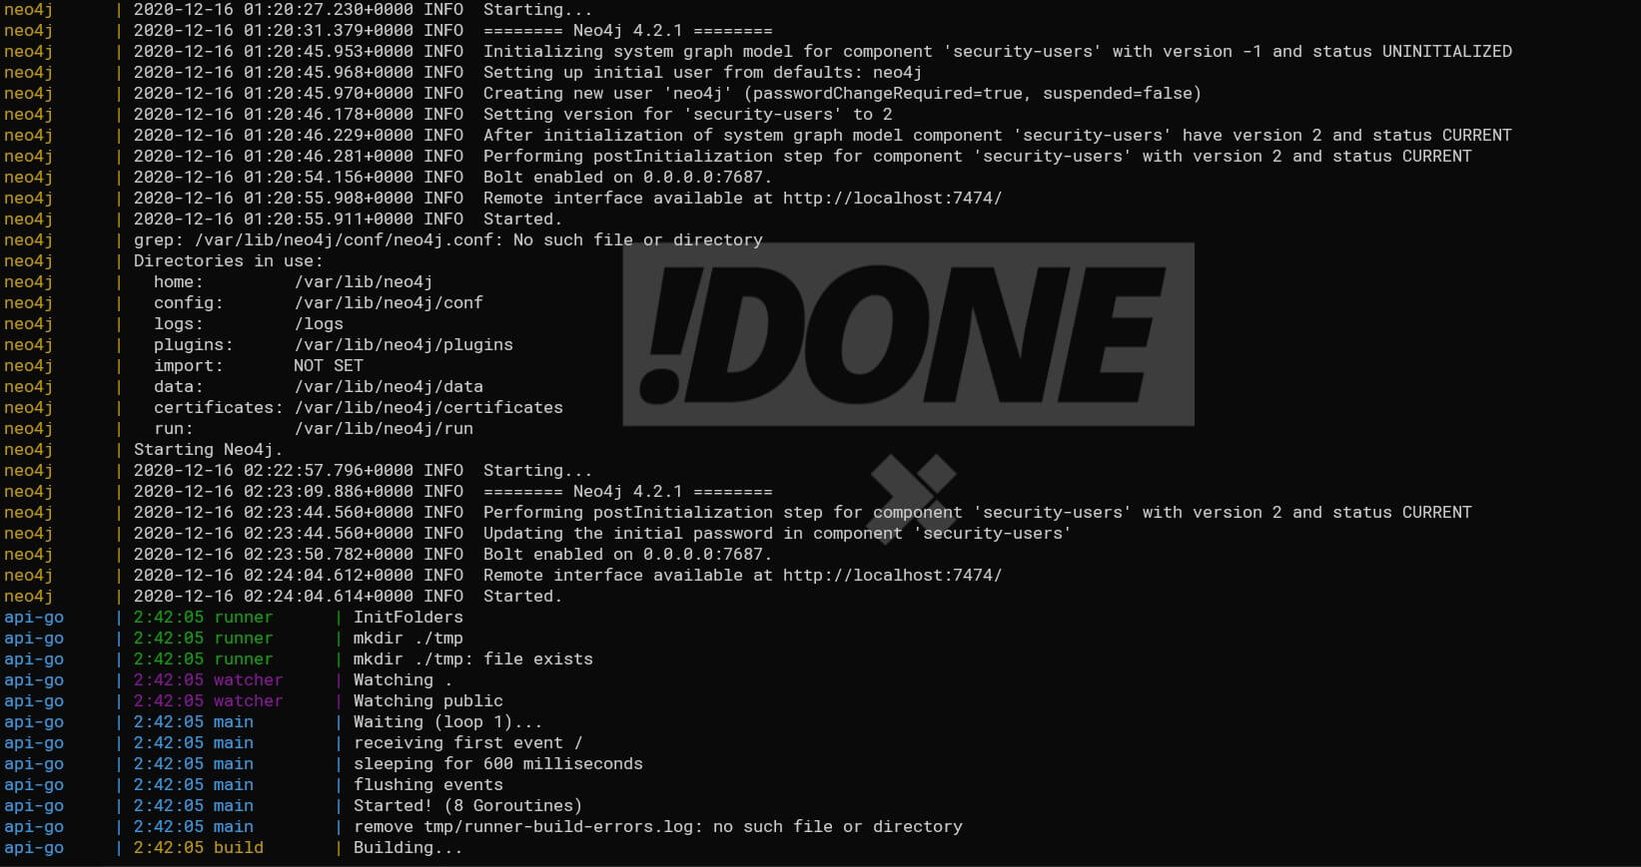
Once you have all the services set up in docker-compose.yml, run the following command again: docker-compose up. You'll get something similar to this:
You can view the app running at http://localhost:8080, where you'll see a list of movies in JSON format.
Wrapping Up
I hope this gave you a good idea of how you can set up your workflow and how easy it can be to share a single environment with the other developers on your team.
If you're new to Docker and the world of containers, give it try. If not for production, at least for development. A clean and productive workflow is essential for every developer. Containers make development much faster, while also reducing bugs caused by different versions of something. Keep your machine clean!
SHARE: